Complete Division Guide
Guide · Complete division guide
Complete division guide for Hearts of Iron IV
Every HoI chapter on divisions, short: why you need them, which types to field, how to build a template, how combat is calculated, and which lineup to take first. This is a map, not a stand-in for the five full chapters.
Guide overview
This is the complete HoI division guide: all five chapters, short, in one place. It is about single-player Hearts of Iron 4.
The tabs are the chapters: basics, types, lineup, stats, and unique templates with no copies. Inside — the core, plus a link to the full chapter.
I am writing for a beginner: first understand what you move on the map, then build a template for the job, and stop treating designer numbers as random.
A division is the unit you actually fight with. Factories with no divisions are a screenshot. A pretty template with no supply, no manpower, and no job on the map is a screenshot too — just one in the designer.
What’s here
- How to create a division, Army Experience, orders, sea transport, and reinforcement
- Which type goes where: infantry, motorized infantry, tanks, special forces, garrison
- The designer’s three layers: battalions, companies, regiments
- How combat is calculated and what the template stats mean
- How to assemble a first working template — without a zoo of 36 lineups
What’s not here
- The full deck of ready templates for every patch — that lives in the templates chapter
- Full tier lists of every company and every stat
- The tank, navy, and air designers
Where to start
- Basics — if you still mix up a template and a division on the map.
- Types — when the question is “what covers the tiles”, not “which designer button do I press”.
- Lineup — when you mix line Artillery with Support Artillery on the right.
- Stats — when the numbers on the right in the designer look like noise.
- Templates — when the job is already clear and you want an honest start, not a museum of lineups.
From practice: after hundreds of games you lose more often to crooked divisions — bad Combat Width, bad lineup — than to having too few tanks, or none.
Quick map of the chapters
| Job | Tab |
|---|---|
| I don’t know what to move on the map | Basics |
| What holds the front / punches through / lands | Types |
| Lost in the designer | Lineup |
| Why the division folds in combat | Stats |
| I need a ready lineup | Templates |
Division basics
A template is the blueprint. A division is the living copy on the map. You edit the blueprint in the designer. The war is fought by divisions.
Why you need divisions
They hold the line, break the front, close pockets, and occupy the rear. A country with no divisions is factories and focuses into the void.
| Role | Why |
|---|---|
| Line infantry | Hold front width and not fold |
| Strike / tanks | Push through and close pockets |
| Garrison | Cheap rear and Suppression |
| Special forces / airborne | Narrow theatre jobs |
Practical takeaway: role first, then a template for that role. A pretty lineup with no job is a screenshot in the designer.
How to create a division
You do not paint a division onto the map with the mouse from scratch.
- Recruit & Deploy (top-left menu) → division designer.
- Build a template: you need at least one combat battalion.
- Edits to the template cost Army Experience.
- Put it in training, wait until it is ready, deploy it onto the map.
Common mistakes
- Mixing up a template and a division already on the map
- Reworking veterans for no reason — unit experience drops
- Spamming with no rifles and no manpower in stock
What to watch
- Free Manpower at the top
- Equipment in stock
- Where the division will appear after deployment
Army Experience
The country’s resource for template edits, doctrines, and some military decisions. Without it the designer is almost useless.
Where it comes from
- Division combat
- Exercises (training)
- Some focuses, advisors, and decisions
Exercises give it quietly. Combat is faster, but you pay in losses.
Where to spend it
- Edits to division templates
- Land doctrines
- Important military decisions, if they ask for experience
Do not dump the whole pool into template cosmetics if the doctrine you need is still locked.
How to plan and attack
Not “everyone into one tile”. Plan and planning bonus first, then a punch on a narrow sector.
- Draw a front line and an attack plan.
- Let the planning bonus stack — the attack is stronger with it (by tens of %).
- Hit with a fist, not the whole army “evenly along the entire border”.
- Watch Organization and supply: a tired division in red supply pushes poorly.
When a plan helps
A long front, lots of divisions, you need a shared push and the planning bonus.
When hands are better
A pinpoint breakthrough, micro-pockets, careful tank work on one axis.
Practical takeaway: the plan collects the bonus and the direction. You decide the punch: where the density is, where the reserve sits, where tanks do not belong.
How to put them on defense
Defense is not “everyone stands still”. It is orders, Entrenchment, and a position where attacking you hurts.
What to use
- Front Line — hold the border
- Fallback Line — static defense, no step back
- Garrison — ports, cities, the rear (an army order, not the occupation template)
Let them dig in. Do not yank the line without a reason: Entrenchment resets when they move.
Where holding is easier
- Rivers, mountains, forest, forts
- Good supply
- A reserve behind the line on the dangerous axis
Tanks in the mountains “because they were free” is an expensive mistake.
How to place divisions
Placement is a job on the map: where you hold, where you hit, where the reserve sits. Not “one on every tile”.
- Find the important axis — capital, supply, plains, the enemy’s punch.
- Stack a fist of several divisions next to each other there.
- A quiet border and mountains can be thinner.
- Keep a reserve behind the line.
- Check supply: a dense pile on red supply holds worse.
| Role | Where to put them |
|---|---|
| Line | Main border, long stretches |
| Strike | A narrow sector for the breakthrough |
| Reserve | Just behind the dangerous axis |
| Rear | Ports, cities, occupation |
Practical takeaway: a pretty even line is almost always weaker than a fist on the important axis and a thin quiet flank.
Moving by sea
Port to your own or an allied port. This is not a naval invasion onto an enemy beach.
How to ship them
- Walk the division to a port.
- Select it.
- Right-click the destination port.
- Check that you have enough convoys.
1 weight = 1 convoy. Weight is in the designer. You do not need extra research for this kind of shipping.
Do not mix this up with a landing
- Shipping — your / allied port
- Invasion — enemy beach, long prep, naval supremacy
Sailing through a raider zone is dangerous: cover the route with the fleet on Convoy Escort.
Reinforcement
Reinforcement is not Organization. Organization comes back with rest. Reinforcement is when men and guns actually reach the division from stock along supply from the capital.
- The division is understrength — it is missing men and/or equipment.
- The game takes soldiers from Manpower at the top and equipment from stock.
- That travels to the division along supply from the capital.
- Once it arrives — combat strength goes up.
What speeds it up
- The right equipment in stock
- Free Manpower
- A living supply path from the capital
- Elite priority on strike templates
What slows it
- Empty stock and zero Manpower
- No supply / encirclement
- Too many divisions on thin logistics
- Every template on Elite — there is no real priority
More in the chapter on division basics.
Division types
Type is a job in the war, not an icon in the designer. Infantry on the front first, then a fist for the attack, then special forces for the terrain. The occupation garrison is a separate template, not an army on the map.
Infantry
The main mass unit. Cheap, no fuel, sits well on a tile. The question is not “does it beat tanks one for one”, it is “do you have the bodies to cover the front”.
Why you need it
- Hold a long line and fill Combat Width
- Defend while the strike fist hits somewhere else
- Mop up and take tiles after a tank breakthrough
Without infantry most countries have nothing to fill the border with. Tanks do not replace that: you have few of them, they are expensive, and they eat fuel.
What it does poorly
- It does not run a blitzkrieg
- From water −50%, through marsh −40%, in mountains −50% to attack
- A front-line template is too expensive for an occupation garrison
Infantry can attack, but without artillery and density it is slow. On defense Organization and position matter more than a pretty Breakthrough on the card.
Practical takeaway: fill tiles with infantry first. The strike fist only makes sense once the line already exists.
Motorized Infantry
Hits almost like infantry. The real difference is speed and cost: trucks and fuel. You need it so the pocket actually closes.
Why
Tanks break through and loop into the rear. Motorized Infantry follows and seals the gap before the enemy slips out. A foot division often just does not arrive in time.
In a head-on grind on one tile, wheels do no miracle. Stats and numbers decide that fight, not map speed.
Why not the whole front
- More expensive than line infantry
- Needs oil and rubber
- Foot divisions still cover the line
A few motorized templates in reserve often pay for themselves with one pocket closed on time.
Practical takeaway: this is not “better infantry for the whole border”. This is a fast reserve for exploiting a breakthrough.
Tank divisions
A strike tool: Breakthrough, Armor, Hard Attack. Expensive in industry and fuel. The question is where to hit, not “armor on every tile”.
Why
Line infantry holds well but slowly grinds a fortified line. Tanks cut the front and close pockets. It makes sense on plains, where tanks have it easiest.
A major can field several large fists. A minor — one small-to-medium. You usually keep a separate tank corps, hit a narrow sector, and let infantry cover the flanks.
What not to do
- Do not put tanks on the whole line “because they are stronger”
- Do not throw them into mountains, marshes, and cities head-on: terrain itself eats the punch (mountains −50%)
- Do not mix the job with infantry: infantry is front and mass, tanks are a chosen sector
Practical takeaway: tanks with no attack plan and no infantry around them are burned fuel. Pick the Breakthrough axis first, then park the fist.
Cavalry
In combat it is almost infantry, only more expensive: an Infantry battalion takes 100 rifles, a Cavalry battalion takes 140. A bit faster on the map, slower to train.
Why people still spam it
More often not for war, but for cheese: train a pile of divisions at once, inflate army size for conditions like Anschluss, park cheap garrisons of one battalion.
It is available on day one, with no special forces tree. It eats infantry equipment; there is no separate “horse” resource.
What to remember
- One battalion is narrow and suppresses Resistance well — classic garrison
- On the front against real infantry and tanks it loses the plot quickly
- Once motorization and tanks arrive, these tricks usually get dropped
Practical takeaway: cavalry is cheese and a cheap rear, not a tank corps. Feeding the front with it “because it is faster than infantry” is an expensive habit.
Special forces and the cap
Mountaineers, Marines, Paratroopers, Rangers — a battalion status, not “the whole army in berets”. The game counts battalions, not divisions.
Where to put them
- Mountaineers — hills and mountains. On plains they are expensive infantry. A battalion eats 140 rifles instead of 100
- Marines — landings, rivers, marshes. Regular infantry from water −50%, through marsh −40%
- Paratroopers — drop on a capital, supply hub, airfield, railway. You need transport planes and ~70% air superiority. After the jump, link up from the ground
- Rangers — forest and jungle. On open ground the cap is better spent on someone else
How the cap is counted
The base is 5% of regular (non-special-forces) battalions, but a floor of 24 battalions. A tiny country still gets 24 while the army is small. Regular infantry, cavalry, and tanks raise the cap. Amphibious tanks and amphibious battalions eat the ceiling.
Do not spam special forces instead of a line army. A few divisions for the theatre, not sea to sea.
Cap calculator
Base with no focuses or doctrines: 5% of regular battalions, floor 24.
Special forces allowed 24
5% gives 0, so the floor of 24 kicks in.
Practical takeaway: special forces with no regular army slam into the ceiling. Line first, then pinpoint templates for the terrain.
Occupation garrison
This is not the army order Garrison on the map. This is a template you assign to occupied land: the game itself counts how many of these “divisions” it needs to suppress Resistance.
That is not this garrison
The army order Fallback Line is also sometimes called a garrison: divisions sit on the map and watch ports. The occupation template lives in occupied territories; you do not train a stack of them in the deployment queue.
What people field
Two working minimums: one Cavalry battalion (cheap) and one Light Tank battalion (more expensive, leaks less thanks to the equipment share). Where to click: country flag → Occupied territories → the template icon at the top left.
The game looks at Suppression. A template with zero Suppression will not be taken for garrison. At 1% Resistance you need about 0.75 Suppression.
Practical takeaway: top templates should fight. The garrison eats stock, but the line does not thin out for partisans.
More in the chapter on division types.
Battalions, companies, and regiments
A division is built from three layers. Combat battalions give Combat Width. Companies on the right do not eat width. A regiment sits under a column once that column already has three battalions.
How a template is built
Three layers
- Combat battalions — columns in the middle. Combat Width, manpower, the bulk of attack and Defense.
- Support companies — up to five slots on the right. They take no width, but they eat Organization and a slot.
- Regiment support — under a column at ≥ 3 battalions. Also no width, but it is tied to the regiment.
The grid: up to 5 columns, up to 5 battalions per column (cap 25). On the right, exactly 5 company slots.
What beginners mix up
- The Support Artillery company and the line Artillery battalion are different buttons and a different Combat Width cost
- A regiment is not “another company on the right”, it is the bottom slot of a column
- An empty support slot is not a free upgrade: every company dilutes Organization
Five tasty companies on a cardboard template is an expensive screenshot. Infantry to Combat Width and engineers first.
Combat battalions
The Infantry battalion is a cheap line with no fuel. Tanks, Motorized Infantry, and Mechanized Infantry are punch and speed, not a stand-in for the whole army. Cavalry is rear and cheese, not the front.
Line Artillery, Anti-Tank, Anti-Air
A line Artillery battalion gives a lot of Soft Attack and eats Combat Width. Support Artillery gives less attack but takes no width — you almost always take it before line guns.
Line Anti-Tank — when there are real tanks across the tile. Line Anti-Air — when the enemy actually flies. Against a quiet AI, support companies often cover it without line battalions.
A short role catalog
- Medium Tank — the working offensive fist
- Light Tank — until you have Medium Tank, then you usually swap
- Motorized Infantry — close the pocket, not hold the whole border
- Mechanized Infantry — late offensive divisions, more expensive than motorized
- Amphibious units and amphibious tanks — landings, they eat the special forces cap
Which battalion for whom
| Battalion | Why |
|---|---|
| Infantry | Line backbone, cheap Combat Width, 100 rifles per battalion |
| Mountaineers / Marines / Paratroopers / Rangers | Terrain and theatre. Eat the special forces cap. Mountaineers — 140 rifles |
| SP Anti-Air / SP Artillery / Tank Destroyer | Armor and an answer to aircraft; Soft Attack; against enemy tanks |
| Line Artillery / Anti-Tank / Anti-Air | The company on the right is often enough first; a line battalion eats Combat Width |
Support companies
Five slots are a queue, not a museum. Support Artillery and engineers cover most games. The rest you fill for the theatre.
Engineers and assault engineers
Engineer Company: Entrenchment, Defense, forest, marshes, rivers, forts. Almost any combat line division — yes. Not for damage into infantry.
Assault Engineer Company: bunkers, forts, urban. Needs a special project and the Götterdämmerung DLC. You do not stack it with engineers in one division. Regular infantry almost always wants engineers.
Support fire
Support Artillery — 12 artillery, for almost every combat line division. A garrison does not need it.
Support Anti-Air — 20 AA, when the enemy flies. Support Anti-Tank — 24 AT, when tanks are across the tile. Support Rocket Artillery is a late add-on on top of Support Artillery, if Organization can take it.
Recon
A support slot. It gives Reconnaissance and terrain bonuses; it is almost never “another artillery”. You cannot put two different recon companies in one template.
Poor infantry often gets by with cavalry recon (40 rifles). Tanks want armored recon (24 Light Tanks). Do not hang cavalry recon on tanks: it cuts the whole division’s speed. This is not the first slot: Support Artillery and engineers first.
Flame tanks
A support company. Huge terrain attack bonuses, no Combat Width. One type per division: Light, Medium, or Heavy Flame Tank Company.
On tank templates — almost mandatory. Infantry needs the slot more for Support Artillery and engineers. Take a Medium Flame Tank Company on a cheap hull: the buffs do not depend on the tank’s own stats. Needs No Step Back and the Flame Tank special project.
Who goes in the five slots, short
Subjective, not a patch law. If you have one slot — do not copy the whole S-tier into one division.
| Tier | Who to take |
|---|---|
| S | Support Artillery, Engineer Company, Medium Flame Tank Company (on tanks) |
| A | Assault engineers, Anti-Air, Logistics Company, Field Hospital, Support Rocket Artillery |
| Further | Recon, Signal Company, Maintenance Company, Military Police — for the job. Helicopters, Land Cruiser, and super-heavies are almost always a miss |
Rear companies and regiments
Logistics and Field Hospital
Logistics Company cuts Supply Use (10 trucks, 20 Support Equipment). Hungry templates need it: tanks, Motorized Infantry, Mechanized Infantry, heavy artillery. On a short, well-fed defense you skip it.
Field Hospital returns some manpower and protects division experience (20 trucks, 30 Support Equipment). It pays off where you melt in long fights, or where the template is packed with infantry.
Signal Company and Maintenance Company
Signal Company raises Initiative (10 trucks, 20 Support Equipment). People often research it for HQ even if they never put it on line infantry.
Maintenance Company raises Reliability and helps capture equipment (25 Support Equipment). On pure infantry you barely feel it; on tanks and SP Artillery it already helps. The base company gives +5% Reliability, with upgrades about +20%, effect cap 100%.
Regiment support
The bottom row under the battalions. It appears once a column already has at least three battalions. It does not take Combat Width.
Heavy Weapons Company raises the column’s Defense well, not Breakthrough. Infantry Guns look fine on paper; in practice they are usually weaker than Support Artillery in the companies. Battalions first, then companies on the right, and only then regiments.
Regiments, short
What people actually take: Heavy Weapons Company and Anti-Air Battery — a strong bottom of the column. Anti-Tank battery and Motorized Heavy Weapons Company — when the job is specific. Support Rocket Artillery, SP Anti-Air, and Tank Destroyer in the regiment are usually weaker than the same ideas as support companies.
Practical takeaway: fill Infantry to Combat Width first, plus one Engineer Company. Pretty artillery with no bodies and no Entrenchment folds fast.
More in the chapter on battalions, companies and support regiments.
Stats and combat
Division stats are the template numbers Hearts of Iron IV uses to resolve a fight. Learn the trade of shots first, then tune the designer to a role.
How a division fight plays out
Land combat is not a contest of “who has more Soft Attack in the tooltip”. It is traded shots, a space limit on the tile, and two pools: Organization and HP.
1) Who even gets to fight
A tile has a Combat Width cap. Each division takes space equal to its Combat Width. Whoever does not fit sits in reserve. Overfill the cap and efficiency drops by roughly −1% per 1% over, capped around −33%. Typical tile caps: plains about 70, forest 60, mountains and marsh 50, urban 80. Attacking from several directions widens the cap.
2) Attacks vs Defense or Breakthrough
Each hour, divisions throw attacks — Soft Attack and Hard Attack by the target’s hardness. On defense those hits are blocked by Defense; while attacking, by Breakthrough.
- While attacks are covered by Defense or Breakthrough, hit chance sits around 10%.
- Attacks past Defense or Breakthrough land closer to 40%.
Classic beginner trap: fat Soft Attack with no Breakthrough looks great in the designer and folds on the attack. High Defense with no Organization holds a few hours and still walks off the tile.
3) Soft Attack, Hard Attack, and hardness
Target hardness decides how much of your fire counts as Soft Attack vs Hard Attack. Regular infantry is mostly “soft” — Soft Attack does the work. A tank fist is “hard”: without Hard Attack and Piercing you are missing the point of the fight.
4) Armor vs Piercing
The game compares the attacking division’s Piercing to the target’s Armor. Enough Piercing — you deal normally. Fall short — damage gets cut.
| Piercing / Armor | Damage share |
|---|---|
| ≥ 100% | 100% |
| ≥ 75% | 80% |
| ≥ 50% | 65% |
| below 50% | 50% |
If your Armor beats their Piercing, you also take less — the armor contest cuts both ways.
5) How the fight ends
A division usually retreats when Organization hits zero — even if HP is still there. HP (men and gear) drains in parallel: that is the bill for stock and Manpower. Terrain, supply, air, tactics, and Entrenchment stack modifiers on top, but the spine stays the same: attacks → blocked by Defense or Breakthrough → hits → damage to Organization and HP.
Practical takeaway: on the attack, watch Soft Attack or Hard Attack, Breakthrough, and Organization. On defense — Defense, Organization, and Combat Width.
Offensive stats
Soft Attack
What it is. Attacks against low-hardness targets — mostly regular infantry. Players almost always say Soft Attack; the UI uses the same name.
Why it matters. The main pressure stat into infantry lines. In a single-player HoI game it usually decides how fast you shove a front.
Quick ways to raise it:
- Line Artillery and a Support Artillery company
- SP Artillery and Support Rocket Artillery in assault templates
- Newer guns and doctrines that push firepower
Hard Attack
What it is. Attacks against high-hardness targets: tanks, mechanized divisions, “hard” templates.
Why it matters. Without it, Soft Attack alone struggles into tanks. Against naked AI infantry, Soft Attack often covers it.
Quick ways to raise it:
- Anti-Tank, Tank Destroyer, tank guns built for Hard Attack
- Support Anti-Tank
- Hard Attack without Piercing hits armor worse — watch Piercing
Air Attack
What it is. The division’s anti-air: Anti-Air and SP Anti-Air answering planes over your fight.
Why it matters. It cuts damage from CAS (reduction cap 75%), shoots planes in the fight, and partly dulls the enemy air superiority penalty. It does not protect factories from strategic bombers and it does not replace fighters.
Quick ways to raise it:
- Support Anti-Air — almost always the best first step
- AA by year: 1936 — 19, 1940 — 25, 1943 — 32; the company takes a −20% penalty, so in the designer you see about 15/20/26
- In combat, protection from air damage looks at average Air Attack of the participants, including reserve
Defense and armor
Defense
What it is. How many enemy attacks the division covers while it is defending.
Why it matters. While attacks are covered, hits are rare (~10%). Past Defense they jump to ~40%. For line infantry this is a top stat together with Organization and Combat Width. Defense barely saves you on your own attack — Breakthrough does that job.
Quick ways to raise it:
- More Infantry battalions and an Engineer Company
- Dig in ahead of time: Entrenchment gives a Defense bonus
- Do not mix it up with Breakthrough — Defense barely saves you on your attack
Breakthrough
What it is. “Defense on the attack”: how many return attacks you cover while you push.
Why it matters. Soft Attack with no Breakthrough burns the attacking division’s Organization fast. Critical for tanks and assault templates; secondary for pure defensive infantry.
Quick ways to raise it:
- Tank battalions and assault support
- Engineer Company gives a noticeable Breakthrough bonus
- Do not stack Soft Attack alone “for a pretty designer”
Armor
What it is. How “hard” the division is for enemy Piercing.
Why it matters. If the enemy does not pierce you, the division lives noticeably better in combat. If they pierce, the armor bonus almost vanishes. Regular infantry usually does not need Armor.
Raise it fast: more tank battalions and thicker armor in the tank designer. Do not dilute Armor with extra naked infantry for no reason.
Piercing
What it is. The ability to pierce an enemy division’s Armor.
Why it matters. Without Piercing, Hard Attack and even fat damage work worse into armored targets. Against naked infantry it is almost useless.
Raise it fast: Anti-Tank, Tank Destroyer, tank guns built for Piercing. Keep the 100% / 75% / 50% Piercing-to-Armor thresholds in your head.
Entrenchment
What it is. How deeply the division has dug in on the spot. Do not mix it up with fort buildings on the tile.
Why it matters. Each level gives +2% Defense. Base cap is 5, gain about +1 per day standing out of combat. Movement and attacking reset the trenches.
Raise it fast: Engineer Company (+2 to the cap), let the division sit on the line, defensive commanders.
Survivability
Mixing up Organization and HP is the most common beginner mistake in HoI.
Organization
What it is. The division’s combat staying power. At zero it retreats, even if HP is still there.
Why it matters. It decides who leaves the tile first. High damage with no Organization is a short bright fight and a walk-off. In my games low Organization is what most often buries “pretty” templates.
Raise it fast: more infantry; extra vehicles often dilute the average. Ballparks: infantry often 45–50+, pure tanks noticeably lower, assault tanks usually 30–40.
HP
What it is. The pool of men and gear. How much the division can lose before it is an empty shell.
Why it matters. HP is about losses in stock; Organization is about who holds the fight. Low HP means the template “eats” rifles and tanks fast.
Raise it fast: more Infantry battalions. Do not build a division out of artillery and holes.
Recovery Rate
What it is. How fast the division recovers Organization out of combat.
Why it matters. After a hard fight it decides how soon the template is ready to attack or hold again. Especially important on short pauses and rotation.
Raise it fast: doctrines and army spirits for recovery, do not park divisions forever in red supply, rotate off the line.
Manpower
What it is. How many people the division template needs at full strength.
Why it matters. Not a combat stat directly, but it breaks wars: a fat template × a hundred divisions = empty mobilization. Critical for minors.
Do not inflate Combat Width without a reason. Separate cheap templates for garrisons.
Speed and supply
Max Speed
What it is. Division speed = the slowest battalion in the template.
Why it matters. Pockets, chase, closing a hole. Infantry with towed Artillery is usually about 4 km/h; Motorized Infantry is clearly faster. In combat, movement is much slower than on the march.
Do not mix 4 km/h and 12 km/h in one “breakthrough” template. Pull towed Artillery out of fast divisions.
Combat Width
What it is. How much “space” the division takes in a fight. Support companies give no width — combat battalions do.
Why it matters. Did not fit — reserve. Overfilled the tile cap — an efficiency penalty (up to about −33%). Build the template to typical terrain caps. Working width anchors: 10, 14–15, 18–20, 25, 36 — not 21 “because it fit”.
Supply Use
What it is. How much the division pulls from a Supply Hub each day.
Why it matters. Empty boxes hit speed, Organization, and the fight itself. Artillery and tanks eat multiples of infantry. The “on you” stock is about three days; after that penalties stack.
Cut it: Logistics Company, a general with logistics, do not add an extra Artillery battalion if the Supply Hub is already screaming.
Fuel and Weight
Fuel Consumption is separate from supply. You can sit on full supply and still stall with no fuel: vehicles collapse on stats and speed. For land units it rises on the move, in combat, and in exercises.
Fuel Capacity is the division’s internal tank. It matters on deep breakthroughs. A big tank still empties if the burn is wild.
Weight is for sea shipping and invasions. 1 Weight = 1 convoy. On a land front in Europe it barely matters.
Reconnaissance and Initiative
Reconnaissance
What it is. A template stat for picking better tactics and gathering intel from the fight. Do not mix it up with recon planes on the map.
Why it matters. The side with the Reconnaissance and commander-skill edge more often seizes tactical initiative. About 1 point of Reconnaissance advantage pulls like 5 commander skill levels when picking a tactic. Each Reconnaissance point gives about +7.5% land intel from that fight.
Initiative
What it is. The Signal Company stat: join the fight from reserve faster, plan faster, stronger fire coordination. Do not mix it up with the “Initiative!” tactics popup — that comes from Reconnaissance and the commander.
Why it matters. The base chance to enter from reserve is only about 2% per hour. Initiative raises it. Coordinated fire share = 35% + coordination × (1 + Initiative). Signal Company gives +10% immediately.
Reliability and losses
Average Reliability
The average Reliability of equipment types in the division before the maintenance bonus. Attrition is counted per type: an 80% average does not save tanks sitting at 50%.
Reliability bonus
The add-on from Maintenance Companies on all equipment. It stacks with type Reliability, effect cap 100%. A base Maintenance Company gives +5%, with upgrades about +20%. Fewer losses from attrition, weather, and bad supply; a higher chance to recover some equipment after the fight.
Equipment Capture Ratio
The share of enemy equipment you can pick up after a rout. On long fronts and in poor countries, loot actually feeds the army. On pure defense with no counterattacks it barely moves. Maintenance Company raises capture too.
Trickleback and experience
Casualty Trickleback — the share of wounded who return to the Manpower pool and hurt War Support less. Field Hospital.
Experience loss — how much the division dumbs down when it replaces losses with green reinforcement. The hospital cuts it. Training time — how long the template trains before it can deploy; simple templates train faster, and at the start of a war that decides the queue.
Rear, night, and terrain
Suppression
What it is. The ability to suppress Resistance on occupied land through garrisons. This is not combat damage.
Why it matters. The higher the template’s Suppression, the fewer divisions you need in the rear. At 1% Resistance you need about 0.75 Suppression. Cavalry + Military Police. A front-line template usually does not need Suppression.
Night Attack
Base night penalty to land attack: −50%. The Night Attack modifier softens that penalty. Night Vision I gives +10% (around 1943), II — +15%.
CAS at night contribute about 10% of their daytime input. You pump Night Attack when offensives keep “deflating” after sunset — not before the template baseline. A minor in 1939 usually needs infantry and supply more than a race for night vision.
Terrain bonuses
Terrain hits the attacker’s attack first. Plains and desert barely cut the punch. Forest −15%, hills −25%, urban and jungle −30%, marsh −40%, mountains −50%.
Then the lineup plays: Mountaineers like hills and mountains, Marines like landings, rivers, and marshes, Rangers like forest and jungle. Engineers and flame tank companies soften it. Tanks and Motorized Infantry take extra penalties in heavy terrain on top of the general ones. Tile Combat Width and the attack penalty are neighbouring topics, not the same thing.
Practical takeaway: learn combat first, then tune stats to a role. Line infantry wants one package; a tank spearhead wants another. A “pretty” designer with no job almost always lies.
More in the chapter on division stats and combat.
Division templates
Unique lineups: each template once, no copies from neighbouring chapter tabs. Thought order first, then ready blueprints for the job.
How to create a template properly
This is not the Train button. Order: job → type → Combat Width → Organization → Armor, if the factories can feed it.
What to watch in the designer
- Combat Width for the terrain where the division sits most often
- Organization: infantry usually 45–50+, tanks 30–40
- Armor pays off while the enemy is not piercing it in bulk
Support companies buff without Combat Width. You do not have to fill all five slots at once: Army Experience will run out, and the divisions will leave the queue full of holes.
Typical mistake
You drop battalions “until it looks pretty”, then Combat Width is 23 and the divisions will not fit the tile without a penalty.
Pick the Combat Width number first, then fill battalions to that number. 10 CW, 14–15 CW, 18–20 CW, 25 CW, 36 CW are working anchors, not 21 “because it fit”.
Practical takeaway: first decide what the division is for, then the type, then a Combat Width your industry can feed, then the lineup while watching Organization. One “does everything” template for the whole war is almost always a middling one.
Infantry templates
From cheap 10 CW to offensive 36 CW. “Armor” here is SP Anti-Air or SP Artillery inside infantry, not a tank division. “Breakthrough 20 CW” is one Medium Tank in infantry — a compromise.
Infantry, Combat Width 10
- Weak minor
- Cheap
- Defense
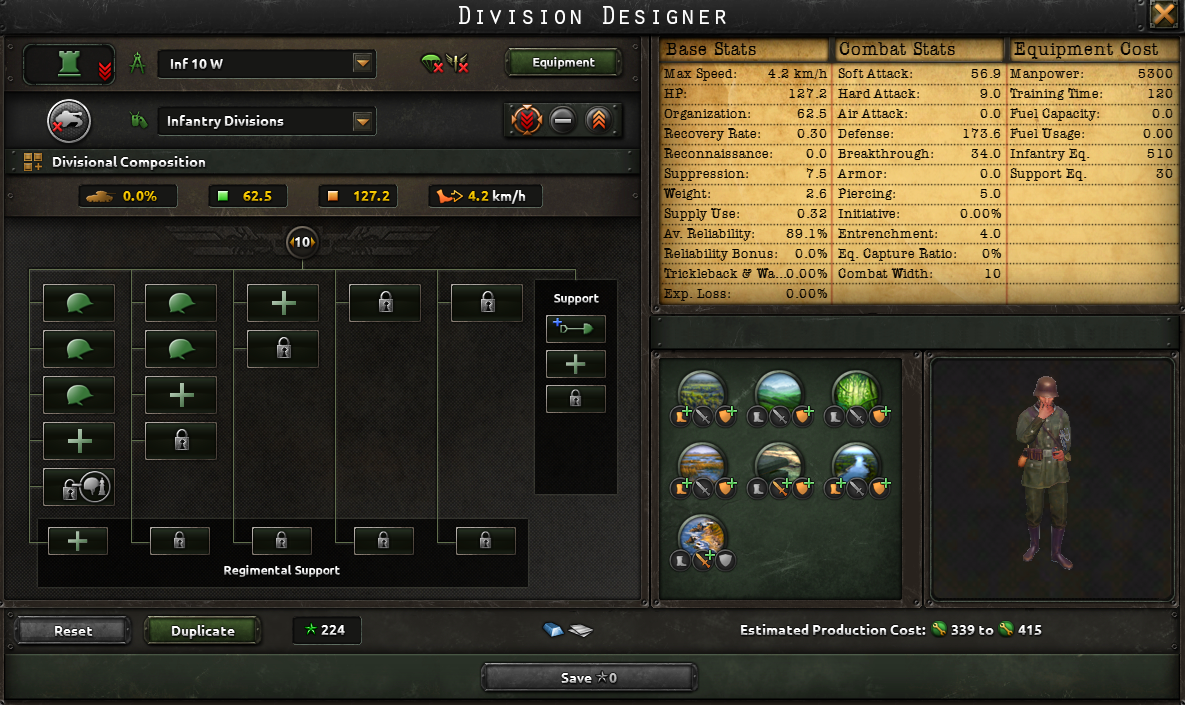


This is the cheapest line infantry you can run. One division will not win the war — you need a lot of them. There is no regiment support on purpose: that keeps the template cheaper, and Organization easier to hold.
Verdict. This is for a weak small country with no vehicles. Add Support Anti-Tank and artillery only if Organization and the factories can take them.
Infantry, Combat Width 12
- For a minor
- Cheap
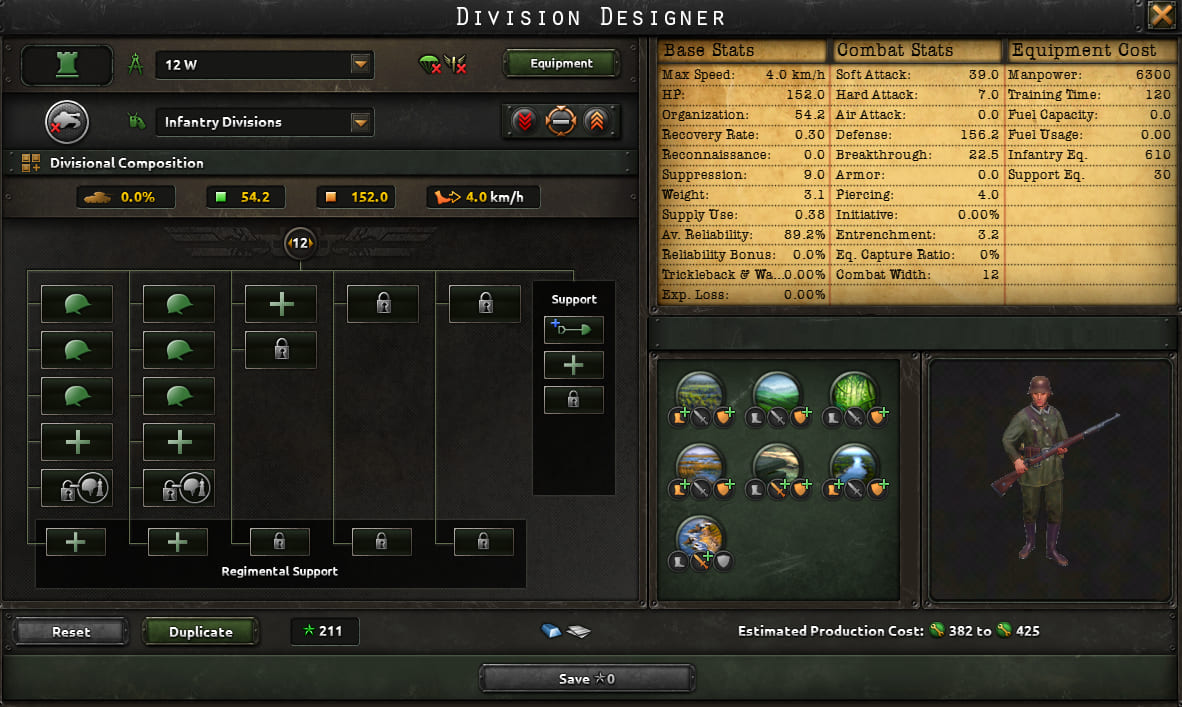
This is cheaper than the width 14 template. You cover the front with numbers. One of these divisions will not hold a line — you need a lot of them.
Verdict. Use this when the rifles barely cover you. Once the factories grow, width 14 is the better line.
Infantry, Combat Width 14
- Minor
- Weak major
- Flexible
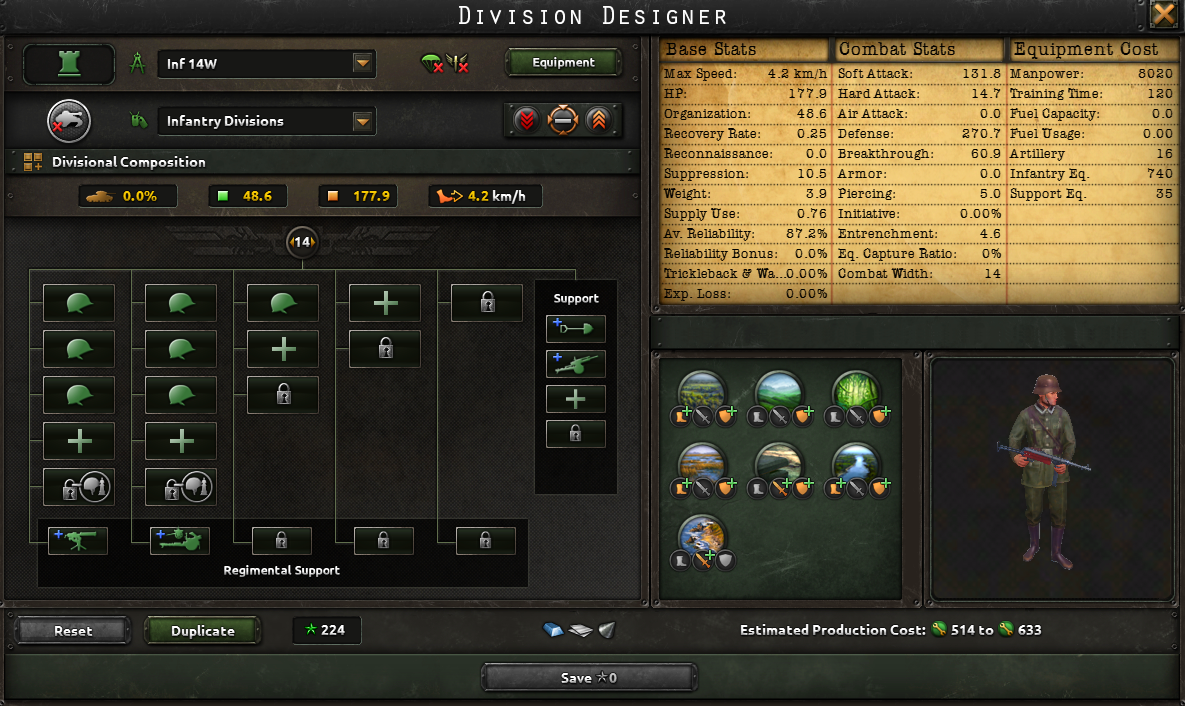


This template holds the front and can attack a little. If Organization is dropping or equipment is short, drop the support regiments.
Verdict. This is the main template for a small country and a weak major. It is not a copy of Soviet width 36 infantry.
Infantry, Combat Width 15
- Minor
- Attack
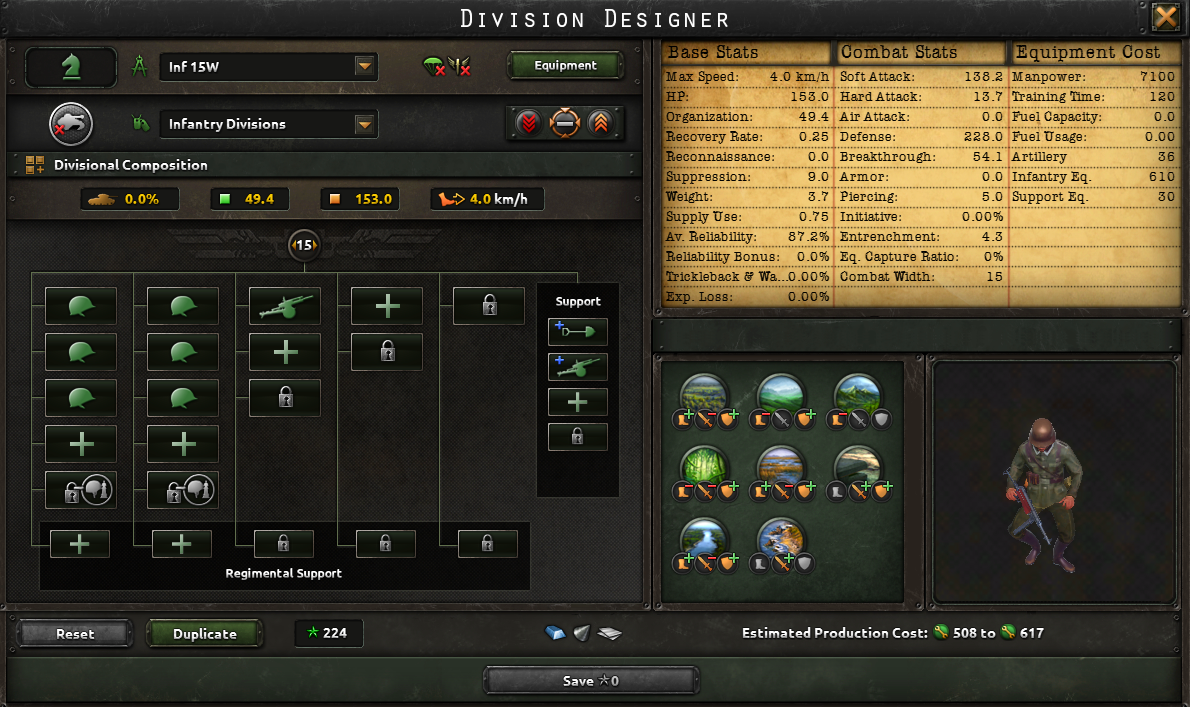
This template hits harder than it sits on defense. In a forest, four of them fill the province cap of 60. Add recon only if Organization can take it.
Verdict. For a minor that is attacking. Do not park this template on the whole national defense.
Infantry, Combat Width 18
- Weak–mid major
- Defense
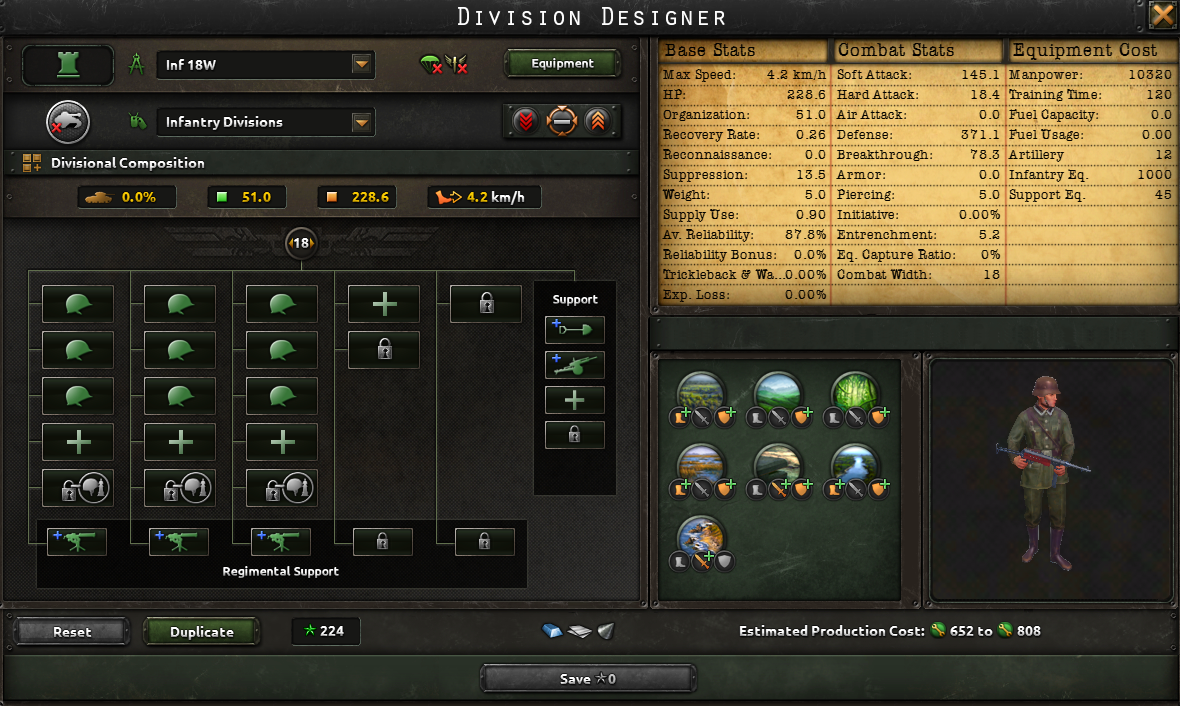
Strong defense of important tiles, not the whole border. Three regiments burn a lot of equipment. If stock is short — drop the regiments.
Verdict. For a weak or mid major — on the stretches of front that matter.
Infantry, Combat Width 20
- Mid major
- Defense
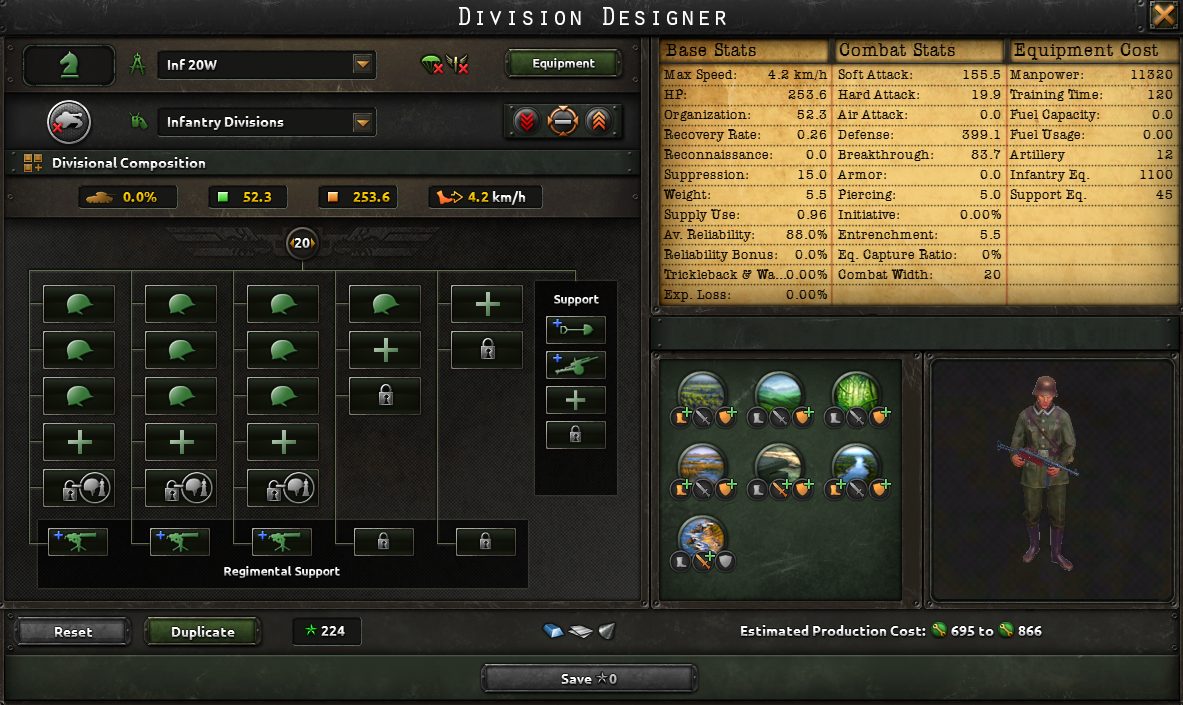
Denser than the 18 CW template. Too expensive for the whole army. Cover quiet stretches with 10 CW infantry.
Verdict. Key tiles of a mid major. Do not run this template from sea to sea.
Infantry, Combat Width 25
- No special forces
- Mountains and marshes
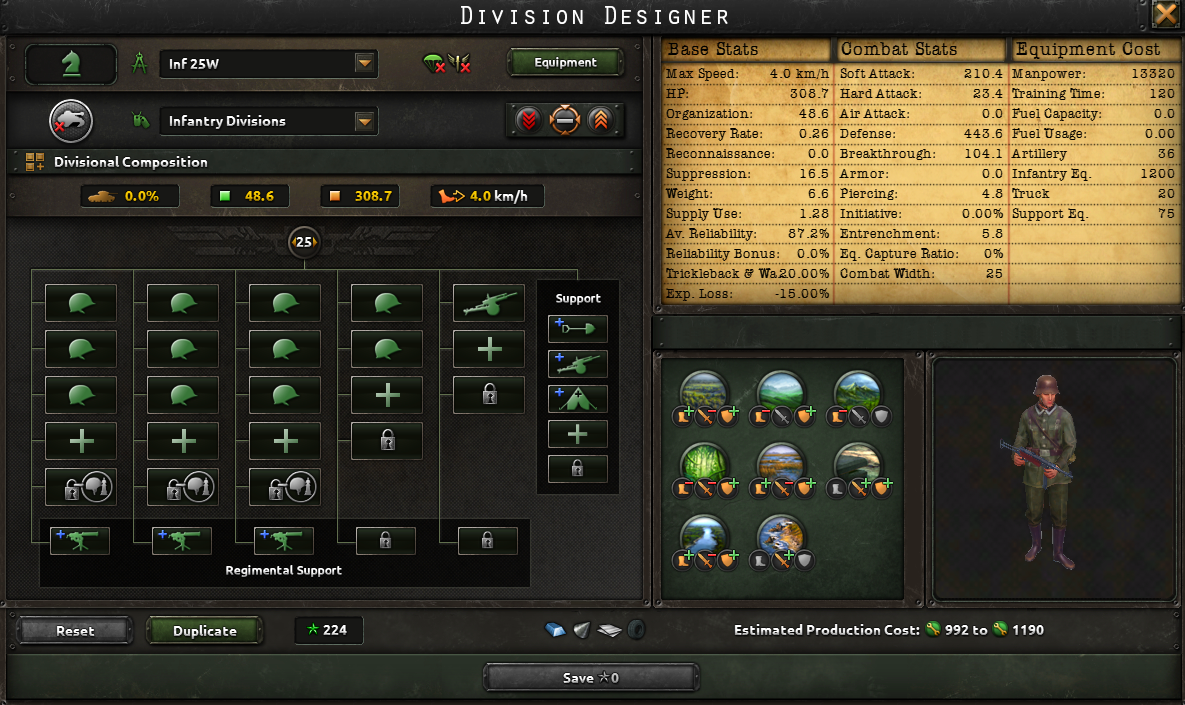

A stand-in if you have no Mountaineers and no Marines: two of these fill a tile cap of 50. Field Hospital burns trucks.
Verdict. Use this if there are no special forces and the front is already in mountains or marsh. On plains, 18–20 CW is cheaper.
Infantry, Combat Width 36
- Major
- Attack
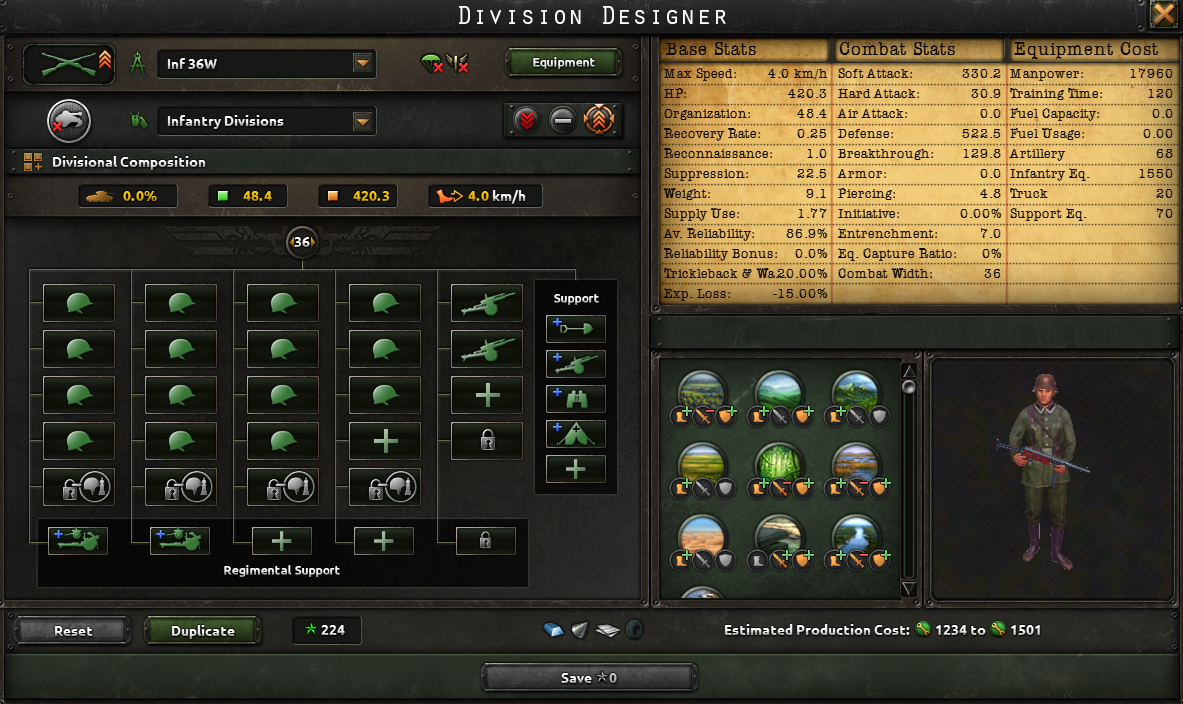

Offensive infantry for a major. Leave the fifth support slot for Anti-Air or Anti-Tank as the war goes, do not lock both in advance.
Verdict. When you already have artillery to spare. Do not cover the whole front with this template.
Armored infantry, Combat Width 10
- Minor
- Armor
- Defense
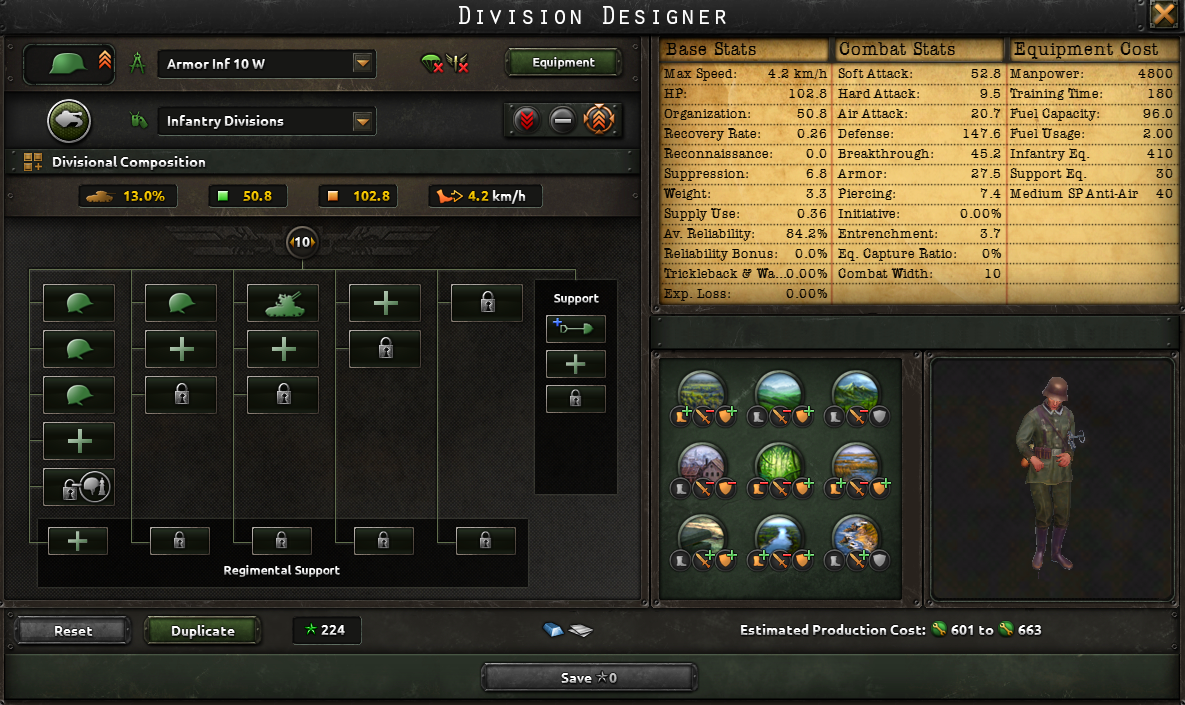

These are not tanks. Cheap Medium SP Anti-Air is what gives the armor. Max the armor in the tank designer. An Interwar hull is enough for the SPAA.
Verdict. Use this only if the factories are actually turning out SP Anti-Air. If you have no vehicles, use ordinary width 10 infantry.
Armored infantry, Combat Width 20
- Major
- Armor
- Defense
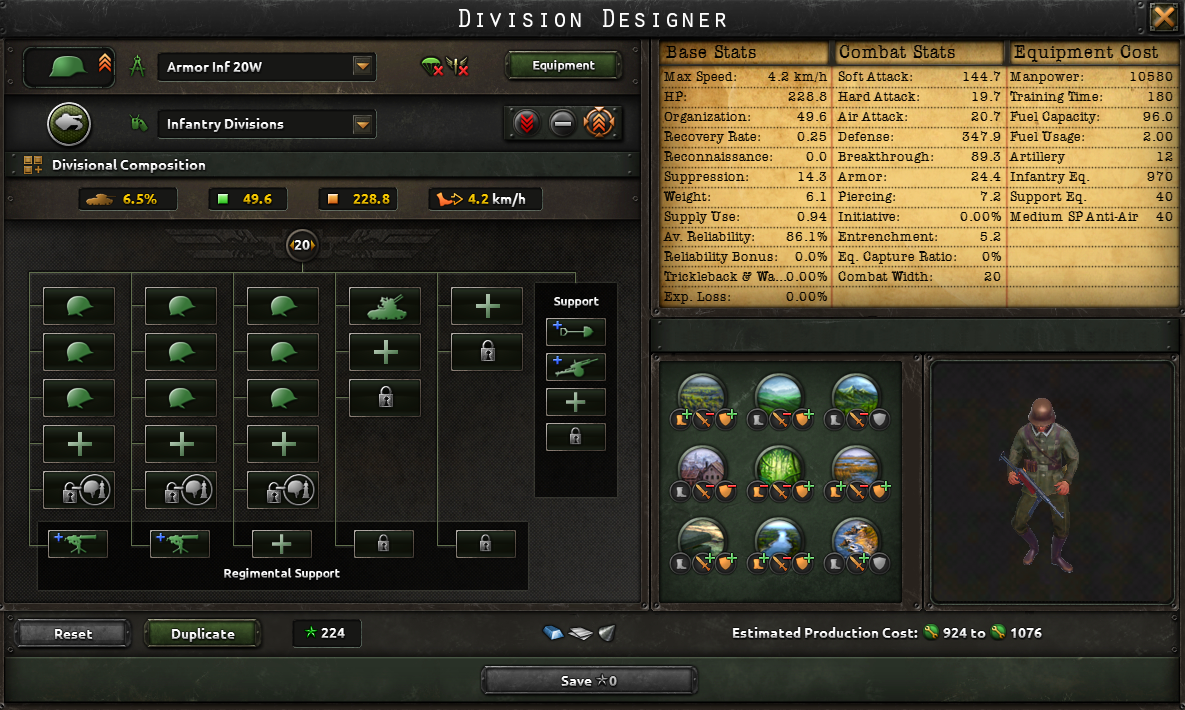
The line is held by SP Anti-Air armor, not tanks. For the SPAA, a 1938 or 1940 hull is better; put armor first. If Organization is weak — drop the regiments.
Verdict. For a major that already produces SP Anti-Air steadily. Do not copy this template onto the whole front.
Armored infantry, Combat Width 36
- Very large major
- Attack
- Armor
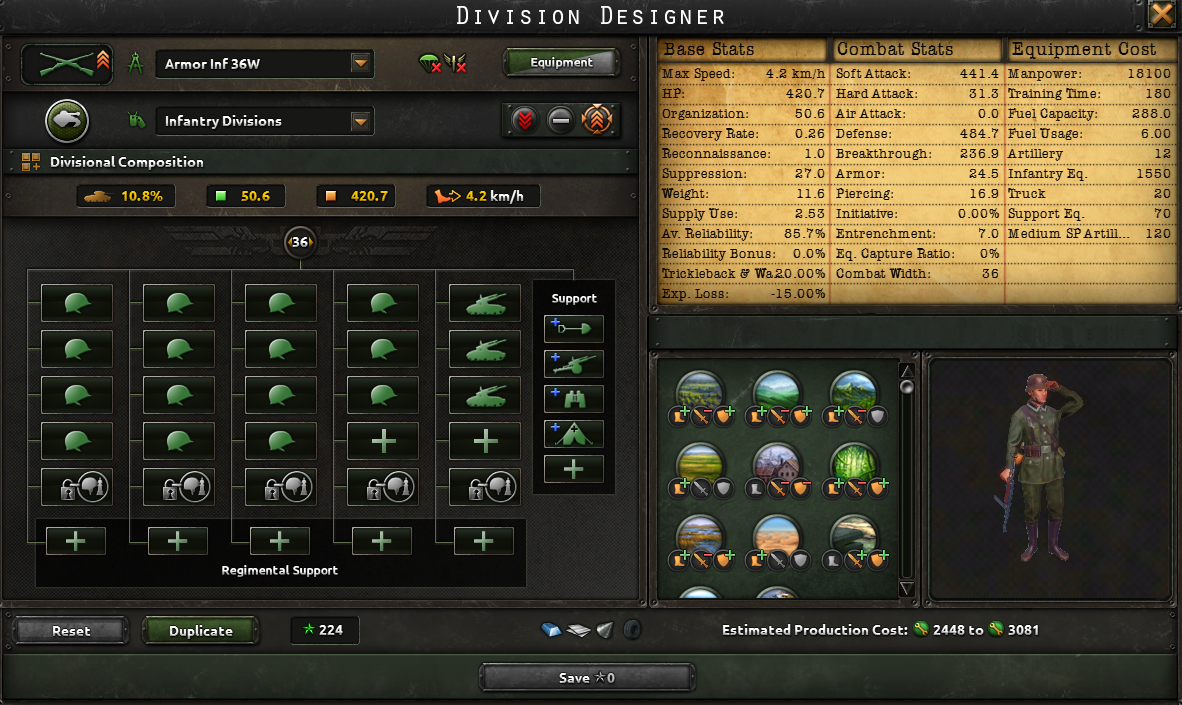

Soft Attack comes from SP Artillery, not tanks. A country the size of the USSR can feed this, not little Portugal.
Verdict. Only for a very large country, once SP Artillery is already in production. A minor is not ready.
Armored infantry, Combat Width 20
- Infantry breakthrough
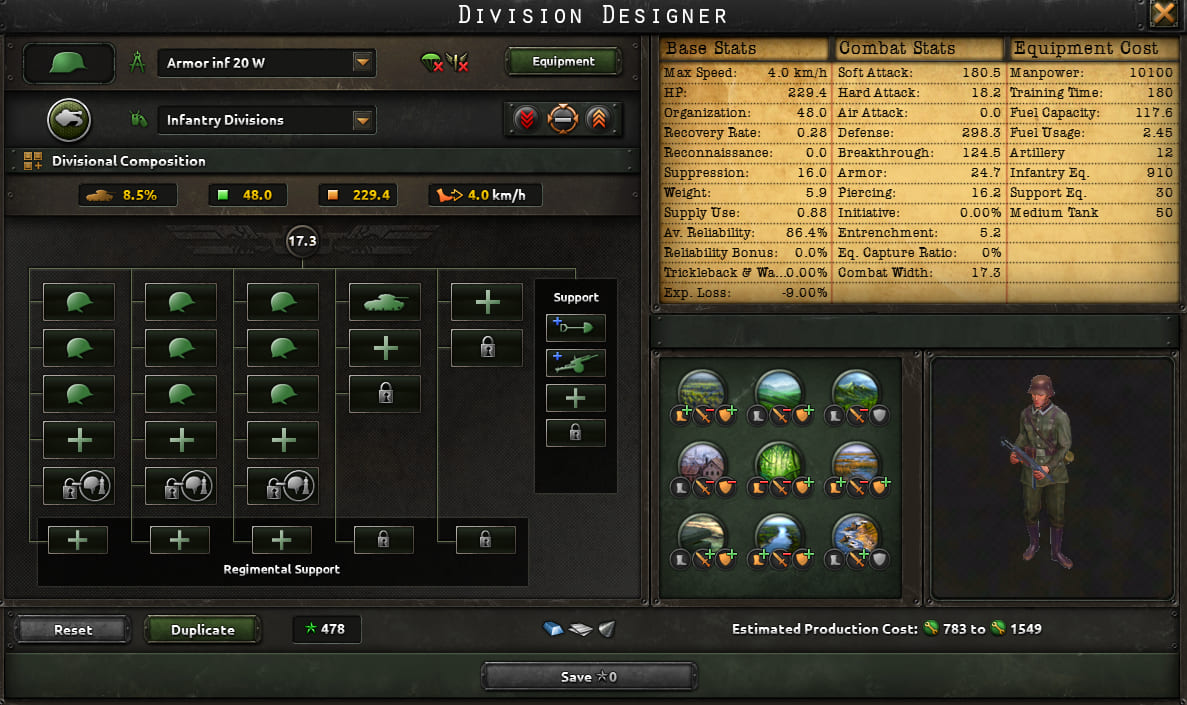

When you do not have tanks for a real breakthrough, and ordinary infantry no longer shoves the line. This is not a 36 CW tank division.
Verdict. A compromise. Real breakthroughs still belong to tank templates.
Tank templates
All on a medium tank chassis. 10 CW and 20 CW are for a minor. 36 CW with nine Medium Tanks is the top fist; 36 CW with eight Medium Tanks is a slightly cheaper breakthrough. Mix and SP Artillery — when the Self-propelled Support subdoctrine is unlocked.
Tanks, Combat Width 10
- Weak minor
- Cheap
- Tank
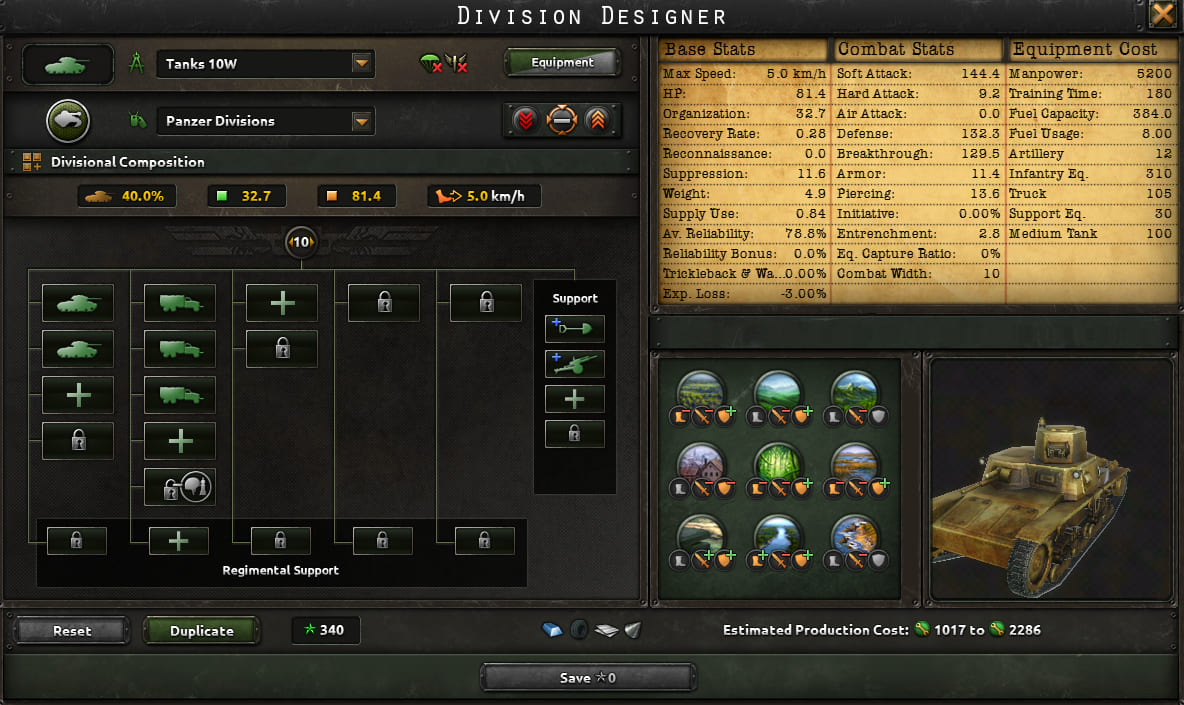

An Interwar hull is often enough. Park 3–4 divisions in one tile: that can fight another minor. HP is low; against a major it is weak.
Verdict. For a weak minor. Add recon only if Organization can take it.
Tanks, Combat Width 20
- Strong minor
- Tank
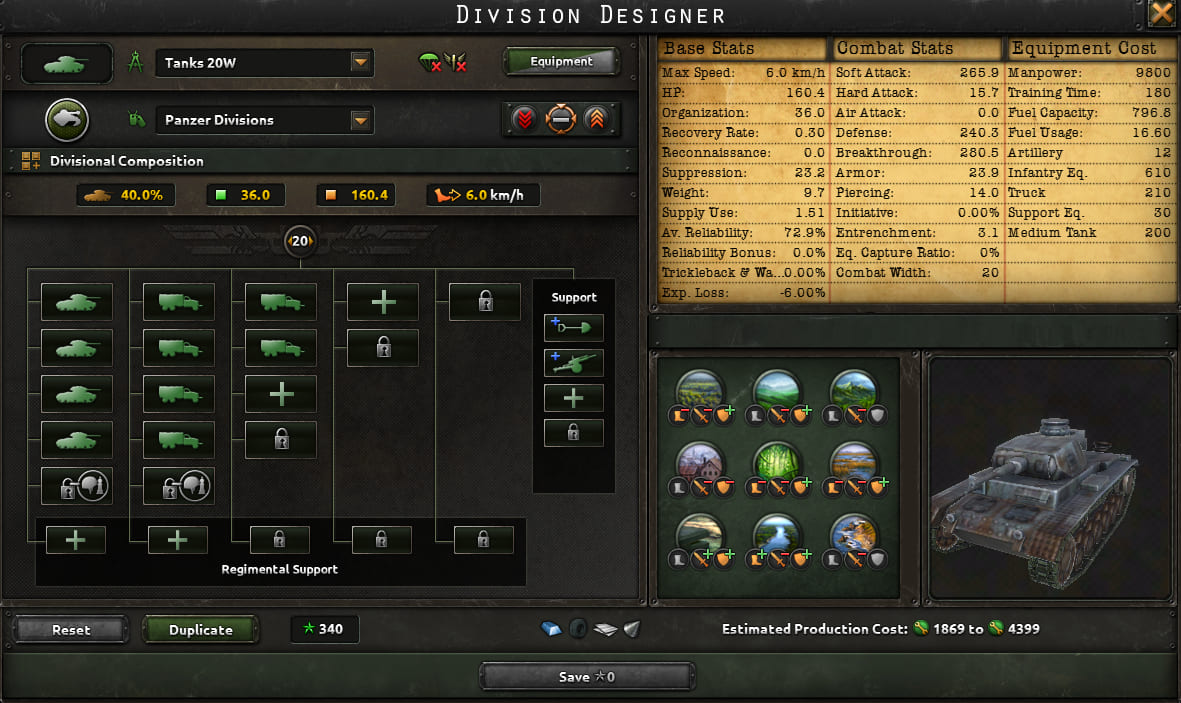
The main attack template. Park 2–5 divisions in one tile. An Interwar hull can fight other minors. A 1938 hull is stronger: better armor, speed, and Reliability. If you can unlock it — take it. If not, Interwar is enough against a minor. Special projects are not required. Supply is average: you need to watch it, but this is not the hungriest template.
Verdict. For a strong minor against a weak or mid major. Against a very large major this is already too little. No rubber — do not build this template.
Tanks 36 CW, eight Medium Tanks (breakthrough)
- Major
- Attack
- Tank
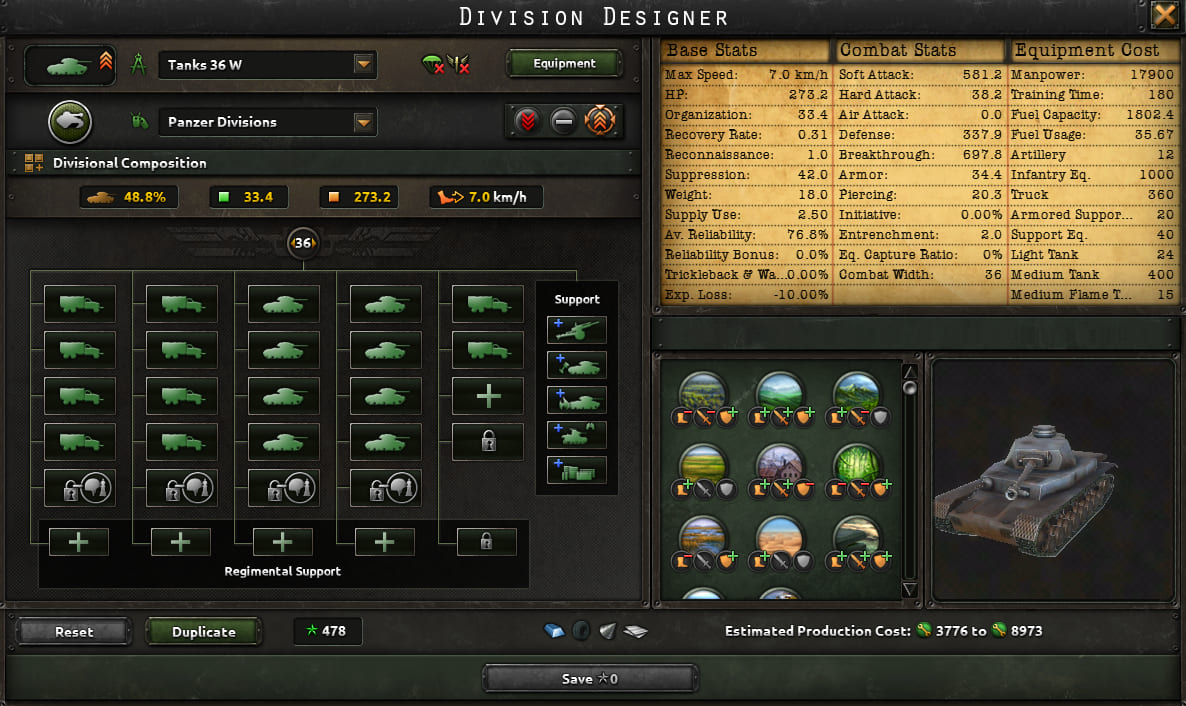


The main template for a major once factories can feed it. Without a Logistics Company the column runs out of supply fast. A minor is not ready for this at game start.
Verdict. Mid and late game, for a major. Thin industry — open the Tanks 20 tab.
Mix of Medium Tanks and SP Artillery, 36 CW
- Major
- Meta
- Mixed
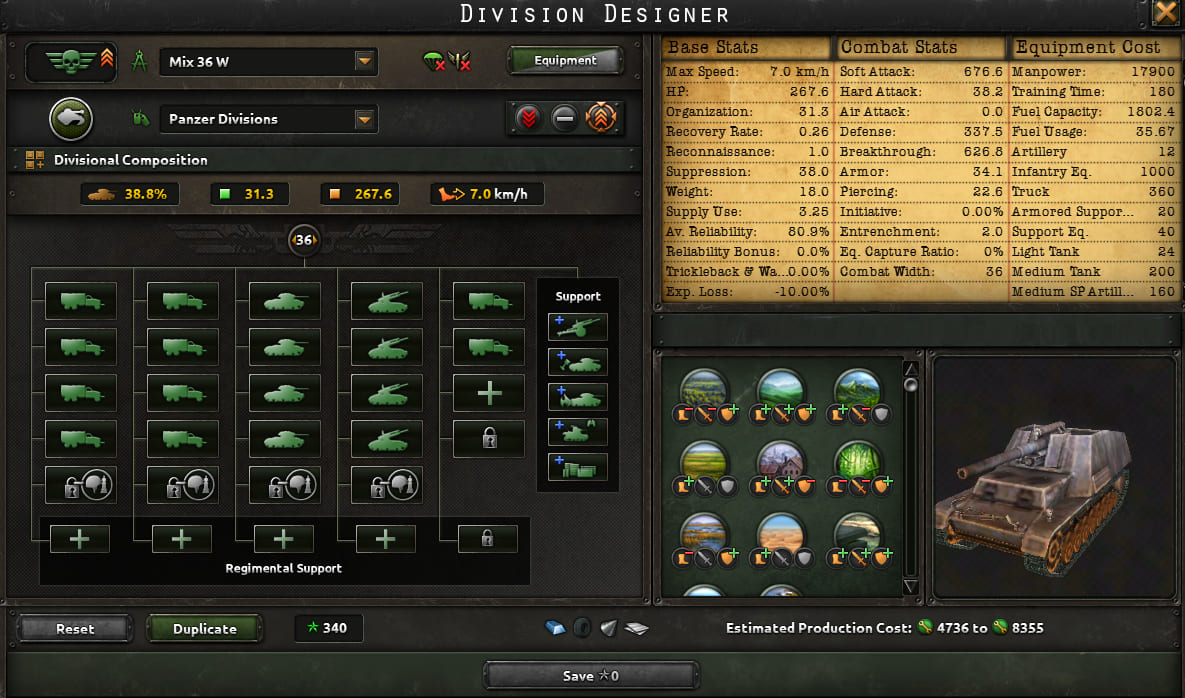
Tank Breakthrough plus Soft Attack from SP Artillery. Needs the Self-propelled Support subdoctrine. Logistics Company is mandatory.
Verdict. For a major against the AI into late war. A minor is not ready.
Medium SP Artillery, 36 CW
- Major
- Meta
- SP Artillery
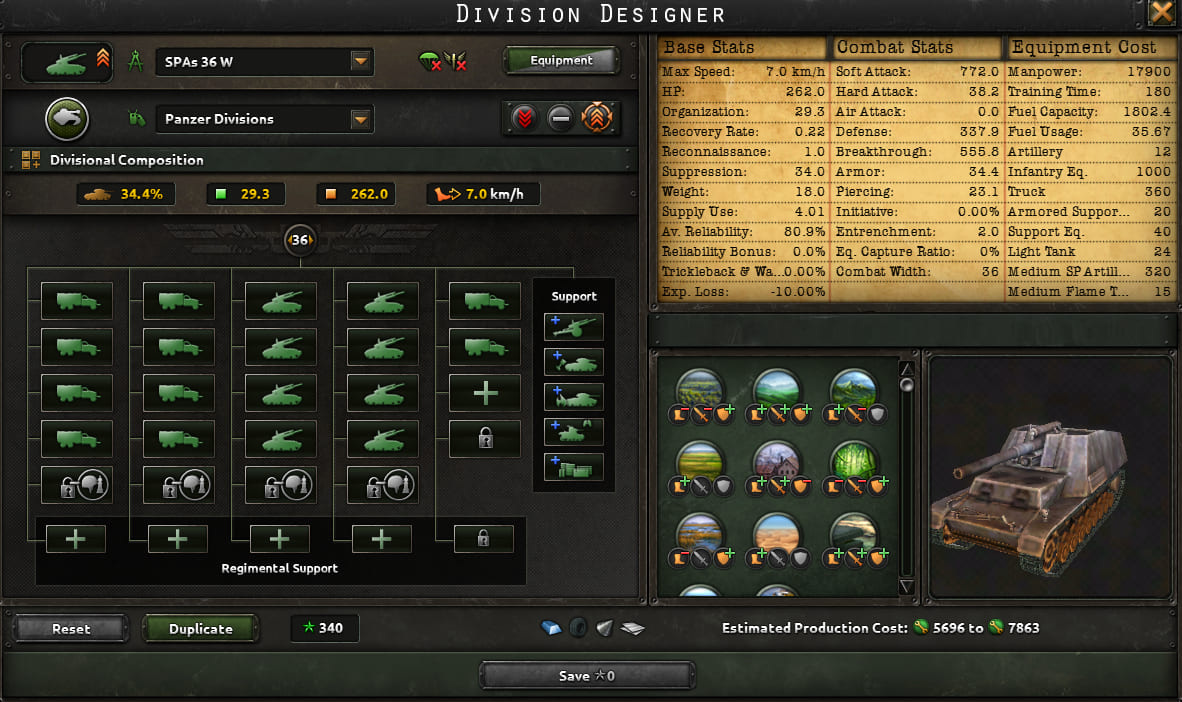
It hits infantry defense well. Enemy tanks it holds worse than clean Medium Tanks. Supply Use is high.
Verdict. For a major with Self-propelled Support. Against enemy tanks, clean Medium Tanks are better.
Motorized Infantry
Without tanks it is weak in a head-on fight. The point is speed and encirclement. It eats rubber and fuel.
Motorized Infantry, Combat Width 10
- Minor
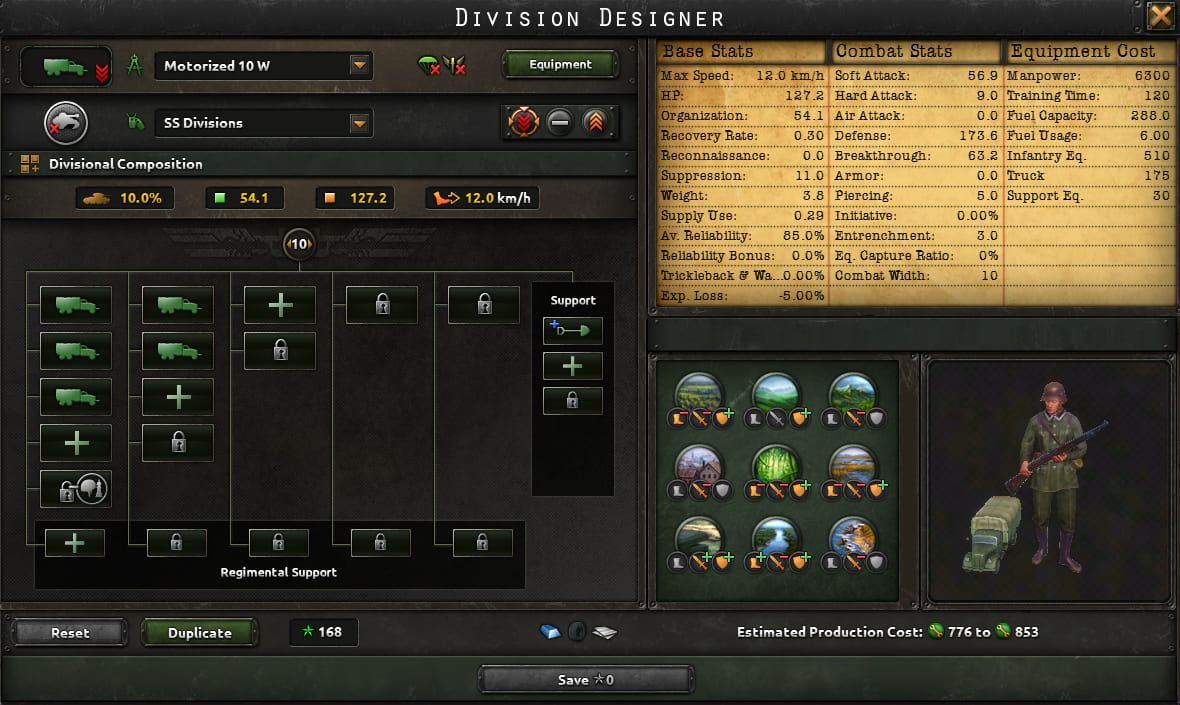
Tanks break the line, these divisions follow in packs. They will not shove trenches head-on. I skip width 2–8 on purpose: a ten still holds a tile a little if someone pokes it.
Verdict. Make a lot of these and do not cry if some fall into a pocket. I usually skip artillery in the companies — the template gets expensive.
Motorized Infantry, Combat Width 20
- Major
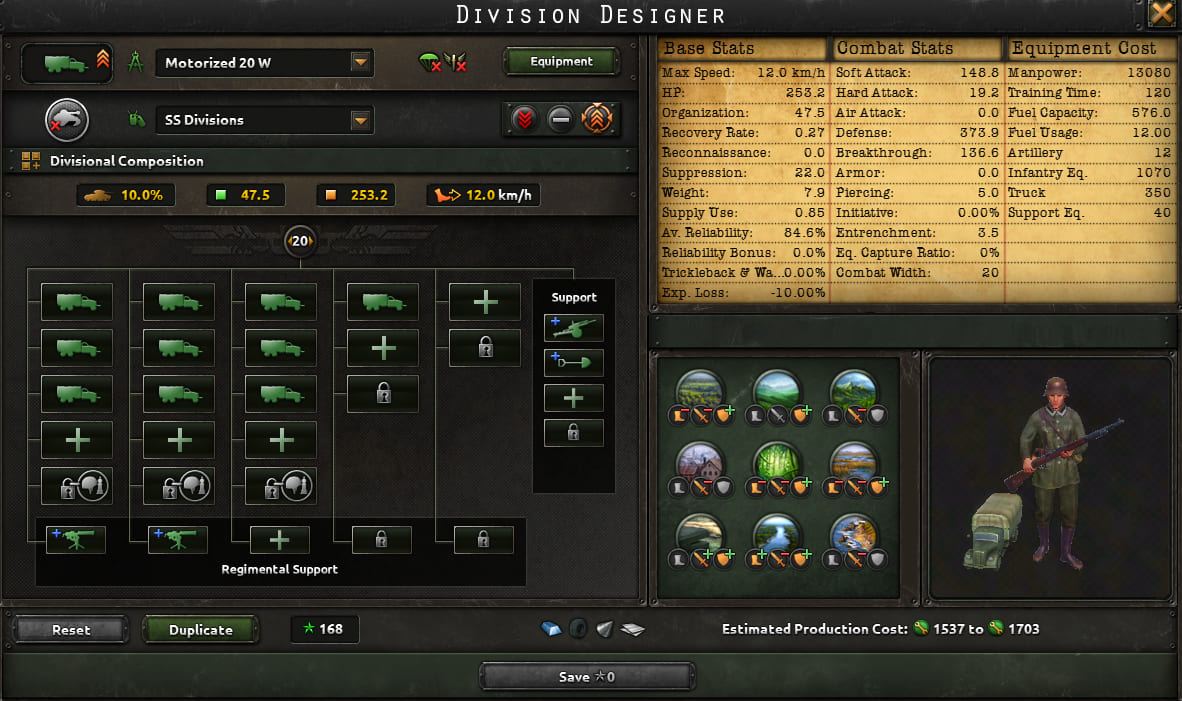
These divisions already hurt to lose. Do not drive one column deep into the rear. A minor is better off dropping the Heavy Weapons Companies. If you can feed this template, you can almost certainly feed 20 CW tanks — and those usually hit harder in combat.
Verdict. Optional. A 20 CW tank template usually hits harder in combat.
Special forces
Mountaineers — hills and mountains (140 rifles per battalion instead of 100). Marines — landings, rivers, marshes (−50% / −40% for regular infantry). Paratroopers — the jump; you need transport planes and ~70% air. Rangers — forest and jungle, a Combat Width 60 tile. All of them eat the shared special forces cap.
8 Mountaineers battalions, 16 CW
- Minor
- Mountains
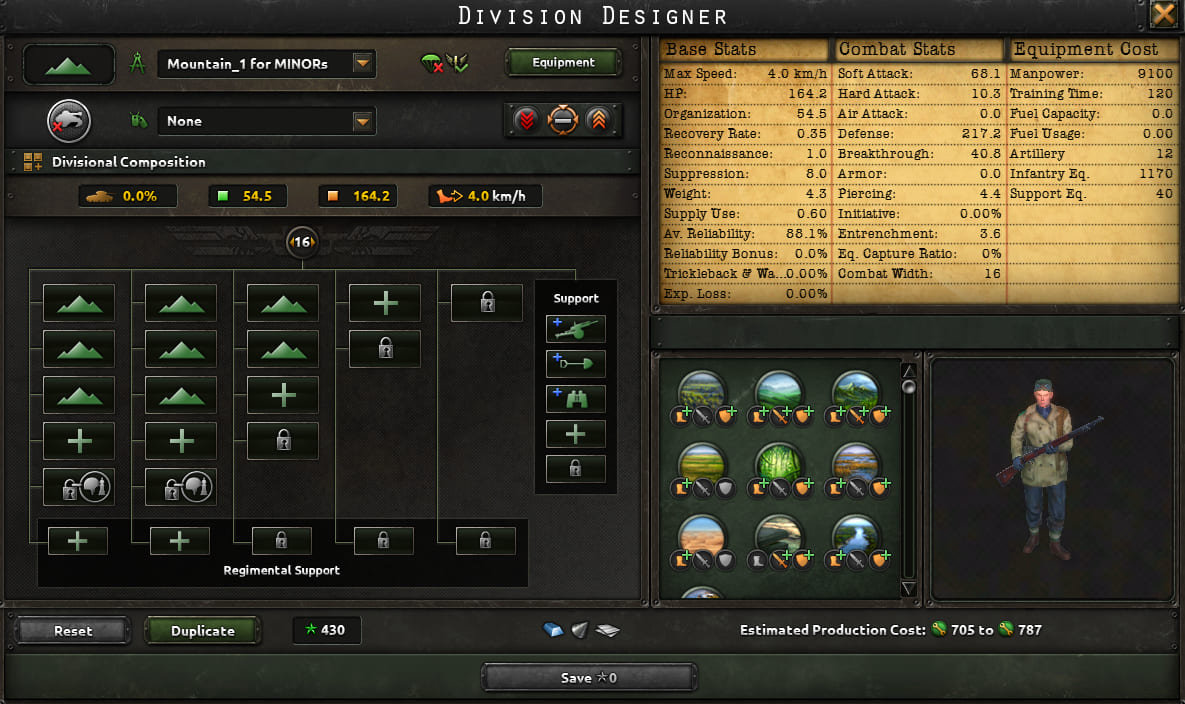

Even a poor start can feed three of these. A battalion wants 140 rifles instead of 100 for regular infantry. Count the special forces cap first.
Verdict. For a minor and a weak major — into the mountains. Do not park this template across the whole Polish plain.
Mountaineers, 25 CW
- Major
- Mountains
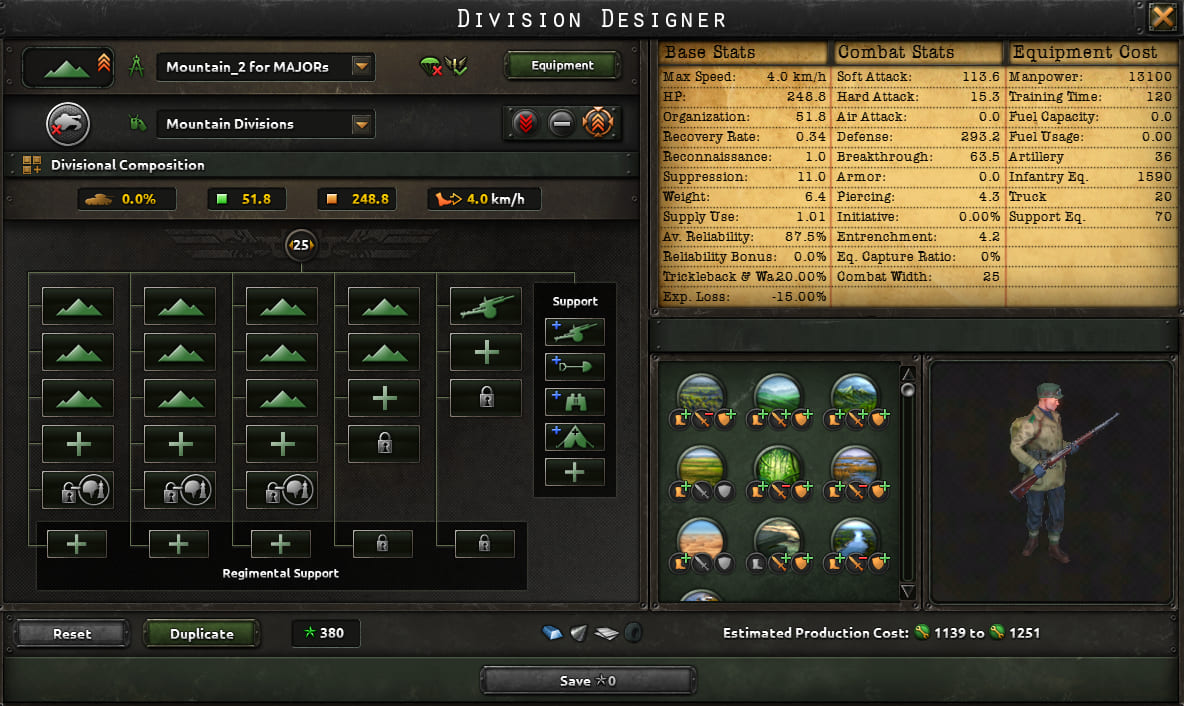
Denser than the minor template. Field Hospital burns trucks. On plains the template still does not pay off.
Verdict. For a major with a mountain front. A few divisions, not the whole army.
Marines 15 CW
- Minor
- Landing
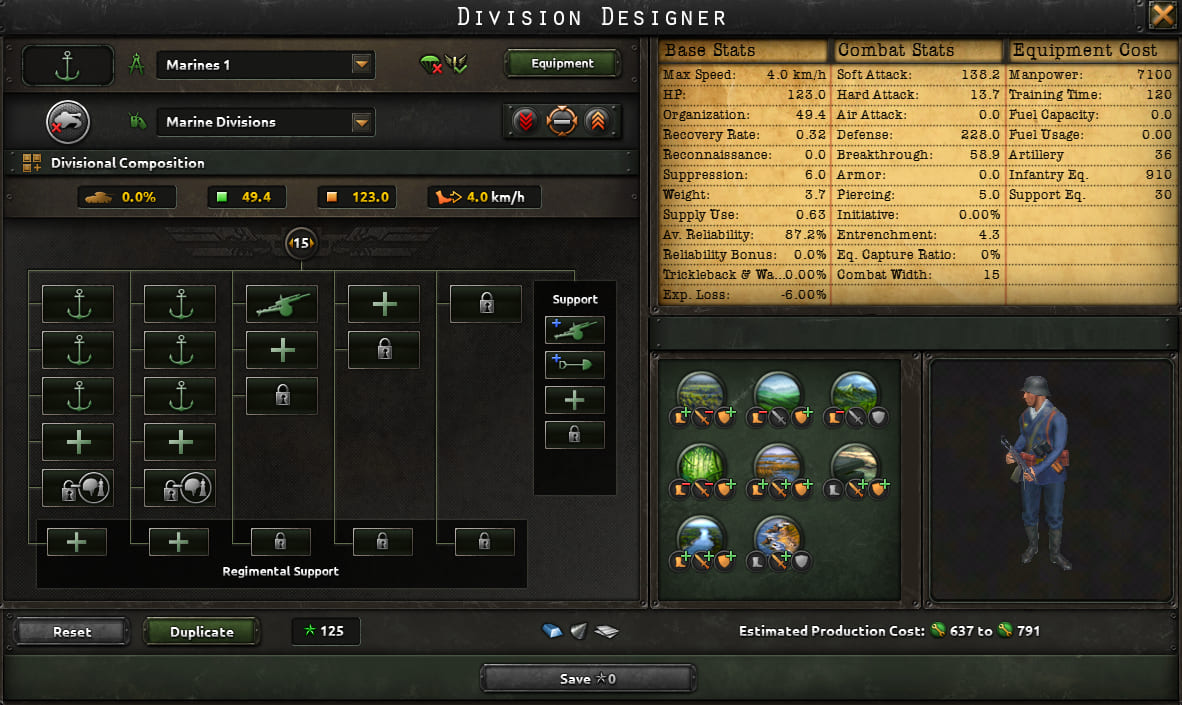

No vehicles. The special forces cap usually covers four of these from any start. Hit several landing points at once.
Verdict. For a minor and a long coast. Do not cover sea to sea with this template.
Marines for marsh
- Major
- Marshes
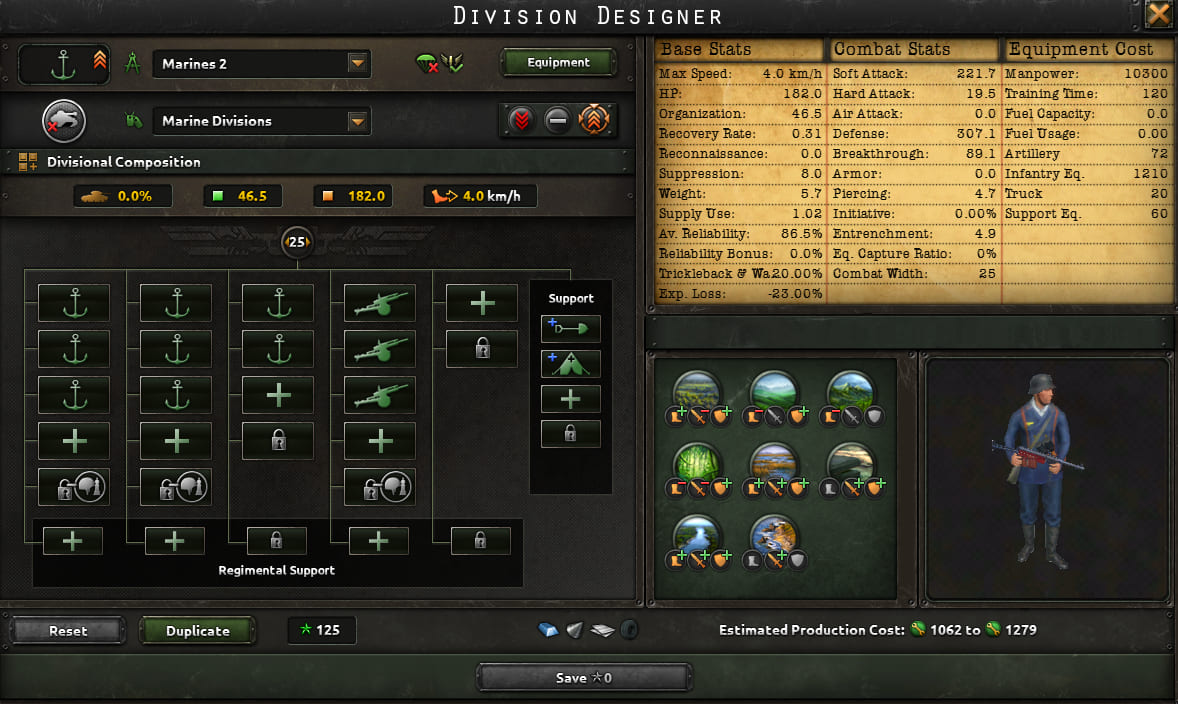
Needs trucks and the Marines research. A lot of Soft Attack. The special forces cap is tighter than on the light template.
Verdict. For a major, or a narrow marsh front. A minor is often too early.
Light Paratroopers
- Drop
- Cheap
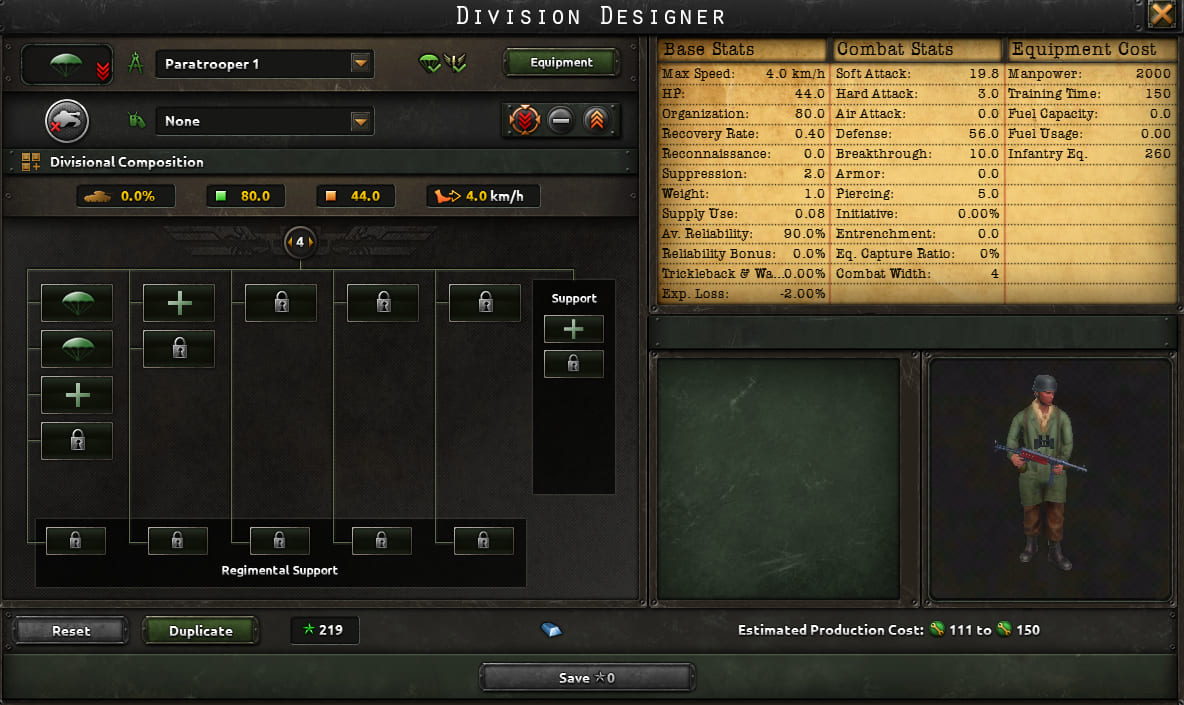

Deep rear, capital, supply hub. After the drop, link up with regular infantry. This template does not hold a front line.
Verdict. For a minor and early war. Without transport planes, do not build this template.
Medium Paratroopers
- Drop
- Sturdier
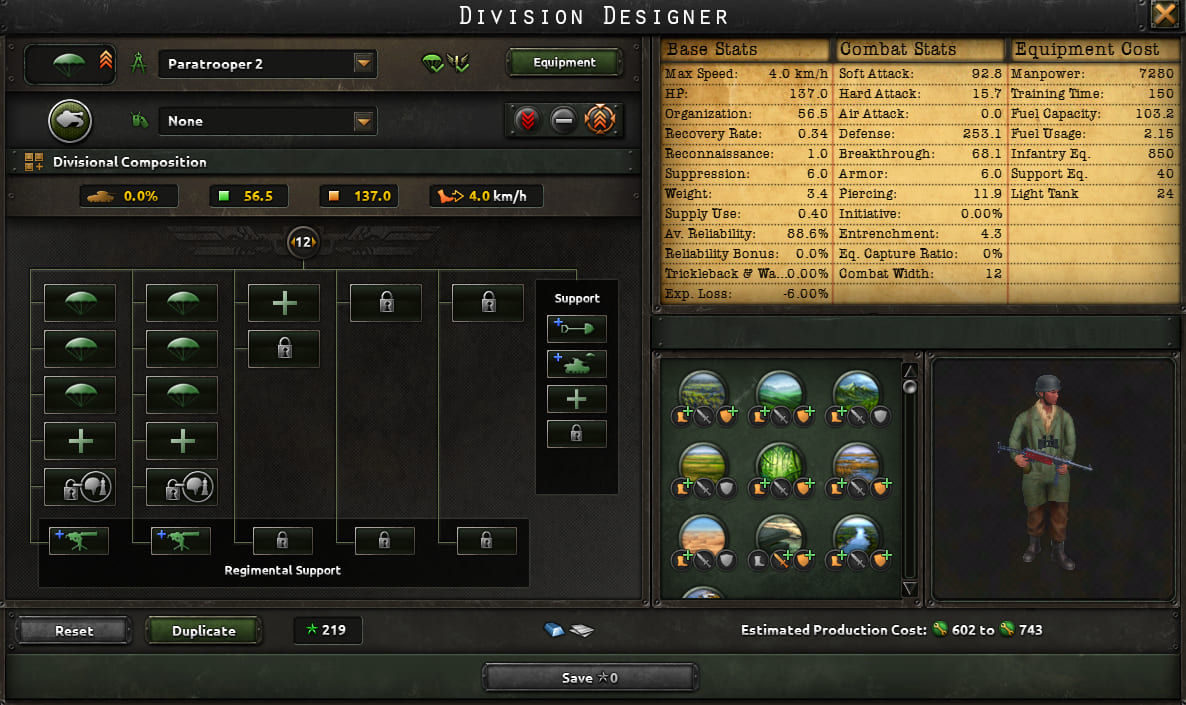

Closer to the front, a supply hub. The light tanks come from the paratrooper subdoctrine; a minor can skip them. This template eats more of the special forces cap.
Verdict. When you already have Army Experience and air. Otherwise take the light airborne template.
6 Rangers battalions and Artillery, 15 CW
- Minor
- Forest
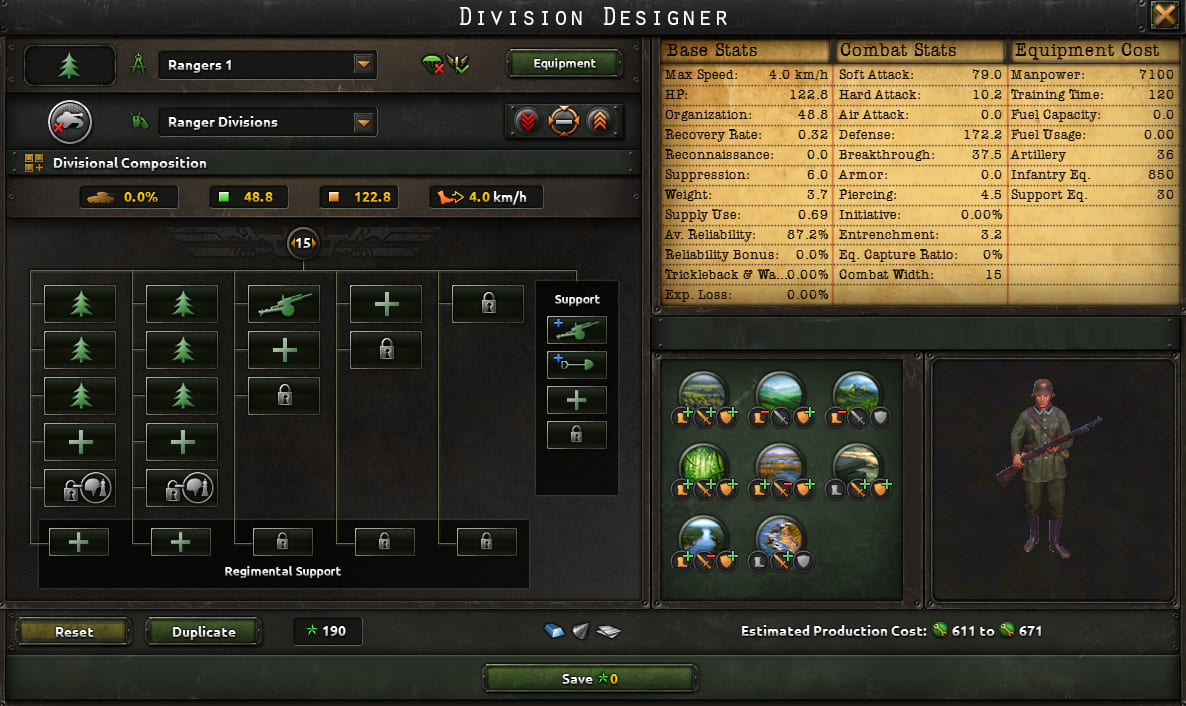

The special forces cap usually covers four of these from any start.
Verdict. A long forest front for a minor.
Rangers, Combat Width 20
- Major
- Forest
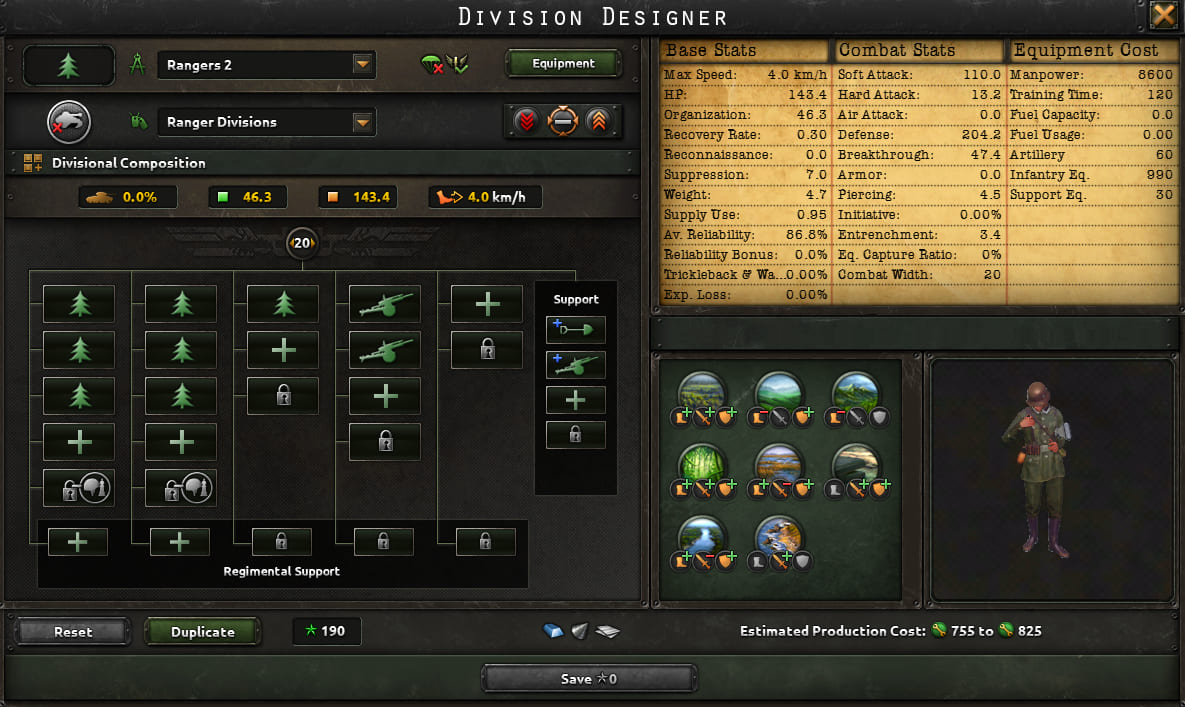
Denser per tile, more expensive on the special forces cap. Do not haul these onto the plains.
Verdict. For a major with a forest front.
Rangers, Combat Width 30
- Very large major
- Forest
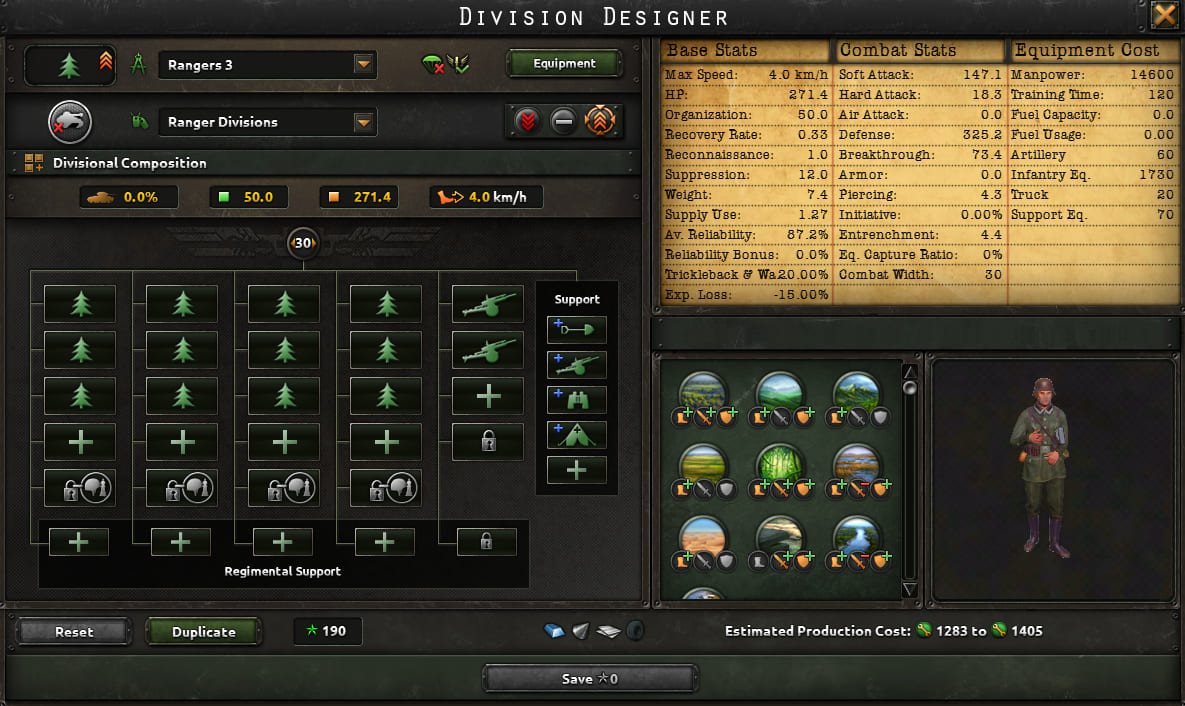
It eats a lot of the special forces cap. It pays off when forest is the main front of a very large country.
Verdict. A minor should not copy this template just because it looks strong.
Rear and cheese
Cavalry 2 CW — occupation, army size for a focus, empty tiles. You do not put it into a fight against real infantry.
Cavalry, Combat Width 2
- Garrison
- Not for combat
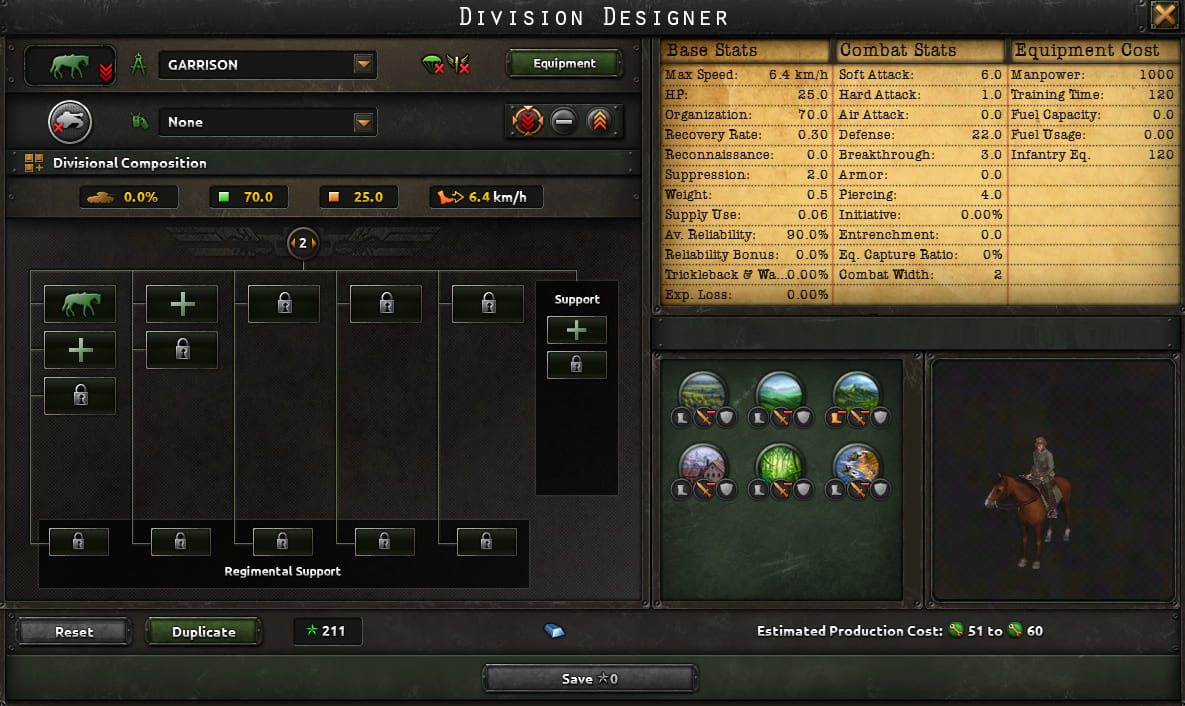

This template is for occupation, for army size under a national focus, and for grabbing empty tiles. Do not put it on the front against regular infantry: it is weak in combat.
Verdict. This is work next to the war, not the war itself. Do not mix it up with line infantry.
Practical takeaway: copy a lineup for the job and the industry, not “the fattiest screenshot”. No rubber — do not build Motorized Infantry and tanks. No special forces cap — do not cover the plains with them.
More in the chapter on best division templates.