Best Division Templates Tanks | SPGs | Infantry | Defense | Offense
{"html":["
\n
\n
\n General \n For Beginners \n Designer Breakdown \n Stats Breakdown \n Combat Width \n Battalions \n Support Companies \n Regimental Support \n Modernization & XP \n Garrisons & Resistance \n ★ Ready Meta Templates★ Test Save
\n\n
\n
\n
Guide • Divisions • All DLC • Single Player
\n
Complete Division Guide \n
How divisions work, what their stats depend on, and how to build a template you won't be ashamed to show the enemy.
\n
\n
+88.7% Manpower Retention
\n
+83.5% Soft Attack
\n
+98.9% Breakthrough
\n
\n
\n
\n
\n \n
A division is a combat organism where infantry, tanks, and artillery act as a single fist. Without it, you can neither attack nor hold positions — just scattered chaos. A division turns resources into victory: it deals damage, holds the front, and gets amplified by support. Without divisions, you have no army — just doomed detachments. In the game, you can only manage battalions, companies, and regiments within a division. The division is the only controllable land warfare unit in the game.
\n
\n
\n \n
The hierarchy is simple: battalions are the core, companies are their building blocks, and regimental support are amplifiers. Support (arty, recon, engineers, medics, logistics) doesn't win battles outright but multiplies efficiency in specific conditions — without them, a division loses many valuable buffs.
\n
Example: building the designer is like constructing a house: battalions are the walls, companies and regiments are the roof and windows, and without a solid foundation (stat balance) the house collapses at the first hit.
\n
\n
\n \n
Research unlocks access to battalions, companies, and regimental support: without the required technology (for example, "Heavy Tanks" or "Rocket Artillery"), you won't be able to add them to a template. It also improves key parameters and provides modifications that change division effectiveness. The deeper you research a branch, the more support options become available, including critical ones like the medium improved howitzer. To see what a particular research provides, just hover over it in the tree — the game will show everything. However, not all research does this. For example, "Improved Infantry Equipment I" only gives buffs, not access to anything new in the designer.
\n
Example: to add a heavy regiment, you must first research "Support Weapons I".
\n
\n
\n
\n \n
\n
What are "soft attack" and "hard attack"? + Soft attack is anti-personnel firepower against soft targets, i.e., infantry. Hard attack is anti-tank firepower against armor, e.g., tanks.
\n
Which is better, SPGs or tanks? + For minors, tanks; for majors, SPGs. The reason is that minors rarely can afford strong infantry templates, so you need to take the "Field Engineer Works" branch in the artillery and support doctrine. A major, thanks to its powerful industry (see industry guide ), can afford solid infantry, so it makes sense to take the "Self-Propelled Support" branch, which buffs SPGs. Still, it depends on the situation. If the enemy has only infantry and you have the industry, a minor could also go for SPGs without the doctrine.
\n
Infantry holds, tanks push? + In general, yes, but if you cannot afford armor as a minor, you can build strong offensive infantry templates and attack with them.
\n
What are the best sub-doctrines? + It all depends on the situation. You can find a detailed breakdown of doctrines and sub-doctrines in our doctrine guide . There you can find setups for your situation, view a tier list, and understand how doctrines work in this game.
\n
Does battalion placement in columns affect combat stats? + No, it does not. However, it's recommended to build regiments of 3 battalions — only then can you add regimental support. If you have fewer than 3 battalions, the game won't let you add regimental support.
\n
What is more important, soft attack or breakthrough? + Both matter in their own way. Without soft attack, you won't deal enough damage to enemy infantry, and without breakthrough, you won't be able to block damage and will quickly lose organization. The best approach is to mix SPGs and tanks — then you'll have both good breakthrough and good soft attack.
\n
What is more important, hard attack or piercing? + Piercing. Piercing allows you to penetrate enemy armor, while hard attack is the actual damage. If you lack piercing, the enemy will simply block part of your damage.
\n
When should I put AT and AA in divisions? + Almost never against the AI, with a few exceptions. AT is necessary against a tank power, like Germany. AA is needed when the enemy has overwhelming air superiority. Usually, this is required either in multiplayer or when facing a total defense scenario.
\n
Why does artillery in a division tank organization so much? + Artillery battalions have low organization compared to infantry. Since a division's organization is the average of all its battalions, adding artillery lowers the overall number.
\n
What's the difference between breakthrough and defense? + Breakthrough is defense while attacking. Defense is defense while defending. The higher your defense, the more enemy attacks you can fend off, meaning you lose less organization during combat.
\n
\n
\n
\n \n
\n Stat Without Guide With Guide \n Soft Attack 54 74 Hard Attack 8 12 Defense 162 219 Breakthrough 26 43 Armor 0 19 Air Attack 0 20 Combat Width 12 18 Organization 47 48 \n
\n
\n
\n
\n\n
\n
\n
\n \n
To build divisions effectively, you must master five key concepts: combat width , the difference between breakthrough and soft attack , the role of organization , the impact of research , and supply consumption . Without understanding these fundamentals, even expensive templates will lose. Start with theory, then move to practice in the designer.
\n
\n
How does combat width work? + Combat width is the limit on how many divisions can fight on a single tile. More details in the "Combat Width" tab.
\n
What's the difference between breakthrough and soft attack? + Soft attack is the damage dealt to infantry, while breakthrough is the ability to block enemy attacks when on the offensive.
\n
How does organization affect combat? + Organization is the "HP" of a division. When it reaches zero, the division is forced to retreat.
\n
How does research affect stats? + Improved weapons and equipment boost the base stats of battalions and unlock new types of support.
\n
How does supply consumption affect logistics? + The higher the consumption, the harder it is to supply a tile with divisions, which leads to penalties (more in the supply guide ).
\n
\n
\n
\n \n
\n First, understand what a division is and what it consists of. \n Then learn about organization and the other key stats (soft attack, breakthrough, defense, piercing). \n After that, find out how soft/hard attack differs from breakthrough. \n Only then move to advanced settings: specific regiments, balancing against a particular enemy, and terrain optimization. \n \n
\n
\n \n
\n 1) Infantry holds the front, tanks break through. Don't make infantry expensive; focus on tanks.2) Organization is more important than any other stat. 30-40 for tanks, 45-50 for infantry.3) The lower the supply consumption, the better. SPGs and artillery require a lot of supply (see supply guide ).4) Support companies are gold. Engineers, artillery, and recon are must-haves.5) Don't forget terrain bonuses. Recon, flame tanks, and engineers improve the situation.6) Keep priority research branches in focus. \n
\n
\n \n
\n 1) Adding everything and too much. Organization drops, the division becomes expensive. Make 1-3 specialized templates.2) Using unnecessary components in single player. AT and AA are often not needed against the AI.3) Making infantry divisions too large. 14/4 or 40 width for a defensive division is expensive and inefficient. Keep them compact. Infantry in HoI4 is for defense, not offense (see defense guide ).4) Using starter templates for minors. They are often inefficient; adjust them to your industry.5) Ignoring combat width and organization. These are the two most important stats.6) Skimping on support companies or adding all of them. For defense, 2-4 companies are enough. \n
\n
\n \n
This video shows just how drastically a template changes effectiveness. Losses with the meta template are 88.7% lower.
\n
\n VIDEO \n
\n
\n
\n
\n\n
\n
\n
\n \n
Hover over elements on the screenshot to see an explanation. More details about UI elements in the game interface guide .
\n
\n
\n
\n
\n
\n
\n
\n
\n
\n
\n
\n
\n\n
\n
\n
\n \n
Hover over a stat name for a detailed explanation.
\n
\n
\n
Base Parameters \n
\n Max Speed (km/h) HP Organization Recovery Rate Reconnaissance Suppression Weight Supply Use Average Reliability Reliability Bonus Casualty Trickleback Experience Loss \n
\n
\n
Combat Parameters \n
\n Soft Attack Hard Attack Air Attack Defense Breakthrough Armor Piercing Initiative Entrenchment Equipment Capture Ratio Combat Width \n
\n
\n
Cost \n
\n Manpower Training Time Fuel Capacity Fuel Consumption Other Equipment \n
\n
\n
\n
\n \n
This is the author's subjective opinion. Stats are rated by importance in a division.
\n
\n
\n
S
\n
\n Max Speed \n Organization \n Supply Use \n Soft Attack \n Breakthrough \n Defense \n Equip. Capture Ratio \n Combat Width \n
\n
\n
\n
A
\n
\n HP \n Hard Attack \n Air Attack \n Armor \n Piercing \n Initiative \n Manpower \n
\n
\n
\n
B
\n
\n Recovery Rate \n Reconnaissance \n Average Reliability \n Reliability Bonus \n Casualty Trickleback \n Experience Loss \n Entrenchment \n Fuel Consumption \n
\n
\n
\n
F
\n
\n Suppression \n Weight \n Training Time \n Fuel Capacity \n
\n
\n
\n
\n
\n
\n\n
\n
\n
Combat width is the amount of space available for fighting during a battle. If your division exceeds a tile's limit, part of it won't fit, and your attack or defense will be weakened. Commonly referred to as CW. The limit depends on terrain and determines how many divisions can fight effectively at once.
\n
Exceeding the limit gives divisions a penalty to soft/hard attack, breakthrough, and defense. The larger the overage, the weaker your punch. Additionally, divisions that don't fit into the battle gain no experience. Example: attacking on plains (limit 80) with three 30-width divisions results in a 10 overage — roughly a 19% penalty to effectiveness.
\n
For defensive infantry: 10, 12, 14, 16, 18.
\n
Plains and desert are ideal. Forests, jungles, hills, and cities impose moderate penalties. Mountains and marshes are hellish — avoid them. Use appropriate division types: mountain troops in mountains, rangers in forests, marines for naval invasions. For maximum offensive efficiency, check out the meta offensive guide .
\n
\n
\n
\n\n
\n
\n
A battalion is the foundation, the skeleton of any division. It's the battalions that define its role: infantry holds the line, tanks break through, artillery deals damage. Each battalion contains 500 to 1200 soldiers with weapons. Changing the battalions completely changes the division's purpose.
\n
\n
\n Infantry (regular infantry, paratroopers, rangers) — 4 km/h speed, boosts organization and defense. \n Tank support battalions (TDs, SPAAs, SPGs) — armored firepower, require an equipment designer template. \n Combat support battalions (towed artillery, AA guns) — boost infantry but lower organization. \n Mobile battalions (truck-towed artillery) — 12 km/h speed, suitable for fast divisions. \n Mobile infantry battalions (motorized, mechanized) — fast infantry for tank divisions. \n Tank battalions (light, medium, heavy) — the core of armored forces, boost breakthrough and armor. I don't recommend heavies. \n \n
Without battalions, companies and regiments are pointless. It's the infantry holding rifles and the tanks smashing through the front that decide the battle. Battalions are also the only element that affects a division's combat width.
\n
Infantry battalion (infantry core), motorized (for tank divisions), cavalry (rapid deployment and garrisons), artillery (soft attack), medium tanks and SPGs (versatile damage), TDs/SPAAs (for multiplayer or specialized roles). For the best tank templates, read the meta tank templates guide .
\n
\n \n
\n Infantry \n Tank Support \n Mobile Support \n Support \n Mobile \n Tanks \n
\n
\n
\n
\n Icon Name Description \n SPAA For adding armor or countering air power. SPG For offensive armored divisions. TD Against a tank power in multiplayer. \n
\n
\n
\n
\n
\n
\n
\n
\n
\n\n
\n
\n
A special unit that assists the division from the rear, not fighting directly. It doesn't consume combat width but provides powerful bonuses: engineers boost defense, recon finds weaknesses, support artillery adds extra punch. It's the most cost-effective way to improve a division.
\n
Direct fire support (artillery, rocket artillery, AT, AA, flame tanks), reconnaissance (horse, motorized, armored), and rear services (engineers, maintenance, hospitals, logistics). Each plays a role: firepower, intel, or supply.
\n
Without support companies, a division loses a significant portion of its effectiveness. Tank divisions without flame tanks suffer on poor terrain, infantry without engineers defends and assaults forts worse. A few well-chosen companies turn an average template into a combat-ready one.
\n
Engineer company (terrain buffs, defense), support artillery (soft attack), armored recon (breakthrough, speed), medium flame support (terrain attack), AA/AT situationally. These provide the biggest boost to combat power.
\n
\n \n
\n Icon Name Buff Cost Notes \n Support AA Boosts air attack 20 AA When enemy has air superiority. Support AT Boosts hard attack & piercing 24 AT When enemy has many tanks. Support Artillery Boosts soft attack 12 Artillery Put in all divisions. Support Rocket Artillery Boosts soft attack 12 Rockets Late-game option. Engineer Company Terrain buffs, defense 30 Sup. Eq., 10 Rifles Every division. Armored Recon Terrain buffs, breakthrough 24 Light Tanks Best recon for offensive divisions. Medium Flame Company Terrain buffs, attack 15 Flame Tanks Only medium, for tank divisions. Field Hospital Reduces manpower losses 20 Trucks, 30 Sup. Eq. For offensive infantry divisions. Logistics Company Reduces supply use 10 Trucks, 20 Sup. Eq. For offensive divisions with many SPGs. Super Heavy Artillery Boosts soft attack 3 Super Heavy Art. For mega-majors, for infantry. SP Super Heavy Artillery Boosts soft attack 3 SP Super Heavy Art. Useless. Land Cruiser Depends on designer 1 Land Cruiser Useless. Super Heavy Tank Depends on designer 20 Super Heavy Tanks Useless. Horse Recon Detachment Terrain buffs, recon 40 Rifles, 10 Sup. Eq. For infantry in the early game. Assault Engineer Company Terrain buffs, breakthrough for infantry 20 Sup. Eq., 20 Armored Cars (Support) Rarely used, situational. Armored Engineer Company Terrain buffs, defense & breakthrough 30 Armored Cars (Support), 15 Sup. Eq. Decent for majors. Medical Evacuation Helicopter Reduces losses, speeds recovery 15 Helicopters, 15 Trucks, 30 Sup. Eq. Useless. Helicopter Brigade Recovery rate, supply use, recovery 15 Helicopters, 15 Sup. Eq. Almost always useless. Helicopter Recon Terrain buffs, soft attack for inf, defense for all 20 Helicopters, 20 Rifles, 10 Sup. Eq. Almost always useless. Cargo Helicopters Reduces supply use, terrain buffs 10 Helicopters, 10 Rifles, 20 Sup. Eq. Almost always useless. Maintenance Company Boosts equipment capture & reliability 25 Sup. Eq. Usually useless, but a minor can use it against a tank power. Armored Maintenance Company Boosts equipment capture & reliability 20 Armored Cars (Support), 15 Sup. Eq. Useless. Military Police Boosts defense, recovery rate, suppression 40 Rifles, 10 Sup. Eq. Situational, majors can use for garrisons. Motorized Military Police Boosts defense, recovery rate, suppression 20 Inf. Eq., 20 Motorcycles, 5 Sup. Eq. Situational. Motorized Recon Terrain buffs, defense 40 Rifles, 20 Trucks, 10 Sup. Eq. Worst recon. Light Armored Recon Terrain buffs, breakthrough 24 Armored Cars Makes no sense. Signal Company Boosts initiative 10 Trucks, 20 Sup. Eq. Suitable if you focus on initiative. Armored Signal Company Boosts initiative, breakthrough for tanks 20 Armored Cars (Support), 15 Sup. Eq. Often useless. \n
\n
\n
\n
\n \n
\n
\n
Direct combat support: machine guns, infantry guns, AA, AT. Cheaper than support companies but also weaker. Mostly used by majors since it requires spare organization. Regiments provide purely combat buffs, unlike the more versatile companies.
\n
Regular (attached to infantry), motorized (to motorized), and armored (SPAA, TD — to tanks). The type determines what speed and bonuses the division gets: armored support rides with tanks, regular walks with infantry.
\n
Regiments directly boost battalions, increasing attack or defense. Their main distinction is they don't provide terrain or logistics buffs — only combat stats. Ideal when you need to seal a breakthrough or reinforce a defense but have spare organization.
\n
Regimental rocket battery (soft attack), heavy regiment (defense), infantry guns (cheap soft attack), AA/AT situationally. Armored SPAAs and TDs are good in multiplayer or against a strong opponent.
\n
\n
\n
\n\n
\n
\n
Division experience gives huge bonuses to combat stats: veterans (level 5) get +75%. The best way to grind XP is in the Spanish Civil War (see Spanish Civil War guide ), where losses are low and fighting is constant. Send volunteers there and don't let them sit idle.
\n
Divisions must participate in combat. The ideal spot is the Spanish Civil War: years of fighting, minimal losses. In your own wars, grinding is harder due to high casualties and rapid battles, so it's best to grow veterans beforehand.
\n
You can switch the composition of a veteran division while keeping its XP. The main rule: the manpower count of the new template must not be lower than the old one. Otherwise, veterans get diluted with rookies and the level drops.
\n
Create a junk template with a large manpower pool, grind it in Spain, then swap battalions to tank/artillery ones while keeping the same manpower. This way you get veteran tankers without spending fuel on training tank divisions.
\n
\n
\n
\n\n
\n
\n
Garrisons automatically occupy captured territory, suppressing resistance. If you leave the standard infantry template, losses in manpower and equipment will be huge. Always switch garrisons to the cheapest template — 1 cavalry or 1 light tank battalion.
\n
An empty template with just 1 cavalry (very cheap, available to all) or 1 light tank (more expensive but fewer losses). Never use full divisions — it's a waste of resources.
\n
Locals sabotage your occupation: they destroy buildings, damage garrisons, and worsen supply. At 30%+ resistance, losses become critical and the region requires constant repairs. Resistance grows if the law is too soft or there aren't enough garrisons.
\n
The best way is a suitable occupation law. Focuses, advisors, events, and agency operations also help. You can temporarily reduce it, but long-term only law and garrisons provide a stable effect.
\n
\n
\n
\n\n
\n\n
\n
\n
\n \n
\n
\n
\n
Temp_div_test_2.hoi4
\n
Size: 43.2 MB • Version: 1.19+ • No Mods • All DLC
\n
\n
\n \n
\n
How to use? + \n
\n
\n Download the file and place it in Documents/Paradox Interactive/Hearts of Iron IV/save games. \n Launch the game and load the "Temp_div_test_2" save. \n For easier testing, open the console (~ key) and type ai to disable the AI. \n \n
\n
\n
\n
\n
VirusTotal Check
\n
\n
\n
\n
\n
\n
\n\n
\n \n
All templates are based on hundreds of hours of gameplay and mechanic analysis. I've tried to make this guide as practical and useful as possible so you can apply the knowledge in your campaigns right away. Hope you can now build divisions that bring you victory. Good luck on the front!
\n
Up to date for 2026, patch 1.19+, all DLC, single player.
\n
\n
"],"css":["* {\n box-sizing: border-box;\n margin: 0;\n padding: 0;\n}\n\nhtml, body {\n width: 100%;\n overflow-x: hidden !important;\n scroll-behavior: smooth;\n}\n\nbody {\n --bg-deep: #0d0c09;\n --gold-light: #f5d98b;\n --gold: #e2b660;\n --gold-dim: #b5943e;\n --green: #7aad7e;\n --green-glow: rgba(122, 173, 126, 0.5);\n --red: #c56a6a;\n --card-bg: rgba(22, 21, 18, 0.8);\n --card-border: rgba(226, 182, 96, 0.15);\n --text-primary: #f0ead8;\n --text-secondary: #c8c0a8;\n --text-muted: #908870;\n --shadow-gold: 0 0 20px rgba(226, 182, 96, 0.2);\n --shadow-card: 0 12px 28px rgba(0,0,0,0.6), 0 0 0 1px rgba(226,182,96,0.08);\n background: radial-gradient(ellipse at 50% 20%, rgba(226, 182, 96, 0.08) 0%, #0a0906 80%);\n background-attachment: fixed;\n color: #f0ead8;\n font-family: 'Segoe UI', 'Inter', system-ui, sans-serif;\n line-height: 1.6;\n -webkit-font-smoothing: antialiased;\n min-height: 100vh;\n position: relative;\n}\n\ncanvas#particles-canvas {\n position: fixed;\n top: 0;\n left: 0;\n width: 98%;\n height: 98%;\n z-index: -1;\n pointer-events: none;\n}\n\n.volunteer-guide {\n max-width: 1200px;\n margin: 0 auto;\n padding: 37.5px 25px;\n user-select: text;\n position: relative;\n z-index: 1;\n}\n\n.guide-tabs {\n position: sticky;\n top: 73px;\n display: flex;\n justify-content: center;\n flex-wrap: wrap;\n gap: 10px;\n background: rgba(12, 11, 8, 0.9);\n backdrop-filter: blur(20px);\n padding: 12.5px 12.5px;\n border-radius: 20px;\n border: 1px solid rgba(226, 182, 96, 0.35);\n box-shadow: 0 12px 40px rgba(0,0,0,0.8), 0 0 30px rgba(226,182,96,0.1), inset 0 1px 0 rgba(255,255,255,0.05);\n z-index: 1000;\n margin-bottom: 37.5px;\n}\n\n.guide-tab {\n background: transparent;\n border: 1px solid transparent;\n color: #b8b098;\n padding: 15px 27.5px;\n font-size: 15.9px;\n font-weight: 600;\n border-radius: 14px;\n cursor: pointer;\n transition: all 0.3s cubic-bezier(0.2, 0.9, 0.4, 1);\n white-space: nowrap;\n position: relative;\n overflow: hidden;\n text-align: center;\n min-width: 110px;\n letter-spacing: 0.3px;\n}\n\n.guide-tab::before {\n content: '';\n position: absolute;\n inset: 0;\n border-radius: 14px;\n padding: 1px;\n background: linear-gradient(135deg, transparent, rgba(226,182,96,0.6), transparent);\n -webkit-mask: linear-gradient(#fff 0 0) content-box, linear-gradient(#fff 0 0);\n mask: linear-gradient(#fff 0 0) content-box, linear-gradient(#fff 0 0);\n -webkit-mask-composite: xor;\n mask-composite: exclude;\n opacity: 0;\n transition: opacity 0.3s ease;\n}\n\n.guide-tab:hover::before { opacity: 0.8; }\n.guide-tab:hover {\n color: #f5e6c7;\n background: rgba(226, 182, 96, 0.12);\n text-shadow: 0 0 8px rgba(226,182,96,0.4);\n}\n\n.guide-tab.active {\n color: #f7e3a8;\n background: rgba(226, 182, 96, 0.2);\n border-color: rgba(226, 182, 96, 0.6);\n box-shadow: 0 0 30px rgba(226, 182, 96, 0.4), inset 0 0 15px rgba(226,182,96,0.15);\n text-shadow: 0 0 12px rgba(226,182,96,0.6);\n}\n.guide-tab.active::before { opacity: 1; background: linear-gradient(135deg, rgba(226,182,96,0.8), rgba(226,182,96,0.2), rgba(226,182,96,0.8)); }\n\n.tab-premium.active {\n border-color: rgba(226, 182, 96, 0.8);\n box-shadow: 0 0 40px rgba(226, 182, 96, 0.5), inset 0 0 20px rgba(226,182,96,0.25);\n}\n\n.tab-star {\n display: inline-block;\n font-size: 22px;\n margin-right: 6px;\n color: #e2b660;\n text-shadow: 0 0 18px rgba(226, 182, 96, 0.8);\n animation: starPulse 2s infinite ease-in-out;\n line-height: 1;\n position: relative;\n top: 2px;\n}\n@keyframes starPulse {\n 0% { text-shadow: 0 0 10px rgba(226, 182, 96, 0.6); transform: scale(1); }\n 50% { text-shadow: 0 0 24px rgba(226, 182, 96, 1); transform: scale(1.15); }\n 100% { text-shadow: 0 0 10px rgba(226, 182, 96, 0.6); transform: scale(1); }\n}\n\n.tab-panel { display: none; }\n.tab-panel.active { display: block; }\n\n.hero-card {\n background: linear-gradient(145deg, rgba(226, 182, 96, 0.18) 0%, rgba(20, 18, 13, 1) 100%);\n border: 1px solid rgba(226,182,96,0.35);\n border-radius: 28px;\n padding: 68.75px 50px;\n text-align: center;\n margin-bottom: 50px;\n position: relative;\n overflow: hidden;\n box-shadow: 0 25px 60px rgba(0,0,0,0.8), 0 0 50px rgba(226,182,96,0.15), inset 0 2px 0 rgba(255,255,255,0.05);\n backdrop-filter: blur(12px);\n}\n.hero-card::before {\n content: '';\n position: absolute;\n top: -80px; right: -80px;\n width: 300px; height: 300px;\n background: radial-gradient(circle, rgba(226,182,96,0.25) 0%, transparent 70%);\n border-radius: 50%; z-index: 0;\n}\n.hero-card::after {\n content: '';\n position: absolute;\n bottom: -80px; left: -80px;\n width: 280px; height: 280px;\n background: radial-gradient(circle, rgba(196, 152, 64, 0.15) 0%, transparent 70%);\n border-radius: 50%; z-index: 0;\n}\n.hero-badge {\n display: inline-block;\n background: rgba(226, 182, 96, 0.25);\n color: #f7e3a8;\n padding: 12.5px 35px;\n border-radius: 40px;\n font-size: 15.1px;\n font-weight: 600;\n margin-bottom: 27.5px;\n letter-spacing: 0.6px;\n backdrop-filter: blur(8px);\n border: 1px solid rgba(226, 182, 96, 0.5);\n box-shadow: 0 0 25px rgba(226,182,96,0.3);\n position: relative; z-index: 1;\n}\n.hero-title {\n font-size: 3.02rem;\n font-weight: 800;\n margin-bottom: 20px;\n color: #faeec8;\n line-height: 1.2;\n position: relative; z-index: 1;\n text-shadow: 0 4px 20px rgba(0,0,0,0.8), 0 0 50px rgba(226,182,96,0.3);\n}\n.hero-sub {\n font-size: 1.23rem;\n color: #d9d0b5;\n margin-bottom: 37.5px;\n position: relative; z-index: 1;\n font-weight: 400;\n text-shadow: 0 2px 10px rgba(0,0,0,0.6);\n}\n.hero-grid {\n display: flex;\n justify-content: center;\n gap: 62.5px;\n flex-wrap: wrap;\n margin-top: 37.5px;\n position: relative; z-index: 1;\n}\n.hero-stat {\n position: relative;\n flex: 1 1 0;\n min-width: 150px;\n text-align: center;\n border-radius: 20px;\n padding: 30px 20px;\n backdrop-filter: blur(10px);\n border: 1px solid rgba(226, 182, 96, 0.2);\n background: rgba(20, 18, 13, 0.5);\n transition: all 0.3s ease;\n box-shadow: 0 6px 18px rgba(0,0,0,0.6);\n}\n.hero-stat:hover {\n transform: translateY(-8px);\n border-color: rgba(226, 182, 96, 0.6);\n box-shadow: 0 12px 28px rgba(226,182,96,0.3), 0 16px 40px rgba(0,0,0,0.7);\n background: rgba(25, 22, 15, 0.7);\n}\n.hero-stat + .hero-stat::before {\n content: '';\n position: absolute;\n left: -31.25px; top: 20%; bottom: 20%;\n width: 1px;\n background: linear-gradient(to bottom, transparent, rgba(226,182,96,0.5), transparent);\n}\n.hero-stat-num {\n display: block;\n font-size: 2.46rem;\n font-weight: 700;\n color: #f5d78c;\n line-height: 1.2;\n margin-bottom: 10px;\n text-shadow: 0 0 20px rgba(226, 182, 96, 0.6);\n}\n.hero-stat-label {\n font-size: 0.95rem;\n color: #b0a890;\n font-weight: 500;\n}\n\n.cards-grid {\n display: grid;\n grid-template-columns: repeat(auto-fill, minmax(480px, 1fr));\n gap: 35px;\n margin-bottom: 50px;\n align-items: stretch;\n}\n.cards-grid--full { grid-template-columns: 1fr; width: 100%; }\n.cards-grid--fixed-2col { grid-template-columns: 1fr 1fr; }\n.full-width { grid-column: 1 / -1; }\n.center-single-card {\n display: grid;\n grid-template-columns: 1fr;\n max-width: 600px;\n margin: 0 auto 50px;\n justify-self: center;\n}\n\n.card {\n background: linear-gradient(160deg, rgba(30, 28, 22, 0.95) 0%, rgba(20, 18, 13, 0.98) 100%);\n border: 1px solid rgba(226, 182, 96, 0.2);\n border-radius: 22px;\n padding: 35px;\n box-shadow: var(--shadow-card);\n transition: all 0.35s ease;\n overflow: hidden;\n position: relative;\n backdrop-filter: blur(4px);\n}\n.card::after {\n content: '';\n position: absolute;\n top: 0; left: 0;\n width: 100%; height: 100%;\n background: radial-gradient(circle at 30% 10%, rgba(226,182,96,0.03), transparent 60%);\n pointer-events: none;\n}\n.card-animate {\n opacity: 0;\n transition: opacity 1.2s ease, transform 1.2s ease;\n}\n.card:hover {\n border-color: rgba(226, 182, 96, 0.5);\n box-shadow: 0 18px 40px rgba(0,0,0,0.8), 0 0 35px rgba(226,182,96,0.15);\n}\n.card-header {\n display: flex;\n align-items: center;\n justify-content: center;\n gap: 15px;\n margin-bottom: 27.5px;\n padding-bottom: 17.5px;\n border-bottom: 1px solid rgba(226, 182, 96, 0.25);\n}\n.card-header h2 {\n font-size: 1.80rem;\n font-weight: 700;\n color: #faeec8;\n margin: 0;\n text-shadow: 0 0 16px rgba(226,182,96,0.3);\n letter-spacing: 0.5px;\n}\n.card-icon {\n flex-shrink: 0;\n filter: drop-shadow(0 0 10px rgba(226, 182, 96, 0.6));\n transition: transform 0.3s ease;\n}\n.card-icon:hover { transform: rotate(-8deg) scale(1.2); }\n.card p {\n color: #c8c0a8;\n font-size: 16.1px;\n line-height: 1.75;\n margin-bottom: 20px;\n}\n.card h3 {\n font-size: 1.32rem;\n color: #e2b660;\n margin-bottom: 0.6em;\n text-shadow: 0 0 8px rgba(226,182,96,0.3);\n}\n\n.styled-list {\n list-style: none;\n padding: 0;\n}\n.styled-list li {\n background: rgba(35, 33, 26, 0.8);\n border: 1px solid rgba(226,182,96,0.2);\n border-radius: 10px;\n padding: 17.5px 22.5px;\n margin-bottom: 12.5px;\n color: #c0b898;\n font-size: 16.1px;\n transition: all 0.25s ease;\n backdrop-filter: blur(6px);\n line-height: 1.65;\n}\n.styled-list li:hover {\n background: rgba(50, 47, 37, 0.9);\n border-color: rgba(226,182,96,0.5);\n box-shadow: 0 0 20px rgba(226,182,96,0.15);\n}\n\n.doctrine-table {\n width: 100%;\n border-collapse: separate;\n border-spacing: 0 12.5px;\n margin: 27.5px 0;\n font-size: 14.2px;\n}\n.doctrine-table thead th {\n background: rgba(226, 182, 96, 0.2);\n color: #f5d78c;\n font-weight: 700;\n padding: 17.5px 20px;\n text-align: left;\n border-radius: 12px 12px 0 0;\n border: 1px solid rgba(226, 182, 96, 0.3);\n border-bottom: none;\n text-shadow: 0 0 8px rgba(226,182,96,0.3);\n}\n.doctrine-table tbody td {\n background: rgba(18, 17, 12, 0.9);\n color: #c8c0a8;\n padding: 15px 20px;\n border: 1px solid rgba(226, 182, 96, 0.15);\n border-top: none;\n transition: background 0.25s;\n}\n.doctrine-table tbody tr:first-child td { border-top: 1px solid rgba(226, 182, 96, 0.2); }\n.doctrine-table tbody tr:hover td {\n background: rgba(30, 28, 20, 0.95);\n border-color: rgba(226, 182, 96, 0.4);\n}\n\n.faq-accordion {\n border: 1px solid rgba(226,182,96,0.3);\n border-radius: 14px;\n overflow: hidden;\n background: rgba(18, 17, 12, 0.9);\n backdrop-filter: blur(8px);\n margin-top: 12.5px;\n box-shadow: 0 6px 18px rgba(0,0,0,0.6);\n}\n.faq-item { border-bottom: 1px solid rgba(226,182,96,0.2); }\n.faq-item:last-child { border-bottom: none; }\n.faq-question {\n background: none;\n border: none;\n width: 100%;\n text-align: left;\n padding: 20px 27.5px;\n display: flex;\n justify-content: space-between;\n align-items: center;\n color: #f0ead8;\n font-size: 16.1px;\n font-weight: 600;\n cursor: pointer;\n transition: background 0.25s ease;\n}\n.faq-question:hover { background: rgba(226,182,96,0.12); }\n.faq-answer {\n max-height: 0; overflow: hidden; opacity: 0;\n padding: 0 27.5px;\n color: #c0b898;\n transition: max-height 0.45s ease, opacity 0.45s ease, padding 0.45s ease;\n background: rgba(0,0,0,0.3);\n}\n.faq-item.open .faq-answer {\n max-height: 700px; opacity: 1; padding: 20px 27.5px;\n}\n.faq-icon {\n font-size: 25px; color: #e2b660;\n transition: transform 0.35s ease;\n filter: drop-shadow(0 0 6px rgba(226,182,96,0.5));\n}\n.faq-item.open .faq-icon { transform: rotate(45deg); }\n\n.cheats-block {\n border: 1px solid rgba(226,182,96,0.3);\n border-radius: 14px;\n overflow: hidden;\n background: rgba(18, 17, 12, 0.9);\n backdrop-filter: blur(8px);\n margin-top: 12.5px;\n box-shadow: 0 6px 18px rgba(0,0,0,0.6);\n}\n.cheats-toggle {\n background: none; border: none;\n width: 100%; text-align: left;\n padding: 20px 27.5px;\n display: flex; justify-content: space-between; align-items: center;\n color: #f0ead8; font-size: 16.1px; font-weight: 600;\n cursor: pointer; transition: background 0.25s ease;\n}\n.cheats-toggle:hover { background: rgba(226,182,96,0.12); }\n.cheats-content {\n max-height: 0; overflow: hidden; opacity: 0;\n padding: 0 27.5px;\n transition: max-height 0.45s ease, opacity 0.45s ease, padding 0.45s ease;\n background: rgba(0,0,0,0.3);\n}\n.cheats-block.open .cheats-content { max-height: 900px; opacity: 1; padding: 20px 27.5px; }\n.cheats-chevron {\n font-size: 25px; color: #e2b660;\n transition: transform 0.35s ease;\n filter: drop-shadow(0 0 6px rgba(226,182,96,0.5));\n}\n.cheats-block.open .cheats-chevron { transform: rotate(45deg); }\n.cheat-scroll {\n max-height: 900px; overflow-y: auto; padding-right: 10px;\n scrollbar-width: thin; scrollbar-color: #4a4a3a #0d0c09;\n}\n.cheat-scroll::-webkit-scrollbar { width: 6px; }\n.cheat-scroll::-webkit-scrollbar-track { background: #0d0c09; border-radius: 6px; }\n.cheat-scroll::-webkit-scrollbar-thumb { background: #4a4a3a; border-radius: 6px; }\n.cheat-scroll::-webkit-scrollbar-thumb:hover { background: #6b6b55; }\n.cheat-item {\n background: rgba(15, 14, 10, 0.9);\n border: 1px solid rgba(226,182,96,0.2);\n border-radius: 10px;\n padding: 15px 17.5px; margin-bottom: 10px;\n font-family: 'Cascadia Code', 'Fira Code', 'Consolas', monospace;\n font-size: 13.6px; color: #c9d1d9;\n transition: all 0.25s ease; backdrop-filter: blur(6px);\n}\n.cheat-item:hover { border-color: #e2b660; box-shadow: 0 0 18px rgba(226,182,96,0.2); }\n.cheat-desc { font-size: 12.5px; color: #8b949e; margin-bottom: 10px; display: block; }\n.cheat-row { display: flex; align-items: center; justify-content: space-between; gap: 17.5px; }\n.cheat-command { flex: 1; word-break: break-all; }\n.copy-btn {\n background: none; border: 1px solid #4a4a3a; border-radius: 8px;\n color: #9e9e8e; cursor: pointer; padding: 6.25px 15px;\n font-size: 13.6px; font-weight: 600; transition: all 0.25s ease; flex-shrink: 0;\n}\n.copy-btn:hover { background: #3d3d30; color: #f0ead8; border-color: #e2b660; box-shadow: 0 0 14px rgba(226,182,96,0.3); }\n.copy-btn.copied { color: #7aad7e; border-color: #7aad7e; background: rgba(122, 173, 126, 0.25); }\n\n.positive-value { color: #7aad7e; font-weight: 700; text-shadow: 0 0 8px rgba(122, 173, 126, 0.5); }\n.negative-value { color: #c56a6a; font-weight: 700; text-shadow: 0 0 6px rgba(200, 80, 80, 0.5); }\n.moderate-value { color: #d4a83c; font-weight: 700; text-shadow: 0 0 6px rgba(212, 168, 60, 0.5); }\n.accent { color: #e2b660; font-weight: 600; text-shadow: 0 0 8px rgba(226, 182, 96, 0.5); }\n\n.author-card {\n background: linear-gradient(145deg, #1f1d18 0%, #151410 100%);\n border: 1px solid rgba(226,182,96,0.3);\n border-radius: 22px;\n padding: 37.5px;\n text-align: center;\n margin-top: 50px;\n box-shadow: 0 14px 36px rgba(0,0,0,0.6), 0 0 28px rgba(226,182,96,0.08);\n backdrop-filter: blur(12px);\n}\n.author-card .card-header { justify-content: center; border-bottom: none; margin-bottom: 22.5px; }\n.author-date { color: #908870; font-size: 12.5px; margin-top: 15px; }\n\n.card-animate.visible { opacity: 1; transform: translateY(0); }\n.ripple {\n position: absolute; border-radius: 50%;\n background: rgba(226, 182, 96, 0.5);\n transform: scale(0); animation: ripple 0.6s linear;\n pointer-events: none;\n}\n@keyframes ripple { to { transform: scale(4); opacity: 0; } }\n\n.volunteer-guide a,\n.guide-link {\n color: #e2b660; text-decoration: none; font-weight: 600;\n border-bottom: 1px solid rgba(226, 182, 96, 0.4);\n transition: color 0.2s ease, border-color 0.2s ease, text-shadow 0.2s ease;\n}\n.volunteer-guide a:hover,\n.guide-link:hover {\n color: #f5d98b; border-bottom-color: #f5d98b;\n text-shadow: 0 0 8px rgba(226, 182, 96, 0.4);\n}\n\n.supply-subtabs {\n display: flex; flex-wrap: wrap; gap: 8px; margin-bottom: 20px;\n justify-content: center;\n border-bottom: 1px solid rgba(226, 182, 96, 0.2);\n padding-bottom: 15px;\n}\n.supply-subtab {\n background: transparent;\n border: 1px solid rgba(226, 182, 96, 0.18);\n color: #b8b098;\n padding: 6px 16px;\n font-size: 14px;\n font-weight: 600;\n border-radius: 8px;\n cursor: pointer;\n transition: all 0.25s ease;\n white-space: nowrap;\n}\n.supply-subtab:hover {\n color: #f5e6c7;\n background: rgba(226, 182, 96, 0.08);\n border-color: rgba(226, 182, 96, 0.4);\n}\n.supply-subtab.active {\n color: #f7e3a8;\n background: rgba(226, 182, 96, 0.18);\n border-color: rgba(226, 182, 96, 0.55);\n box-shadow: 0 0 10px rgba(226, 182, 96, 0.15);\n}\n.supply-table-container { display: none; }\n.supply-table-container.active { display: block; }\n\n.tier-list { margin-top: 15px; }\n.tier-row {\n display: flex; align-items: stretch; margin-bottom: 8px;\n border-radius: 8px; overflow: hidden;\n box-shadow: 0 4px 10px rgba(0,0,0,0.3);\n}\n.tier-label {\n width: 50px; display: flex; align-items: center; justify-content: center;\n font-size: 1.6rem; font-weight: 800; color: #fff; flex-shrink: 0;\n}\n.tier-s .tier-label { background: #c49840; color: #1a1814; }\n.tier-g .tier-label { background: #6f9b7a; }\n.tier-r .tier-label { background: #5a8ab5; }\n.tier-b .tier-label { background: #8b7355; }\n.tier-items {\n padding: 10px 14px; background: rgba(15, 14, 12, 0.8);\n backdrop-filter: blur(4px); flex: 1;\n display: flex; flex-wrap: wrap; gap: 6px; align-items: center;\n}\n.tier-tag {\n display: inline-flex; align-items: center;\n padding: 4px 12px; border-radius: 16px;\n font-size: 14.4px; font-weight: 500; white-space: nowrap;\n border: 1px solid transparent; transition: all 0.2s ease;\n}\n.tier-tag:hover { transform: translateY(-1px); box-shadow: 0 2px 8px rgba(0,0,0,0.4); }\n.tier-tag-s { background: rgba(196, 152, 64, 0.15); color: #e0c880; border-color: rgba(196, 152, 64, 0.3); }\n.tier-tag-g { background: rgba(111, 155, 122, 0.15); color: #c0e6c8; border-color: rgba(111, 155, 122, 0.3); }\n.tier-tag-r { background: rgba(90, 138, 181, 0.15); color: #b8d8f0; border-color: rgba(90, 138, 181, 0.3); }\n.tier-tag-b { background: rgba(139, 115, 85, 0.15); color: #e0d0c0; border-color: rgba(139, 115, 85, 0.3); }\n\n.hq-selector {\n display: flex; justify-content: center; flex-wrap: wrap; gap: 8px;\n margin: 24px 0 28px; z-index: 999; position: relative;\n}\n.hq-tab {\n background: none; border: 1px solid rgba(226, 182, 96, 0.3);\n color: #b8b098; padding: 10px 22px; font-size: 15px;\n font-weight: 600; border-radius: 10px; cursor: pointer;\n transition: all 0.25s ease; white-space: nowrap;\n}\n.hq-tab:hover { color: #f0ead8; background: rgba(226, 182, 96, 0.08); }\n.hq-tab.active {\n color: #e2b660; background: rgba(226, 182, 96, 0.14);\n border-color: rgba(226, 182, 96, 0.5);\n box-shadow: 0 0 18px rgba(226, 182, 96, 0.15);\n}\n.hq-panels { margin-bottom: 20px; }\n.hq-panel { display: none; animation: fadeIn 0.3s ease; }\n.hq-panel.active { display: block; }\n@keyframes fadeIn {\n from { opacity: 0; transform: translateY(10px); }\n to { opacity: 1; transform: translateY(0); }\n}\n\n.card-img {\n display: block; max-width: 100%; height: auto;\n margin: 20px auto 0; border-radius: 8px;\n border: 1px solid rgba(226, 182, 96, 0.2);\n}\n.modal-img { cursor: zoom-in; }\n.table-icon {\n max-width: 50px; max-height: 50px;\n vertical-align: middle; margin-right: 6px;\n object-fit: contain;\n}\n\n.interactive-svg {\n margin-top: 20px;\n border-radius: 16px;\n border: 1px solid rgba(226, 182, 96, 0.2);\n background: #0f0f0d;\n}\n.interactive-svg title { pointer-events: none; }\n\n.stats-grid {\n display: flex;\n gap: 30px;\n flex-wrap: wrap;\n margin-top: 20px;\n}\n.stats-column {\n flex: 1 1 280px;\n background: rgba(18, 17, 12, 0.6);\n border-radius: 14px;\n padding: 18px;\n border: 1px solid rgba(226, 182, 96, 0.15);\n}\n.stats-column h3 {\n text-align: center;\n margin-bottom: 16px;\n color: #e2b660;\n font-size: 1.2rem;\n}\n.stats-list {\n list-style: none;\n padding: 0;\n text-align: center;\n}\n.stats-list li {\n margin-bottom: 10px;\n}\n.stat-name {\n position: relative;\n cursor: help;\n color: #c8c0a8;\n font-size: 15px;\n font-weight: 500;\n border-bottom: 1px dotted rgba(226, 182, 96, 0.3);\n display: inline-block;\n}\n.stat-name:hover {\n color: #f0ead8;\n border-bottom-color: #e2b660;\n}\n\n.custom-tooltip {\n position: fixed;\n background: #1a1a14;\n color: #f0ead8;\n padding: 8px 14px;\n border-radius: 8px;\n font-size: 13px;\n white-space: normal;\n max-width: 280px;\n width: max-content;\n border: 1px solid rgba(226, 182, 96, 0.5);\n box-shadow: 0 8px 24px rgba(0,0,0,0.8);\n z-index: 9999;\n pointer-events: none;\n line-height: 1.4;\n opacity: 0;\n transition: opacity 0.15s ease;\n}\n.custom-tooltip.show {\n opacity: 1;\n}\n\n.template-selector {\n display: flex;\n flex-wrap: wrap;\n gap: 8px;\n margin-bottom: 20px;\n justify-content: center;\n}\n\n.save-grid {\n display: flex;\n gap: 2rem;\n align-items: flex-start;\n flex-wrap: wrap;\n}\n\n.save-file-info {\n flex: 1 1 35%;\n min-width: 240px;\n}\n\n.save-file-details {\n margin-bottom: 1.5rem;\n}\n\n.save-file-name {\n font-size: 1.4rem;\n font-weight: 700;\n color: #faeec8;\n margin-bottom: 0.3rem;\n}\n\n.save-file-meta {\n font-size: 0.9rem;\n color: #908870;\n margin-bottom: 1.5rem;\n}\n\n.save-btn {\n display: inline-flex;\n align-items: center;\n gap: 0.5rem;\n background: rgba(226, 182, 96, 0.15);\n border: 1px solid rgba(226, 182, 96, 0.4);\n color: #f0ead8;\n font-weight: 600;\n font-size: 1rem;\n padding: 12px 28px;\n border-radius: 12px;\n text-decoration: none;\n transition: all 0.25s ease;\n cursor: pointer;\n margin-bottom: 1.8rem;\n}\n\n.save-btn:hover {\n background: rgba(226, 182, 96, 0.25);\n border-color: rgba(226, 182, 96, 0.7);\n box-shadow: 0 0 24px rgba(226, 182, 96, 0.3);\n color: #fff;\n}\n\n.instruction-block {\n margin-top: 0;\n}\n\n.save-virustotal {\n flex: 1 1 60%;\n min-width: 300px;\n text-align: center;\n}\n\n.save-virustotal p {\n margin-bottom: 0.8rem;\n font-weight: 600;\n color: #b8b098;\n}\n\n.save-virustotal img {\n max-width: 100%;\n height: auto;\n border-radius: 10px;\n border: 1px solid rgba(226, 182, 96, 0.2);\n}\n\n.interactive-screenshot {\n position: relative;\n width: 100%;\n max-width: 800px;\n margin: 20px auto 0;\n border-radius: 12px;\n overflow: hidden;\n border: 1px solid rgba(226, 182, 96, 0.25);\n box-shadow: 0 12px 30px rgba(0,0,0,0.6);\n}\n\n.interactive-screenshot-img {\n display: block;\n width: 100%;\n height: auto;\n}\n\n.hotspot {\n position: absolute;\n background: transparent;\n border-radius: 6px;\n cursor: help;\n transition: background 0.2s ease, box-shadow 0.2s ease;\n z-index: 2;\n}\n\n.hotspot:hover {\n background: rgba(226, 182, 96, 0.15);\n box-shadow: 0 0 0 2px rgba(226, 182, 96, 0.4);\n}\n\n@media (max-width: 768px) {\n .guide-tabs {\n position: static;\n margin-bottom: 25px;\n flex-wrap: nowrap;\n overflow-x: auto;\n white-space: nowrap;\n justify-content: flex-start;\n gap: 7.5px;\n padding: 10px 10px;\n -webkit-overflow-scrolling: touch;\n }\n\n\n .guide-tab {\n font-size: 13.2px;\n padding: 12.5px 20px;\n min-width: auto;\n flex-shrink: 0;\n }\n .hero-card { padding: 40px 20px; border-radius: 20px; }\n .hero-title { font-size: 1.9rem; }\n .hero-sub { font-size: 0.95rem; }\n .hero-grid { gap: 25px; }\n .hero-stat { min-width: 120px; padding: 20px 12.5px; }\n .hero-stat + .hero-stat::before { display: none; }\n .hero-stat-num { font-size: 1.9rem; }\n .hero-stat-label { font-size: 0.85rem; }\n .cards-grid,\n .cards-grid--fixed-2col,\n .cards-grid--full,\n .center-single-card {\n grid-template-columns: 1fr;\n max-width: 100%;\n margin: 0 0 40px 0;\n gap: 25px;\n }\n .full-width { grid-column: 1 / -1; }\n .card { padding: 25px; overflow-x: auto; overflow-y: visible; }\n .card-header h2 { font-size: 1.42rem; word-break: break-word; }\n .card p { font-size: 14.2px; }\n .styled-list li { font-size: 14.2px; padding: 15px; }\n .doctrine-table {\n display: block;\n width: 100%;\n overflow-x: auto;\n -webkit-overflow-scrolling: touch;\n border-spacing: 0 8px;\n margin: 20px 0;\n }\n .doctrine-table thead,\n .doctrine-table tbody,\n .doctrine-table tr,\n .doctrine-table th,\n .doctrine-table td { white-space: nowrap; }\n .doctrine-table tbody td { padding: 10px 12px; }\n .doctrine-table thead th { padding: 12px 12px; }\n .supply-subtabs {\n flex-wrap: nowrap;\n overflow-x: auto;\n justify-content: flex-start;\n padding-bottom: 10px;\n -webkit-overflow-scrolling: touch;\n }\n .supply-subtab { font-size: 12px; padding: 6px 12px; white-space: nowrap; flex-shrink: 0; }\n .checklist-items { column-count: 1; }\n .faq-question { font-size: 15px; padding: 15px 20px; }\n .faq-answer { padding: 0 20px; }\n .faq-item.open .faq-answer { padding: 15px 20px; }\n .cheats-toggle { font-size: 15px; padding: 15px 20px; }\n .cheats-content { padding: 0 20px; }\n .cheats-block.open .cheats-content { padding: 15px 20px; }\n .cheat-item { font-size: 12px; padding: 12px; }\n .copy-btn { padding: 4px 12px; font-size: 12px; }\n .card-img { max-width: 100%; height: auto; }\n .card svg { max-width: 100%; height: auto; }\n .author-card { padding: 25px; }\n .hq-row { gap: 8px; }\n .hq-slot { font-size: 12px; padding: 8px 12px; min-width: 80px; }\n .hq-slot.main-slot { min-width: 130px; }\n .hq-tab { font-size: 13px; padding: 8px 12px; }\n .tier-label { width: 40px; font-size: 1.4rem; }\n .tier-items { padding: 8px 10px; }\n .tier-tag { font-size: 13px; padding: 3px 10px; }\n .stats-grid { gap: 20px; }\n .stats-column { flex: 1 1 100%; }\n .save-grid {\n flex-direction: column;\n }\n .save-file-info,\n .save-virustotal {\n flex: 1 1 100%;\n min-width: 100%;\n }\n .save-virustotal img {\n max-width: 100%;\n height: auto;\n }\n}\n\n.template-modal-overlay {\n position: fixed;\n inset: 0;\n background: rgba(0, 0, 0, 0.85);\n backdrop-filter: blur(8px);\n display: flex;\n align-items: center;\n justify-content: center;\n z-index: 9999;\n cursor: pointer;\n}\n\n.template-modal-content {\n position: relative;\n max-width: 90vw;\n max-height: 90vh;\n overflow: auto;\n background: #1a1915;\n border: 1px solid rgba(226, 182, 96, 0.4);\n border-radius: 12px;\n padding: 16px;\n box-shadow: 0 25px 60px rgba(0, 0, 0, 0.9);\n display: flex;\n flex-direction: column;\n align-items: center;\n}\n\n.template-modal-content img {\n max-width: 100%;\n height: auto;\n display: block;\n border-radius: 4px;\n}\n\n.template-modal-close {\n align-self: flex-end;\n font-size: 32px;\n color: #e2b660;\n cursor: pointer;\n line-height: 1;\n margin-bottom: 8px;\n transition: color 0.2s;\n}\n\n.template-modal-close:hover {\n color: #f5d98b;\n}\n\n@keyframes fadeInUp {\n 0% { opacity: 0; transform: translateY(20px); }\n 100% { opacity: 1; transform: translateY(0); }\n}\n@keyframes fadeOut {\n 0% { opacity: 1; transform: translateY(0); }\n 100% { opacity: 0; transform: translateY(-10px); }\n}\n.template-fade-in {\n animation: fadeInUp 0.4s ease forwards;\n}\n.template-fade-out {\n animation: fadeOut 0.25s ease forwards;\n}"],"js":["(function () {\n 'use strict';\n\n if (!document.getElementById('guide-styles')) {\n var style = document.createElement('style');\n style.id = 'guide-styles';\n style.textContent =\n '.template-modal-overlay{position:fixed;inset:0;background:rgba(0,0,0,0.85);backdrop-filter:blur(8px);display:flex;align-items:center;justify-content:center;z-index:9999;cursor:pointer}' +\n '.template-modal-content{position:relative;max-width:90vw;max-height:90vh;overflow:auto;background:#1a1915;border:1px solid rgba(226,182,96,0.4);border-radius:12px;padding:16px;box-shadow:0 25px 60px rgba(0,0,0,0.9);display:flex;flex-direction:column;align-items:center}' +\n '.template-modal-content img{max-width:100%;height:auto;display:block;border-radius:4px}' +\n '.template-modal-close{align-self:flex-end;font-size:32px;color:#e2b660;cursor:pointer;line-height:1;margin-bottom:8px;transition:color 0.2s}' +\n '.template-modal-close:hover{color:#f5d98b}' +\n '@keyframes fadeInUp{0%{opacity:0;transform:translateY(20px)}100%{opacity:1;transform:translateY(0)}}' +\n '@keyframes fadeOut{0%{opacity:1;transform:translateY(0)}100%{opacity:0;transform:translateY(-10px)}}' +\n '.template-fade-in{animation:fadeInUp 0.4s ease forwards}' +\n '.template-fade-out{animation:fadeOut 0.25s ease forwards}' +\n '.custom-tooltip{position:fixed;background:#1a1a14;color:#f0ead8;padding:8px 14px;border-radius:8px;font-size:13px;white-space:normal;max-width:280px;width:max-content;border:1px solid rgba(226,182,96,0.5);box-shadow:0 8px 24px rgba(0,0,0,0.8);z-index:9999;pointer-events:none;line-height:1.4;opacity:0;transition:opacity 0.15s ease}' +\n '.custom-tooltip.show{opacity:1}';\n document.head.appendChild(style);\n }\n\n function initParticles() {\n var canvas = document.getElementById('particles-canvas');\n if (!canvas || canvas.dataset.initialized === 'true') return;\n canvas.dataset.initialized = 'true';\n var ctx = canvas.getContext('2d');\n var particles = [];\n var maxParticles = 28;\n var mouseX = window.innerWidth / 2;\n var mouseY = window.innerHeight / 2;\n\n function resizeCanvas() {\n canvas.width = window.innerWidth;\n canvas.height = window.innerHeight;\n initParticleArray();\n }\n\n var goldColors = [\n 'rgba(226,182,96,0.30)',\n 'rgba(196,152,64,0.35)',\n 'rgba(212,168,84,0.25)',\n 'rgba(180,140,50,0.28)'\n ];\n\n function drawEagle(x, y, size, color, angle) {\n ctx.save();\n ctx.translate(x, y);\n ctx.rotate(angle);\n ctx.strokeStyle = color;\n ctx.lineWidth = 0.7;\n ctx.lineCap = 'round';\n var s = size * 0.25;\n ctx.beginPath();\n ctx.arc(0, -s, s * 0.8, 0.2, Math.PI - 0.2);\n ctx.stroke();\n ctx.beginPath();\n ctx.moveTo(s * 0.5, -s * 1.2);\n ctx.lineTo(0, -s * 0.6);\n ctx.lineTo(-s * 0.5, -s * 1.2);\n ctx.stroke();\n ctx.beginPath();\n ctx.moveTo(0, -s * 0.6);\n ctx.quadraticCurveTo(0, s * 0.2, 0, s * 1.2);\n ctx.stroke();\n ctx.beginPath();\n ctx.moveTo(-s * 0.8, s * 0.2);\n ctx.quadraticCurveTo(-s * 1.5, 0, -s * 1.2, s * 0.8);\n ctx.stroke();\n ctx.beginPath();\n ctx.moveTo(s * 0.8, s * 0.2);\n ctx.quadraticCurveTo(s * 1.5, 0, s * 1.2, s * 0.8);\n ctx.stroke();\n ctx.restore();\n }\n\n function Particle() { this.init(); }\n\n Particle.prototype.init = function () {\n this.x = Math.random() * canvas.width;\n this.y = Math.random() * canvas.height;\n this.size = Math.random() * 24 + 16;\n this.baseSpeedX = (Math.random() - 0.5) * 0.12;\n this.baseSpeedY = (Math.random() - 0.5) * 0.12;\n this.rotationSpeed = (Math.random() - 0.5) * 0.004;\n this.angle = Math.random() * Math.PI * 2;\n this.opacity = Math.random() * 0.7 + 0.3;\n this.pulseSpeed = Math.random() * 0.005 + 0.002;\n this.pulseOffset = Math.random() * Math.PI * 2;\n this.color = goldColors[Math.floor(Math.random() * goldColors.length)];\n this.time = 0;\n };\n\n Particle.prototype.update = function () {\n var dx = mouseX - canvas.width / 2;\n var dy = mouseY - canvas.height / 2;\n this.speedX = this.baseSpeedX + dx * 0.00015;\n this.speedY = this.baseSpeedY + dy * 0.00015;\n this.x += this.speedX;\n this.y += this.speedY;\n this.angle += this.rotationSpeed;\n this.time += this.pulseSpeed;\n if (this.x < -this.size * 2) this.x = canvas.width + this.size;\n if (this.x > canvas.width + this.size * 2) this.x = -this.size;\n if (this.y < -this.size * 2) this.y = canvas.height + this.size;\n if (this.y > canvas.height + this.size * 2) this.y = -this.size;\n };\n\n Particle.prototype.draw = function () {\n var pulse = 0.5 + 0.5 * Math.sin(this.time + this.pulseOffset);\n var alpha = this.opacity * (0.6 + 0.4 * pulse);\n ctx.globalAlpha = alpha;\n drawEagle(this.x, this.y, this.size, this.color, this.angle);\n ctx.globalAlpha = 1;\n };\n\n function initParticleArray() {\n particles = [];\n for (var i = 0; i < maxParticles; i++) particles.push(new Particle());\n }\n\n function animate() {\n ctx.clearRect(0, 0, canvas.width, canvas.height);\n for (var i = 0; i < particles.length; i++) {\n particles[i].update();\n particles[i].draw();\n }\n for (var i = 0; i < particles.length; i++) {\n for (var j = i + 1; j < particles.length; j++) {\n var dx = particles[i].x - particles[j].x;\n var dy = particles[i].y - particles[j].y;\n var dist = Math.sqrt(dx * dx + dy * dy);\n if (dist < 140) {\n var alpha = (1 - dist / 140) * 0.08;\n ctx.beginPath();\n ctx.moveTo(particles[i].x, particles[i].y);\n ctx.lineTo(particles[j].x, particles[j].y);\n ctx.strokeStyle = 'rgba(196,152,64,' + alpha + ')';\n ctx.lineWidth = 0.3;\n ctx.stroke();\n }\n }\n }\n requestAnimationFrame(animate);\n }\n\n window.addEventListener('resize', function () {\n resizeCanvas();\n initParticleArray();\n });\n window.addEventListener('mousemove', function (e) {\n mouseX = e.clientX;\n mouseY = e.clientY;\n });\n resizeCanvas();\n initParticleArray();\n animate();\n }\n\n var tooltip = null;\n function createTooltip() {\n if (tooltip) return;\n tooltip = document.createElement('div');\n tooltip.className = 'custom-tooltip';\n document.body.appendChild(tooltip);\n }\n function showTooltip(text, anchor) {\n createTooltip();\n tooltip.textContent = text;\n tooltip.classList.add('show');\n var rect = anchor.getBoundingClientRect();\n var vw = window.innerWidth;\n var vh = window.innerHeight;\n var left = rect.left + rect.width / 2;\n var top = rect.top - 10;\n var tw = tooltip.offsetWidth;\n var th = tooltip.offsetHeight;\n if (left + tw / 2 > vw - 10) left = vw - tw - 10;\n else if (left - tw / 2 < 10) left = 10;\n else left -= tw / 2;\n if (top - th < 10) top = rect.bottom + 10;\n else top -= th;\n tooltip.style.left = Math.max(10, left) + 'px';\n tooltip.style.top = Math.max(10, top) + 'px';\n }\n function hideTooltip() {\n if (tooltip) tooltip.classList.remove('show');\n }\n function initTooltips() {\n document.addEventListener('mouseover', function(e) {\n var target = e.target.closest('.stat-name, .hotspot');\n if (!target) return;\n var text = target.getAttribute('data-tooltip');\n if (text) showTooltip(text, target);\n });\n document.addEventListener('mouseout', function(e) {\n var target = e.target.closest('.stat-name, .hotspot');\n if (target && target.getAttribute('data-tooltip')) hideTooltip();\n });\n document.addEventListener('touchstart', function(e) {\n var target = e.target.closest('.stat-name, .hotspot');\n if (!target) { hideTooltip(); return; }\n var text = target.getAttribute('data-tooltip');\n if (text) {\n e.preventDefault();\n if (tooltip && tooltip.classList.contains('show') && tooltip.textContent === text) {\n hideTooltip();\n } else {\n showTooltip(text, target);\n }\n }\n }, { passive: false });\n }\n\n function switchMainTab(targetTabId) {\n var panels = document.querySelectorAll('.tab-panel');\n var tabs = document.querySelectorAll('.guide-tab');\n for (var i = 0; i < panels.length; i++) panels[i].classList.remove('active');\n for (var j = 0; j < tabs.length; j++) tabs[j].classList.remove('active');\n var panel = document.getElementById(targetTabId);\n var tab = document.querySelector('.guide-tab[data-tab="' + targetTabId + '"]');\n if (panel) panel.classList.add('active');\n if (tab) tab.classList.add('active');\n }\n\n function updateHash(targetTabId) {\n if (history.replaceState) history.replaceState(null, null, '#' + targetTabId);\n else location.hash = targetTabId;\n }\n\n function activateTabFromHash() {\n var hash = location.hash.replace('#', '');\n if (hash) {\n var tab = document.querySelector('.guide-tab[data-tab="' + hash + '"]');\n if (tab) {\n switchMainTab(hash);\n return;\n }\n }\n var firstTab = document.querySelector('.guide-tab.active') || document.querySelector('.guide-tab');\n if (firstTab) {\n var target = firstTab.getAttribute('data-tab');\n if (target) switchMainTab(target);\n }\n }\n\n function switchSubTab(subtab, card) {\n var subtabs = card.querySelectorAll('.supply-subtab');\n var containers = card.querySelectorAll('.supply-table-container');\n for (var i = 0; i < subtabs.length; i++) subtabs[i].classList.remove('active');\n for (var j = 0; j < containers.length; j++) containers[j].classList.remove('active');\n subtab.classList.add('active');\n var targetId = subtab.getAttribute('data-subtab');\n if (targetId) {\n var container = card.querySelector('#subtab-' + targetId);\n if (container) container.classList.add('active');\n }\n }\n\n function switchHqTab(hqId, card) {\n var panels = card.querySelectorAll('.hq-panel');\n var tabs = card.querySelectorAll('.hq-tab');\n for (var i = 0; i < panels.length; i++) panels[i].classList.remove('active');\n for (var j = 0; j < tabs.length; j++) tabs[j].classList.remove('active');\n var panel = card.querySelector('#hq-' + hqId);\n var tab = card.querySelector('.hq-tab[data-hq="' + hqId + '"]');\n if (panel) panel.classList.add('active');\n if (tab) tab.classList.add('active');\n }\n\n function openImageModal(src) {\n var existing = document.querySelector('.template-modal-overlay');\n if (existing) existing.remove();\n var overlay = document.createElement('div');\n overlay.className = 'template-modal-overlay';\n overlay.innerHTML = '
× ';\n document.body.appendChild(overlay);\n }\n\n function addRippleEffect() {\n document.addEventListener('click', function (e) {\n var tab = e.target.closest('.guide-tab');\n if (!tab) return;\n var ripple = document.createElement('span');\n ripple.className = 'ripple';\n var rect = tab.getBoundingClientRect();\n var size = Math.max(rect.width, rect.height);\n ripple.style.width = ripple.style.height = size + 'px';\n ripple.style.left = (e.clientX - rect.left - size / 2) + 'px';\n ripple.style.top = (e.clientY - rect.top - size / 2) + 'px';\n tab.appendChild(ripple);\n ripple.addEventListener('animationend', function () { ripple.remove(); });\n });\n }\n\n function animateValue(element, start, end, duration, prefix, suffix) {\n var startTime = performance.now();\n function update(currentTime) {\n var elapsed = currentTime - startTime;\n var progress = Math.min(elapsed / duration, 1);\n var current = start + (end - start) * progress;\n if (end < 1000 && Number.isInteger(end)) element.textContent = prefix + Math.floor(current) + suffix;\n else element.textContent = prefix + current.toFixed(1).replace(/\\.0$/, '') + suffix;\n if (progress < 1) requestAnimationFrame(update);\n else element.textContent = prefix + end + suffix;\n }\n requestAnimationFrame(update);\n }\n\n function parseHeroStat(el) {\n var text = el.textContent.trim();\n var matchNum = text.match(/^([^0-9]*?)(\\d+\\.?\\d*)(.*)/);\n if (matchNum) {\n return {\n prefix: matchNum[1],\n number: parseFloat(matchNum[2]),\n suffix: matchNum[3]\n };\n }\n return { prefix: '', number: 0, suffix: '' };\n }\n\n function initHeroCountUp() {\n var stats = document.querySelectorAll('.hero-stat-num');\n for (var i = 0; i < stats.length; i++) {\n var parsed = parseHeroStat(stats[i]);\n if (parsed.number > 0) {\n stats[i].style.visibility = 'visible';\n animateValue(stats[i], 0, parsed.number, 750, parsed.prefix, parsed.suffix);\n }\n }\n }\n\n function typeWriter(element, text, speed, delay) {\n var i = 0;\n element.textContent = '';\n function type() {\n if (i < text.length) {\n element.textContent += text.charAt(i);\n i++;\n setTimeout(type, speed);\n }\n }\n setTimeout(type, delay || 0);\n }\n\n function initTypewriter() {\n var heroSub = document.querySelector('.hero-sub');\n if (heroSub) typeWriter(heroSub, heroSub.textContent.trim(), 7, 200);\n }\n\n document.addEventListener('click', function (e) {\n var guideTab = e.target.closest('.guide-tab');\n if (guideTab) {\n var target = guideTab.getAttribute('data-tab');\n if (target) {\n switchMainTab(target);\n updateHash(target);\n }\n return;\n }\n\n var faqTrigger = e.target.closest('.faq-question');\n if (faqTrigger) {\n var faqItem = faqTrigger.closest('.faq-item');\n if (faqItem) faqItem.classList.toggle('open');\n return;\n }\n\n var cheatsTrigger = e.target.closest('.cheats-toggle');\n if (cheatsTrigger) {\n var cheatsBlock = cheatsTrigger.closest('.cheats-block');\n if (cheatsBlock) cheatsBlock.classList.toggle('open');\n return;\n }\n\n var supplySubtab = e.target.closest('.supply-subtab');\n if (supplySubtab) {\n var card = supplySubtab.closest('.card');\n if (card) switchSubTab(supplySubtab, card);\n return;\n }\n\n var hqTab = e.target.closest('.hq-tab');\n if (hqTab) {\n var card = hqTab.closest('.card');\n var hqId = hqTab.getAttribute('data-hq');\n if (card && hqId) switchHqTab(hqId, card);\n return;\n }\n\n var modalImg = e.target.closest('.modal-img');\n if (modalImg) {\n e.preventDefault();\n e.stopPropagation();\n openImageModal(modalImg.src);\n return;\n }\n\n var modalClose = e.target.closest('.template-modal-close');\n var modalOverlay = e.target.closest('.template-modal-overlay');\n if (modalClose || (modalOverlay && e.target === modalOverlay)) {\n var overlay = document.querySelector('.template-modal-overlay');\n if (overlay) overlay.remove();\n return;\n }\n\n var copyBtn = e.target.closest('.copy-btn');\n if (copyBtn) {\n var command = copyBtn.getAttribute('data-command');\n if (command) {\n var originalHTML = copyBtn.innerHTML;\n var onCopied = function () {\n copyBtn.classList.add('copied');\n copyBtn.innerHTML = '✓';\n setTimeout(function () {\n copyBtn.classList.remove('copied');\n copyBtn.innerHTML = originalHTML;\n }, 1500);\n };\n if (navigator.clipboard && navigator.clipboard.writeText) {\n navigator.clipboard.writeText(command).then(onCopied).catch(function () {\n fallbackCopy(command, onCopied);\n });\n } else {\n fallbackCopy(command, onCopied);\n }\n function fallbackCopy(text, callback) {\n var ta = document.createElement('textarea');\n ta.value = text;\n ta.style.position = 'fixed';\n ta.style.left = '-9999px';\n document.body.appendChild(ta);\n ta.select();\n document.execCommand('copy');\n document.body.removeChild(ta);\n callback();\n }\n }\n return;\n }\n });\n\n document.addEventListener('keydown', function (e) {\n if (e.key === 'Escape') {\n var overlay = document.querySelector('.template-modal-overlay');\n if (overlay) overlay.remove();\n }\n });\n\n function init() {\n initParticles();\n addRippleEffect();\n initHeroCountUp();\n initTypewriter();\n activateTabFromHash();\n initTooltips();\n }\n\n if (document.readyState === 'loading') {\n document.addEventListener('DOMContentLoaded', init);\n } else {\n init();\n }\n})();"]}
{"html":[" \n \n \n General \n For Beginners \n Designer Breakdown \n Stats Breakdown \n Combat Width \n Battalions \n Support Companies \n Regimental Support \n Modernization & XP \n Garrisons & Resistance \n ★ Ready Meta Templates \n ★ Test Save \n \n\n \n \n Guide • Divisions • All DLC • Single Player \n Complete Division Guide \n How divisions work, what their stats depend on, and how to build a template you won't be ashamed to show the enemy. \n \n +88.7% Manpower Retention \n +83.5% Soft Attack \n +98.9% Breakthrough \n \n \n \n \n What is a Division? \n A division is a combat organism where infantry, tanks, and artillery act as a single fist. Without it, you can neither attack nor hold positions — just scattered chaos. A division turns resources into victory: it deals damage, holds the front, and gets amplified by support. Without divisions, you have no army — just doomed detachments. In the game, you can only manage battalions, companies, and regiments within a division. The division is the only controllable land warfare unit in the game. \n \n \n What Makes Up a Division? \n The hierarchy is simple: battalions are the core, companies are their building blocks, and regimental support are amplifiers. Support (arty, recon, engineers, medics, logistics) doesn't win battles outright but multiplies efficiency in specific conditions — without them, a division loses many valuable buffs. \n Example: building the designer is like constructing a house: battalions are the walls, companies and regiments are the roof and windows, and without a solid foundation (stat balance) the house collapses at the first hit. \n \n \n How Does Research Affect Them? \n Research unlocks access to battalions, companies, and regimental support: without the required technology (for example, "Heavy Tanks" or "Rocket Artillery"), you won't be able to add them to a template. It also improves key parameters and provides modifications that change division effectiveness. The deeper you research a branch, the more support options become available, including critical ones like the medium improved howitzer. To see what a particular research provides, just hover over it in the tree — the game will show everything. However, not all research does this. For example, "Improved Infantry Equipment I" only gives buffs, not access to anything new in the designer. \n Example: to add a heavy regiment, you must first research "Support Weapons I". \n \n \n \n Frequently Asked Questions \n \n What are "soft attack" and "hard attack"? + Soft attack is anti-personnel firepower against soft targets, i.e., infantry. Hard attack is anti-tank firepower against armor, e.g., tanks. \n Which is better, SPGs or tanks? + For minors, tanks; for majors, SPGs. The reason is that minors rarely can afford strong infantry templates, so you need to take the "Field Engineer Works" branch in the artillery and support doctrine. A major, thanks to its powerful industry (see industry guide ), can afford solid infantry, so it makes sense to take the "Self-Propelled Support" branch, which buffs SPGs. Still, it depends on the situation. If the enemy has only infantry and you have the industry, a minor could also go for SPGs without the doctrine. \n Infantry holds, tanks push? + In general, yes, but if you cannot afford armor as a minor, you can build strong offensive infantry templates and attack with them. \n What are the best sub-doctrines? + It all depends on the situation. You can find a detailed breakdown of doctrines and sub-doctrines in our doctrine guide . There you can find setups for your situation, view a tier list, and understand how doctrines work in this game. \n Does battalion placement in columns affect combat stats? + No, it does not. However, it's recommended to build regiments of 3 battalions — only then can you add regimental support. If you have fewer than 3 battalions, the game won't let you add regimental support. \n What is more important, soft attack or breakthrough? + Both matter in their own way. Without soft attack, you won't deal enough damage to enemy infantry, and without breakthrough, you won't be able to block damage and will quickly lose organization. The best approach is to mix SPGs and tanks — then you'll have both good breakthrough and good soft attack. \n What is more important, hard attack or piercing? + Piercing. Piercing allows you to penetrate enemy armor, while hard attack is the actual damage. If you lack piercing, the enemy will simply block part of your damage. \n When should I put AT and AA in divisions? + Almost never against the AI, with a few exceptions. AT is necessary against a tank power, like Germany. AA is needed when the enemy has overwhelming air superiority. Usually, this is required either in multiplayer or when facing a total defense scenario. \n Why does artillery in a division tank organization so much? + Artillery battalions have low organization compared to infantry. Since a division's organization is the average of all its battalions, adding artillery lowers the overall number. \n What's the difference between breakthrough and defense? + Breakthrough is defense while attacking. Defense is defense while defending. The higher your defense, the more enemy attacks you can fend off, meaning you lose less organization during combat. \n \n \n \n Template Comparison \n \n Stat Without Guide With Guide \n \n Soft Attack 54 74 \n Hard Attack 8 12 \n Defense 162 219 \n Breakthrough 26 43 \n Armor 0 19 \n Air Attack 0 20 \n Combat Width 12 18 \n Organization 47 48 \n \n \n \n \n \n\n \n \n \n What Beginners Need to Know \n To build divisions effectively, you must master five key concepts: combat width , the difference between breakthrough and soft attack , the role of organization , the impact of research , and supply consumption . Without understanding these fundamentals, even expensive templates will lose. Start with theory, then move to practice in the designer. \n \n How does combat width work? + Combat width is the limit on how many divisions can fight on a single tile. More details in the "Combat Width" tab. \n What's the difference between breakthrough and soft attack? + Soft attack is the damage dealt to infantry, while breakthrough is the ability to block enemy attacks when on the offensive. \n How does organization affect combat? + Organization is the "HP" of a division. When it reaches zero, the division is forced to retreat. \n How does research affect stats? + Improved weapons and equipment boost the base stats of battalions and unlock new types of support. \n How does supply consumption affect logistics? + The higher the consumption, the harder it is to supply a tile with divisions, which leads to penalties (more in the supply guide ). \n \n \n \n Recommended Learning Order \n \n First, understand what a division is and what it consists of. \n Then learn about organization and the other key stats (soft attack, breakthrough, defense, piercing). \n After that, find out how soft/hard attack differs from breakthrough. \n Only then move to advanced settings: specific regiments, balancing against a particular enemy, and terrain optimization. \n \n \n \n Main Rules for Beginners \n \n 1) Infantry holds the front, tanks break through. Don't make infantry expensive; focus on tanks. \n 2) Organization is more important than any other stat. 30-40 for tanks, 45-50 for infantry. \n 3) The lower the supply consumption, the better. SPGs and artillery require a lot of supply (see supply guide ). \n 4) Support companies are gold. Engineers, artillery, and recon are must-haves. \n 5) Don't forget terrain bonuses. Recon, flame tanks, and engineers improve the situation. \n 6) Keep priority research branches in focus. \n \n \n \n Common Beginner Mistakes \n \n 1) Adding everything and too much. Organization drops, the division becomes expensive. Make 1-3 specialized templates. \n 2) Using unnecessary components in single player. AT and AA are often not needed against the AI. \n 3) Making infantry divisions too large. 14/4 or 40 width for a defensive division is expensive and inefficient. Keep them compact. Infantry in HoI4 is for defense, not offense (see defense guide ). \n 4) Using starter templates for minors. They are often inefficient; adjust them to your industry. \n 5) Ignoring combat width and organization. These are the two most important stats. \n 6) Skimping on support companies or adding all of them. For defense, 2-4 companies are enough. \n \n \n \n Divisions in Action – Example \n This video shows just how drastically a template changes effectiveness. Losses with the meta template are 88.7% lower. \n \n \n \n \n \n \n\n \n \n \n Interactive Designer \n Hover over elements on the screenshot to see an explanation. More details about UI elements in the game interface guide . \n \n \n \n \n \n \n \n \n \n \n \n \n\n \n \n \n Stat List \n Hover over a stat name for a detailed explanation. \n \n \n Base Parameters \n \n Max Speed (km/h) \n HP \n Organization \n Recovery Rate \n Reconnaissance \n Suppression \n Weight \n Supply Use \n Average Reliability \n Reliability Bonus \n Casualty Trickleback \n Experience Loss \n \n \n \n Combat Parameters \n \n Soft Attack \n Hard Attack \n Air Attack \n Defense \n Breakthrough \n Armor \n Piercing \n Initiative \n Entrenchment \n Equipment Capture Ratio \n Combat Width \n \n \n \n Cost \n \n Manpower \n Training Time \n Fuel Capacity \n Fuel Consumption \n Other Equipment \n \n \n \n \n \n Stat Tier List \n This is the author's subjective opinion. Stats are rated by importance in a division. \n \n \n S \n \n Max Speed \n Organization \n Supply Use \n Soft Attack \n Breakthrough \n Defense \n Equip. Capture Ratio \n Combat Width \n \n \n \n A \n \n HP \n Hard Attack \n Air Attack \n Armor \n Piercing \n Initiative \n Manpower \n \n \n \n B \n \n Recovery Rate \n Reconnaissance \n Average Reliability \n Reliability Bonus \n Casualty Trickleback \n Experience Loss \n Entrenchment \n Fuel Consumption \n \n \n \n F \n \n Suppression \n Weight \n Training Time \n Fuel Capacity \n \n \n \n \n \n \n\n \n \n What Is Combat Width? Combat width is the amount of space available for fighting during a battle. If your division exceeds a tile's limit, part of it won't fit, and your attack or defense will be weakened. Commonly referred to as CW. The limit depends on terrain and determines how many divisions can fight effectively at once. \n How Does CW Affect Combat? Exceeding the limit gives divisions a penalty to soft/hard attack, breakthrough, and defense. The larger the overage, the weaker your punch. Additionally, divisions that don't fit into the battle gain no experience. Example: attacking on plains (limit 80) with three 30-width divisions results in a 10 overage — roughly a 19% penalty to effectiveness. \n What Are the Best CWs? For defensive infantry: 10, 12, 14, 16, 18. For offensive infantry: 14, 15, 20, 36. For armored divisions: 20, 36. The choice depends on terrain and objectives. \n Best Terrain for Offensives Plains and desert are ideal. Forests, jungles, hills, and cities impose moderate penalties. Mountains and marshes are hellish — avoid them. Use appropriate division types: mountain troops in mountains, rangers in forests, marines for naval invasions. For maximum offensive efficiency, check out the meta offensive guide . \n \n Terrain Table \n \n View Name Attack Penalty Supply Notes Recommendation \n \n Plains none no penalties Ideal for offensives Attack with tanks \n Forest -15% -8% Slows advance Attack with infantry \n Hills -25% -10% Advantage for defenders Tanks struggle but better than forest \n Mountains -50% -12% Almost impassable without special forces Only mountain troops \n Urban -30% +20% Excellent defense Encircle first, then push \n Jungle -30% -16% High disease chance Avoid, or use rangers \n Marsh -40% -16% Awful, second only to mountains Encircle, then crush \n Desert none -14% Equipment attrition Almost perfect for tanks, but supply suffers \n \n \n \n \n \n\n \n \n What Is a Battalion? A battalion is the foundation, the skeleton of any division. It's the battalions that define its role: infantry holds the line, tanks break through, artillery deals damage. Each battalion contains 500 to 1200 soldiers with weapons. Changing the battalions completely changes the division's purpose. \n \n What Types of Battalions Are There? \n Infantry (regular infantry, paratroopers, rangers) — 4 km/h speed, boosts organization and defense. \n Tank support battalions (TDs, SPAAs, SPGs) — armored firepower, require an equipment designer template. \n Combat support battalions (towed artillery, AA guns) — boost infantry but lower organization. \n Mobile battalions (truck-towed artillery) — 12 km/h speed, suitable for fast divisions. \n Mobile infantry battalions (motorized, mechanized) — fast infantry for tank divisions. \n Tank battalions (light, medium, heavy) — the core of armored forces, boost breakthrough and armor. I don't recommend heavies. \n \n Why Is the Battalion the Most Important? Without battalions, companies and regiments are pointless. It's the infantry holding rifles and the tanks smashing through the front that decide the battle. Battalions are also the only element that affects a division's combat width. \n Best Battalions Infantry battalion (infantry core), motorized (for tank divisions), cavalry (rapid deployment and garrisons), artillery (soft attack), medium tanks and SPGs (versatile damage), TDs/SPAAs (for multiplayer or specialized roles). For the best tank templates, read the meta tank templates guide . \n \n Battalion Table \n \n Infantry \n Tank Support \n Mobile Support \n Support \n Mobile \n Tanks \n \n \n \n Icon Name Description \n \n Infantry Core of the infantry division. \n Mountaineers Used in mountains. \n Marines Used for naval invasions. \n Rangers Used in forests and jungles. \n Paratroopers Deployed from the air. \n \n \n \n \n \n Icon Name Description \n \n SPAA For adding armor or countering air power. \n SPG For offensive armored divisions. \n TD Against a tank power in multiplayer. \n \n \n \n \n \n Icon Name Description \n \n Motorized AA When the enemy has total air superiority. \n Motorized AT When the enemy has many tanks. \n Motorized Artillery If organization and industry allow. \n Towed Rocket Artillery For motorized divisions if organization and industry allow. \n Motorized Rocket Artillery Upgraded version, for motorized divisions with good industry. \n \n \n \n \n \n Icon Name Description \n \n AA In infantry divisions when enemy has air superiority. \n AT In infantry divisions when enemy has many tanks. \n Artillery For infantry divisions if industry and organization allow. \n Rocket Artillery Late-game alternative to artillery. Use if organization allows. \n \n \n \n \n \n Icon Name Description \n \n Amphibious Battalion For divisions doing naval invasions. \n Armored Car For niche templates. \n Cavalry For garrisons or cheesing. \n Mechanized Infantry For offensive divisions in the late game. \n Motorized Infantry For offensive divisions in the early-to-mid game. \n \n \n \n \n \n Icon Name Description \n \n Amphibious Tank For naval invasions and river crossings. \n Light Tank Very early war periods. \n Medium Tank Best tank — put in all offensive divisions. \n Heavy Tank Useless, but can be fun to use. \n Modern Tank Useless, but can be fun to put in tank divisions. \n \n \n \n \n \n \n\n \n \n What Is a Support Company? A special unit that assists the division from the rear, not fighting directly. It doesn't consume combat width but provides powerful bonuses: engineers boost defense, recon finds weaknesses, support artillery adds extra punch. It's the most cost-effective way to improve a division. \n What Types of Companies Are There? Direct fire support (artillery, rocket artillery, AT, AA, flame tanks), reconnaissance (horse, motorized, armored), and rear services (engineers, maintenance, hospitals, logistics). Each plays a role: firepower, intel, or supply. \n Why Are Companies Necessary? Without support companies, a division loses a significant portion of its effectiveness. Tank divisions without flame tanks suffer on poor terrain, infantry without engineers defends and assaults forts worse. A few well-chosen companies turn an average template into a combat-ready one. \n Best Companies Engineer company (terrain buffs, defense), support artillery (soft attack), armored recon (breakthrough, speed), medium flame support (terrain attack), AA/AT situationally. These provide the biggest boost to combat power. \n \n Company Table \n \n Icon Name Buff Cost Notes \n \n Support AA Boosts air attack 20 AA When enemy has air superiority. \n Support AT Boosts hard attack & piercing 24 AT When enemy has many tanks. \n Support Artillery Boosts soft attack 12 Artillery Put in all divisions. \n Support Rocket Artillery Boosts soft attack 12 Rockets Late-game option. \n Engineer Company Terrain buffs, defense 30 Sup. Eq., 10 Rifles Every division. \n Armored Recon Terrain buffs, breakthrough 24 Light Tanks Best recon for offensive divisions. \n Medium Flame Company Terrain buffs, attack 15 Flame Tanks Only medium, for tank divisions. \n Field Hospital Reduces manpower losses 20 Trucks, 30 Sup. Eq. For offensive infantry divisions. \n Logistics Company Reduces supply use 10 Trucks, 20 Sup. Eq. For offensive divisions with many SPGs. \n Super Heavy Artillery Boosts soft attack 3 Super Heavy Art. For mega-majors, for infantry. \n SP Super Heavy Artillery Boosts soft attack 3 SP Super Heavy Art. Useless. \n Land Cruiser Depends on designer 1 Land Cruiser Useless. \n Super Heavy Tank Depends on designer 20 Super Heavy Tanks Useless. \n Horse Recon Detachment Terrain buffs, recon 40 Rifles, 10 Sup. Eq. For infantry in the early game. \n Assault Engineer Company Terrain buffs, breakthrough for infantry 20 Sup. Eq., 20 Armored Cars (Support) Rarely used, situational. \n Armored Engineer Company Terrain buffs, defense & breakthrough 30 Armored Cars (Support), 15 Sup. Eq. Decent for majors. \n Medical Evacuation Helicopter Reduces losses, speeds recovery 15 Helicopters, 15 Trucks, 30 Sup. Eq. Useless. \n Helicopter Brigade Recovery rate, supply use, recovery 15 Helicopters, 15 Sup. Eq. Almost always useless. \n Helicopter Recon Terrain buffs, soft attack for inf, defense for all 20 Helicopters, 20 Rifles, 10 Sup. Eq. Almost always useless. \n Cargo Helicopters Reduces supply use, terrain buffs 10 Helicopters, 10 Rifles, 20 Sup. Eq. Almost always useless. \n Maintenance Company Boosts equipment capture & reliability 25 Sup. Eq. Usually useless, but a minor can use it against a tank power. \n Armored Maintenance Company Boosts equipment capture & reliability 20 Armored Cars (Support), 15 Sup. Eq. Useless. \n Military Police Boosts defense, recovery rate, suppression 40 Rifles, 10 Sup. Eq. Situational, majors can use for garrisons. \n Motorized Military Police Boosts defense, recovery rate, suppression 20 Inf. Eq., 20 Motorcycles, 5 Sup. Eq. Situational. \n Motorized Recon Terrain buffs, defense 40 Rifles, 20 Trucks, 10 Sup. Eq. Worst recon. \n Light Armored Recon Terrain buffs, breakthrough 24 Armored Cars Makes no sense. \n Signal Company Boosts initiative 10 Trucks, 20 Sup. Eq. Suitable if you focus on initiative. \n Armored Signal Company Boosts initiative, breakthrough for tanks 20 Armored Cars (Support), 15 Sup. Eq. Often useless. \n \n \n \n \n \n \n \n \n What Is Regimental Support? Direct combat support: machine guns, infantry guns, AA, AT. Cheaper than support companies but also weaker. Mostly used by majors since it requires spare organization. Regiments provide purely combat buffs, unlike the more versatile companies. \n What Types of Regiments Are There? Regular (attached to infantry), motorized (to motorized), and armored (SPAA, TD — to tanks). The type determines what speed and bonuses the division gets: armored support rides with tanks, regular walks with infantry. \n Why Are Regiments Needed? Regiments directly boost battalions, increasing attack or defense. Their main distinction is they don't provide terrain or logistics buffs — only combat stats. Ideal when you need to seal a breakthrough or reinforce a defense but have spare organization. \n Best Regiments Regimental rocket battery (soft attack), heavy regiment (defense), infantry guns (cheap soft attack), AA/AT situationally. Armored SPAAs and TDs are good in multiplayer or against a strong opponent. \n \n Regiment Table \n \n Icon Name Boosts Cost Recommendation \n \n Infantry Guns Soft Attack 4 Artillery All divisions. \n Rocket Artillery Support Soft Attack 4 Rockets Late game, all divisions. \n AA Battery Air Attack 12 AA When enemy air force is strong. \n AT Battery Hard Attack, Piercing 16 AT When enemy tank forces are strong. \n Heavy Regiment Defense 30 Rifles, 5 Sup. Eq. Infantry and tanks, if organization allows. \n Motorized Heavy Regiment Defense 5 Trucks, 5 Sup. Eq., 30 Rifles Almost useless. Sometimes for tank divisions with high org. \n Light / Medium / Heavy SPAA Air Attack (depends on designer) Depends on designer In multiplayer against strong majors. \n Light / Medium / Heavy TD Hard Attack, Piercing Depends on designer In multiplayer against strong majors. \n \n \n \n \n \n\n \n \n What's the Deal with XP? Division experience gives huge bonuses to combat stats: veterans (level 5) get +75%. The best way to grind XP is in the Spanish Civil War (see Spanish Civil War guide ), where losses are low and fighting is constant. Send volunteers there and don't let them sit idle. \n How to Gain XP? Divisions must participate in combat. The ideal spot is the Spanish Civil War: years of fighting, minimal losses. In your own wars, grinding is harder due to high casualties and rapid battles, so it's best to grow veterans beforehand. \n What About Modernization? You can switch the composition of a veteran division while keeping its XP. The main rule: the manpower count of the new template must not be lower than the old one. Otherwise, veterans get diluted with rookies and the level drops. \n How to Modernize Correctly? Create a junk template with a large manpower pool, grind it in Spain, then swap battalions to tank/artillery ones while keeping the same manpower. This way you get veteran tankers without spending fuel on training tank divisions. \n \n Experience Level Table \n \n \n \n Icon \n Level \n Name \n Combat Stat Modifier \n \n \n \n 1 Green -25% \n 2 Trained 0% \n 3 Regular +25% (last level achievable without combat) \n 4 Seasoned +50% \n 5 Veteran +75% \n \n \n \n \n \n\n \n \n What Are Garrisons? Garrisons automatically occupy captured territory, suppressing resistance. If you leave the standard infantry template, losses in manpower and equipment will be huge. Always switch garrisons to the cheapest template — 1 cavalry or 1 light tank battalion. \n Best Garrison Templates An empty template with just 1 cavalry (very cheap, available to all) or 1 light tank (more expensive but fewer losses). Never use full divisions — it's a waste of resources. \n What Is Resistance? Locals sabotage your occupation: they destroy buildings, damage garrisons, and worsen supply. At 30%+ resistance, losses become critical and the region requires constant repairs. Resistance grows if the law is too soft or there aren't enough garrisons. \n How to Lower Resistance? The best way is a suitable occupation law. Focuses, advisors, events, and agency operations also help. You can temporarily reduce it, but long-term only law and garrisons provide a stable effect. \n \n Occupation Law Table \n \n Icon Name Resistance Compliance Garrisons \n \n No Garrison +40% - -100% \n Civilian Oversight - - -25% \n Local Police Force -15% -0.025% -35% \n Secret Police -30% -0.040% -15% \n Military Governor -35% -0.045% - \n Martial Law -60% -0.055% - \n Forced Labor -40% -0.080% +15% \n Harsh Quotas -40% -0.080% +15% \n Brutal Oppression -75% -0.110% +25% \n \n \n \n \n \n\n \n \n \n Ready Meta Templates \n Pick a category to see a proven template and an in-game screenshot. \n \n Armored \n Infantry \n Special Forces \n Garrison | Ports \n \n \n \n \n Mixed | 36 CW \n Tank | 36 CW \n SPG | 36 CW \n Mixed | 20 CW \n Tank | 20 CW \n SPG | 20 CW \n \n \n Mixed Offensive Armored Template (36 CW) \n Description: Ideal for majors, combines breakthrough and soft attack. \n Battalions: 10 motorized, 4 medium tanks, 4 medium SPGs. \n Support Companies: artillery | engineers | armored recon | logistics | medium flame tank. \n Regimental Support: — \n \n \n \n Tank Offensive Armored Template (36 CW) \n Description: Focus on traditional tank breakthrough. \n Battalions: 10 motorized, 8 medium tanks. \n Support Companies: artillery | engineers | armored recon | rocket artillery (if available) | medium flame tank. \n Regimental Support: — \n \n \n \n SPG Offensive Armored Template (36 CW) \n Description: Maximum soft attack, requires "Self-Propelled Support" doctrine. \n Battalions: 10 motorized, 8 medium SPGs. \n Support Companies: artillery | engineers | armored recon | logistics | medium flame tank. \n Regimental Support: — \n \n \n \n Simplified Mixed Armored Template (20 CW) \n Description: For weaker majors or strong minors. \n Battalions: 5 motorized, 2 medium tanks, 3 medium SPGs. \n Support Companies: artillery | engineers | armored recon | medium flame tank. \n Regimental Support: — \n \n \n \n Simplified Tank Armored Template (20 CW) \n Description: Breakthrough on a budget. \n Battalions: 5 motorized, 5 medium tanks. \n Support Companies: artillery | engineers | armored recon | medium flame tank. \n Regimental Support: — \n \n \n \n Simplified SPG Armored Template (20 CW) \n Description: Soft attack over breakthrough, use with care. \n Battalions: 5 motorized, 5 medium SPGs. \n Support Companies: artillery | engineers | armored recon | medium flame tank | logistics. \n Regimental Support: — \n \n \n \n\n \n \n Offensive 15/2 (36 CW) \n Armored 36 CW \n Offensive 7/2 (20 CW) \n Armored 18 CW \n Defensive 18 CW \n Defensive 16 CW \n Versatile 15 CW \n Offensive 14 CW (Majors) \n Defensive 14 CW (Minors) \n \n \n Unarmored Offensive Infantry (15/2, 36 CW) \n Description: For minors who can't afford tanks. \n Battalions: 15 infantry, 2 artillery. \n Support Companies: engineers | artillery | rocket artillery (if avail.) | field hospital | horse recon. \n Regimental Support: 2 rocket artillery (if avail.) \n \n \n \n Armored Offensive Infantry (36 CW) \n Description: Armor and high soft attack for weaker majors. \n Battalions: 12 infantry, 6 medium SPGs. \n Support Companies: artillery | engineers | rocket artillery | field hospital. \n Regimental Support: — \n \n \n \n Offensive Infantry (7/2, 20 CW) \n Description: An accessible offensive template for minors. \n Battalions: 7 infantry, 2 artillery. \n Support Companies: engineers | artillery | horse recon. \n Regimental Support: — \n \n \n \n Armored Infantry 18 CW with Cheap SPAA \n Description: A bit of armor at minimal cost, holds defense well. \n Battalions: 8 infantry, 1 light SPAA. \n Support Companies: artillery | horse recon | engineers. \n Regimental Support: — \n \n \n \n Defensive Infantry 18 CW (for Majors) \n Description: Cheap and reliably holds the front. \n Battalions: 9 infantry. \n Support Companies: engineers | artillery | horse recon. \n Regimental Support: — \n \n \n \n Defensive Infantry 16 CW (Weaker Majors / Minors) \n Description: Saves resources while keeping a stable front. \n Battalions: 8 infantry. \n Support Companies: engineers | artillery | horse recon. \n Regimental Support: — \n \n \n \n Versatile Infantry 15 CW \n Description: For defense and cautious attacks — perfect for minors and early game. \n Battalions: 6 infantry, 1 artillery. \n Support Companies: engineers | artillery | horse recon. \n Regimental Support: — \n \n \n \n Offensive Infantry 14 CW (for Majors) \n Description: A heavy offensive fist with massive soft attack. \n Battalions: 7 infantry. \n Support Companies: engineers | horse recon | artillery | rocket artillery | super heavy artillery. \n Regimental Support: — \n \n \n \n Defensive Infantry 14 CW (for Minors) \n Description: Maximum economy while holding the line. \n Battalions: 7 infantry. \n Support Companies: engineers | horse recon | artillery. \n Regimental Support: — \n \n \n \n\n \n \n Marines | 16 CW \n Rangers | 16 CW \n Mountaineers | 16 CW \n Paratroopers | 16 CW \n \n \n Marines (16 CW) \n Description: For naval invasions and coastal combat. \n Battalions: 8 marines. \n Support Companies: artillery | engineers | horse recon. \n Regimental Support: — \n \n \n \n Rangers (16 CW) \n Description: For forests, jungles, and marshes. \n Battalions: 8 rangers. \n Support Companies: artillery | engineers | horse recon. \n Regimental Support: — \n \n \n \n Mountaineers (16 CW) \n Description: For assaulting mountain ranges and hills. \n Battalions: 8 mountaineers. \n Support Companies: artillery | engineers | horse recon. \n Regimental Support: — \n \n \n \n Paratroopers (16 CW) \n Description: For drops behind enemy lines, capturing key points. \n Battalions: 8 paratroopers. \n Support Companies: engineers | horse recon. \n Regimental Support: — \n \n \n \n\n \n \n Port Infantry | 12 CW \n Port Infantry | 10 CW \n Cavalry Garrison | 2 CW \n Light Tank Garrison | 2 CW \n \n \n Port Infantry 12 CW \n Description: Cheap, can delay naval invasions. \n Battalions: 6 infantry. \n Support Companies: engineers. \n Regimental Support: — \n \n \n \n Port Infantry 10 CW \n Description: Minimal cost, minimal port defense. \n Battalions: 5 infantry. \n Support Companies: engineers. \n Regimental Support: — \n \n \n \n Cavalry Garrison / Cheesing (2 CW) \n Description: Super cheap template for suppressing resistance or rapid deployment. \n Battalions: 1 cavalry. \n Support Companies: — \n Regimental Support: — \n \n \n \n Light Tank Garrison (2 CW) \n Description: Slightly more expensive than cavalry, adds a bit of armor and suppression. \n Battalions: 1 light tank (cheapest design possible). \n Support Companies: — \n Regimental Support: — \n \n \n \n \n \n \n \n\n \n \n \n \n \n Test Save \n \n \n \n \n Temp_div_test_2.hoi4 \n Size: 43.2 MB • Version: 1.19+ • No Mods • All DLC \n \n \n \n Download Save\n \n \n How to use? + \n \n \n Download the file and place it in Documents/Paradox Interactive/Hearts of Iron IV/save games . \n Launch the game and load the "Temp_div_test_2" save. \n For easier testing, open the console (~ key) and type ai to disable the AI. \n \n \n \n \n \n VirusTotal Check \n \n \n \n \n \n \n\n \n From the Author \n All templates are based on hundreds of hours of gameplay and mechanic analysis. I've tried to make this guide as practical and useful as possible so you can apply the knowledge in your campaigns right away. Hope you can now build divisions that bring you victory. Good luck on the front! \n Up to date for 2026, patch 1.19+, all DLC, single player. \n \n "],"css":["* {\n box-sizing: border-box;\n margin: 0;\n padding: 0;\n}\n\nhtml, body {\n width: 100%;\n overflow-x: hidden !important;\n scroll-behavior: smooth;\n}\n\nbody {\n --bg-deep: #0d0c09;\n --gold-light: #f5d98b;\n --gold: #e2b660;\n --gold-dim: #b5943e;\n --green: #7aad7e;\n --green-glow: rgba(122, 173, 126, 0.5);\n --red: #c56a6a;\n --card-bg: rgba(22, 21, 18, 0.8);\n --card-border: rgba(226, 182, 96, 0.15);\n --text-primary: #f0ead8;\n --text-secondary: #c8c0a8;\n --text-muted: #908870;\n --shadow-gold: 0 0 20px rgba(226, 182, 96, 0.2);\n --shadow-card: 0 12px 28px rgba(0,0,0,0.6), 0 0 0 1px rgba(226,182,96,0.08);\n background: radial-gradient(ellipse at 50% 20%, rgba(226, 182, 96, 0.08) 0%, #0a0906 80%);\n background-attachment: fixed;\n color: #f0ead8;\n font-family: 'Segoe UI', 'Inter', system-ui, sans-serif;\n line-height: 1.6;\n -webkit-font-smoothing: antialiased;\n min-height: 100vh;\n position: relative;\n}\n\ncanvas#particles-canvas {\n position: fixed;\n top: 0;\n left: 0;\n width: 98%;\n height: 98%;\n z-index: -1;\n pointer-events: none;\n}\n\n.volunteer-guide {\n max-width: 1200px;\n margin: 0 auto;\n padding: 37.5px 25px;\n user-select: text;\n position: relative;\n z-index: 1;\n}\n\n.guide-tabs {\n position: sticky;\n top: 73px;\n display: flex;\n justify-content: center;\n flex-wrap: wrap;\n gap: 10px;\n background: rgba(12, 11, 8, 0.9);\n backdrop-filter: blur(20px);\n padding: 12.5px 12.5px;\n border-radius: 20px;\n border: 1px solid rgba(226, 182, 96, 0.35);\n box-shadow: 0 12px 40px rgba(0,0,0,0.8), 0 0 30px rgba(226,182,96,0.1), inset 0 1px 0 rgba(255,255,255,0.05);\n z-index: 1000;\n margin-bottom: 37.5px;\n}\n\n.guide-tab {\n background: transparent;\n border: 1px solid transparent;\n color: #b8b098;\n padding: 15px 27.5px;\n font-size: 15.9px;\n font-weight: 600;\n border-radius: 14px;\n cursor: pointer;\n transition: all 0.3s cubic-bezier(0.2, 0.9, 0.4, 1);\n white-space: nowrap;\n position: relative;\n overflow: hidden;\n text-align: center;\n min-width: 110px;\n letter-spacing: 0.3px;\n}\n\n.guide-tab::before {\n content: '';\n position: absolute;\n inset: 0;\n border-radius: 14px;\n padding: 1px;\n background: linear-gradient(135deg, transparent, rgba(226,182,96,0.6), transparent);\n -webkit-mask: linear-gradient(#fff 0 0) content-box, linear-gradient(#fff 0 0);\n mask: linear-gradient(#fff 0 0) content-box, linear-gradient(#fff 0 0);\n -webkit-mask-composite: xor;\n mask-composite: exclude;\n opacity: 0;\n transition: opacity 0.3s ease;\n}\n\n.guide-tab:hover::before { opacity: 0.8; }\n.guide-tab:hover {\n color: #f5e6c7;\n background: rgba(226, 182, 96, 0.12);\n text-shadow: 0 0 8px rgba(226,182,96,0.4);\n}\n\n.guide-tab.active {\n color: #f7e3a8;\n background: rgba(226, 182, 96, 0.2);\n border-color: rgba(226, 182, 96, 0.6);\n box-shadow: 0 0 30px rgba(226, 182, 96, 0.4), inset 0 0 15px rgba(226,182,96,0.15);\n text-shadow: 0 0 12px rgba(226,182,96,0.6);\n}\n.guide-tab.active::before { opacity: 1; background: linear-gradient(135deg, rgba(226,182,96,0.8), rgba(226,182,96,0.2), rgba(226,182,96,0.8)); }\n\n.tab-premium.active {\n border-color: rgba(226, 182, 96, 0.8);\n box-shadow: 0 0 40px rgba(226, 182, 96, 0.5), inset 0 0 20px rgba(226,182,96,0.25);\n}\n\n.tab-star {\n display: inline-block;\n font-size: 22px;\n margin-right: 6px;\n color: #e2b660;\n text-shadow: 0 0 18px rgba(226, 182, 96, 0.8);\n animation: starPulse 2s infinite ease-in-out;\n line-height: 1;\n position: relative;\n top: 2px;\n}\n@keyframes starPulse {\n 0% { text-shadow: 0 0 10px rgba(226, 182, 96, 0.6); transform: scale(1); }\n 50% { text-shadow: 0 0 24px rgba(226, 182, 96, 1); transform: scale(1.15); }\n 100% { text-shadow: 0 0 10px rgba(226, 182, 96, 0.6); transform: scale(1); }\n}\n\n.tab-panel { display: none; }\n.tab-panel.active { display: block; }\n\n.hero-card {\n background: linear-gradient(145deg, rgba(226, 182, 96, 0.18) 0%, rgba(20, 18, 13, 1) 100%);\n border: 1px solid rgba(226,182,96,0.35);\n border-radius: 28px;\n padding: 68.75px 50px;\n text-align: center;\n margin-bottom: 50px;\n position: relative;\n overflow: hidden;\n box-shadow: 0 25px 60px rgba(0,0,0,0.8), 0 0 50px rgba(226,182,96,0.15), inset 0 2px 0 rgba(255,255,255,0.05);\n backdrop-filter: blur(12px);\n}\n.hero-card::before {\n content: '';\n position: absolute;\n top: -80px; right: -80px;\n width: 300px; height: 300px;\n background: radial-gradient(circle, rgba(226,182,96,0.25) 0%, transparent 70%);\n border-radius: 50%; z-index: 0;\n}\n.hero-card::after {\n content: '';\n position: absolute;\n bottom: -80px; left: -80px;\n width: 280px; height: 280px;\n background: radial-gradient(circle, rgba(196, 152, 64, 0.15) 0%, transparent 70%);\n border-radius: 50%; z-index: 0;\n}\n.hero-badge {\n display: inline-block;\n background: rgba(226, 182, 96, 0.25);\n color: #f7e3a8;\n padding: 12.5px 35px;\n border-radius: 40px;\n font-size: 15.1px;\n font-weight: 600;\n margin-bottom: 27.5px;\n letter-spacing: 0.6px;\n backdrop-filter: blur(8px);\n border: 1px solid rgba(226, 182, 96, 0.5);\n box-shadow: 0 0 25px rgba(226,182,96,0.3);\n position: relative; z-index: 1;\n}\n.hero-title {\n font-size: 3.02rem;\n font-weight: 800;\n margin-bottom: 20px;\n color: #faeec8;\n line-height: 1.2;\n position: relative; z-index: 1;\n text-shadow: 0 4px 20px rgba(0,0,0,0.8), 0 0 50px rgba(226,182,96,0.3);\n}\n.hero-sub {\n font-size: 1.23rem;\n color: #d9d0b5;\n margin-bottom: 37.5px;\n position: relative; z-index: 1;\n font-weight: 400;\n text-shadow: 0 2px 10px rgba(0,0,0,0.6);\n}\n.hero-grid {\n display: flex;\n justify-content: center;\n gap: 62.5px;\n flex-wrap: wrap;\n margin-top: 37.5px;\n position: relative; z-index: 1;\n}\n.hero-stat {\n position: relative;\n flex: 1 1 0;\n min-width: 150px;\n text-align: center;\n border-radius: 20px;\n padding: 30px 20px;\n backdrop-filter: blur(10px);\n border: 1px solid rgba(226, 182, 96, 0.2);\n background: rgba(20, 18, 13, 0.5);\n transition: all 0.3s ease;\n box-shadow: 0 6px 18px rgba(0,0,0,0.6);\n}\n.hero-stat:hover {\n transform: translateY(-8px);\n border-color: rgba(226, 182, 96, 0.6);\n box-shadow: 0 12px 28px rgba(226,182,96,0.3), 0 16px 40px rgba(0,0,0,0.7);\n background: rgba(25, 22, 15, 0.7);\n}\n.hero-stat + .hero-stat::before {\n content: '';\n position: absolute;\n left: -31.25px; top: 20%; bottom: 20%;\n width: 1px;\n background: linear-gradient(to bottom, transparent, rgba(226,182,96,0.5), transparent);\n}\n.hero-stat-num {\n display: block;\n font-size: 2.46rem;\n font-weight: 700;\n color: #f5d78c;\n line-height: 1.2;\n margin-bottom: 10px;\n text-shadow: 0 0 20px rgba(226, 182, 96, 0.6);\n}\n.hero-stat-label {\n font-size: 0.95rem;\n color: #b0a890;\n font-weight: 500;\n}\n\n.cards-grid {\n display: grid;\n grid-template-columns: repeat(auto-fill, minmax(480px, 1fr));\n gap: 35px;\n margin-bottom: 50px;\n align-items: stretch;\n}\n.cards-grid--full { grid-template-columns: 1fr; width: 100%; }\n.cards-grid--fixed-2col { grid-template-columns: 1fr 1fr; }\n.full-width { grid-column: 1 / -1; }\n.center-single-card {\n display: grid;\n grid-template-columns: 1fr;\n max-width: 600px;\n margin: 0 auto 50px;\n justify-self: center;\n}\n\n.card {\n background: linear-gradient(160deg, rgba(30, 28, 22, 0.95) 0%, rgba(20, 18, 13, 0.98) 100%);\n border: 1px solid rgba(226, 182, 96, 0.2);\n border-radius: 22px;\n padding: 35px;\n box-shadow: var(--shadow-card);\n transition: all 0.35s ease;\n overflow: hidden;\n position: relative;\n backdrop-filter: blur(4px);\n}\n.card::after {\n content: '';\n position: absolute;\n top: 0; left: 0;\n width: 100%; height: 100%;\n background: radial-gradient(circle at 30% 10%, rgba(226,182,96,0.03), transparent 60%);\n pointer-events: none;\n}\n.card-animate {\n opacity: 0;\n transition: opacity 1.2s ease, transform 1.2s ease;\n}\n.card:hover {\n border-color: rgba(226, 182, 96, 0.5);\n box-shadow: 0 18px 40px rgba(0,0,0,0.8), 0 0 35px rgba(226,182,96,0.15);\n}\n.card-header {\n display: flex;\n align-items: center;\n justify-content: center;\n gap: 15px;\n margin-bottom: 27.5px;\n padding-bottom: 17.5px;\n border-bottom: 1px solid rgba(226, 182, 96, 0.25);\n}\n.card-header h2 {\n font-size: 1.80rem;\n font-weight: 700;\n color: #faeec8;\n margin: 0;\n text-shadow: 0 0 16px rgba(226,182,96,0.3);\n letter-spacing: 0.5px;\n}\n.card-icon {\n flex-shrink: 0;\n filter: drop-shadow(0 0 10px rgba(226, 182, 96, 0.6));\n transition: transform 0.3s ease;\n}\n.card-icon:hover { transform: rotate(-8deg) scale(1.2); }\n.card p {\n color: #c8c0a8;\n font-size: 16.1px;\n line-height: 1.75;\n margin-bottom: 20px;\n}\n.card h3 {\n font-size: 1.32rem;\n color: #e2b660;\n margin-bottom: 0.6em;\n text-shadow: 0 0 8px rgba(226,182,96,0.3);\n}\n\n.styled-list {\n list-style: none;\n padding: 0;\n}\n.styled-list li {\n background: rgba(35, 33, 26, 0.8);\n border: 1px solid rgba(226,182,96,0.2);\n border-radius: 10px;\n padding: 17.5px 22.5px;\n margin-bottom: 12.5px;\n color: #c0b898;\n font-size: 16.1px;\n transition: all 0.25s ease;\n backdrop-filter: blur(6px);\n line-height: 1.65;\n}\n.styled-list li:hover {\n background: rgba(50, 47, 37, 0.9);\n border-color: rgba(226,182,96,0.5);\n box-shadow: 0 0 20px rgba(226,182,96,0.15);\n}\n\n.doctrine-table {\n width: 100%;\n border-collapse: separate;\n border-spacing: 0 12.5px;\n margin: 27.5px 0;\n font-size: 14.2px;\n}\n.doctrine-table thead th {\n background: rgba(226, 182, 96, 0.2);\n color: #f5d78c;\n font-weight: 700;\n padding: 17.5px 20px;\n text-align: left;\n border-radius: 12px 12px 0 0;\n border: 1px solid rgba(226, 182, 96, 0.3);\n border-bottom: none;\n text-shadow: 0 0 8px rgba(226,182,96,0.3);\n}\n.doctrine-table tbody td {\n background: rgba(18, 17, 12, 0.9);\n color: #c8c0a8;\n padding: 15px 20px;\n border: 1px solid rgba(226, 182, 96, 0.15);\n border-top: none;\n transition: background 0.25s;\n}\n.doctrine-table tbody tr:first-child td { border-top: 1px solid rgba(226, 182, 96, 0.2); }\n.doctrine-table tbody tr:hover td {\n background: rgba(30, 28, 20, 0.95);\n border-color: rgba(226, 182, 96, 0.4);\n}\n\n.faq-accordion {\n border: 1px solid rgba(226,182,96,0.3);\n border-radius: 14px;\n overflow: hidden;\n background: rgba(18, 17, 12, 0.9);\n backdrop-filter: blur(8px);\n margin-top: 12.5px;\n box-shadow: 0 6px 18px rgba(0,0,0,0.6);\n}\n.faq-item { border-bottom: 1px solid rgba(226,182,96,0.2); }\n.faq-item:last-child { border-bottom: none; }\n.faq-question {\n background: none;\n border: none;\n width: 100%;\n text-align: left;\n padding: 20px 27.5px;\n display: flex;\n justify-content: space-between;\n align-items: center;\n color: #f0ead8;\n font-size: 16.1px;\n font-weight: 600;\n cursor: pointer;\n transition: background 0.25s ease;\n}\n.faq-question:hover { background: rgba(226,182,96,0.12); }\n.faq-answer {\n max-height: 0; overflow: hidden; opacity: 0;\n padding: 0 27.5px;\n color: #c0b898;\n transition: max-height 0.45s ease, opacity 0.45s ease, padding 0.45s ease;\n background: rgba(0,0,0,0.3);\n}\n.faq-item.open .faq-answer {\n max-height: 700px; opacity: 1; padding: 20px 27.5px;\n}\n.faq-icon {\n font-size: 25px; color: #e2b660;\n transition: transform 0.35s ease;\n filter: drop-shadow(0 0 6px rgba(226,182,96,0.5));\n}\n.faq-item.open .faq-icon { transform: rotate(45deg); }\n\n.cheats-block {\n border: 1px solid rgba(226,182,96,0.3);\n border-radius: 14px;\n overflow: hidden;\n background: rgba(18, 17, 12, 0.9);\n backdrop-filter: blur(8px);\n margin-top: 12.5px;\n box-shadow: 0 6px 18px rgba(0,0,0,0.6);\n}\n.cheats-toggle {\n background: none; border: none;\n width: 100%; text-align: left;\n padding: 20px 27.5px;\n display: flex; justify-content: space-between; align-items: center;\n color: #f0ead8; font-size: 16.1px; font-weight: 600;\n cursor: pointer; transition: background 0.25s ease;\n}\n.cheats-toggle:hover { background: rgba(226,182,96,0.12); }\n.cheats-content {\n max-height: 0; overflow: hidden; opacity: 0;\n padding: 0 27.5px;\n transition: max-height 0.45s ease, opacity 0.45s ease, padding 0.45s ease;\n background: rgba(0,0,0,0.3);\n}\n.cheats-block.open .cheats-content { max-height: 900px; opacity: 1; padding: 20px 27.5px; }\n.cheats-chevron {\n font-size: 25px; color: #e2b660;\n transition: transform 0.35s ease;\n filter: drop-shadow(0 0 6px rgba(226,182,96,0.5));\n}\n.cheats-block.open .cheats-chevron { transform: rotate(45deg); }\n.cheat-scroll {\n max-height: 900px; overflow-y: auto; padding-right: 10px;\n scrollbar-width: thin; scrollbar-color: #4a4a3a #0d0c09;\n}\n.cheat-scroll::-webkit-scrollbar { width: 6px; }\n.cheat-scroll::-webkit-scrollbar-track { background: #0d0c09; border-radius: 6px; }\n.cheat-scroll::-webkit-scrollbar-thumb { background: #4a4a3a; border-radius: 6px; }\n.cheat-scroll::-webkit-scrollbar-thumb:hover { background: #6b6b55; }\n.cheat-item {\n background: rgba(15, 14, 10, 0.9);\n border: 1px solid rgba(226,182,96,0.2);\n border-radius: 10px;\n padding: 15px 17.5px; margin-bottom: 10px;\n font-family: 'Cascadia Code', 'Fira Code', 'Consolas', monospace;\n font-size: 13.6px; color: #c9d1d9;\n transition: all 0.25s ease; backdrop-filter: blur(6px);\n}\n.cheat-item:hover { border-color: #e2b660; box-shadow: 0 0 18px rgba(226,182,96,0.2); }\n.cheat-desc { font-size: 12.5px; color: #8b949e; margin-bottom: 10px; display: block; }\n.cheat-row { display: flex; align-items: center; justify-content: space-between; gap: 17.5px; }\n.cheat-command { flex: 1; word-break: break-all; }\n.copy-btn {\n background: none; border: 1px solid #4a4a3a; border-radius: 8px;\n color: #9e9e8e; cursor: pointer; padding: 6.25px 15px;\n font-size: 13.6px; font-weight: 600; transition: all 0.25s ease; flex-shrink: 0;\n}\n.copy-btn:hover { background: #3d3d30; color: #f0ead8; border-color: #e2b660; box-shadow: 0 0 14px rgba(226,182,96,0.3); }\n.copy-btn.copied { color: #7aad7e; border-color: #7aad7e; background: rgba(122, 173, 126, 0.25); }\n\n.positive-value { color: #7aad7e; font-weight: 700; text-shadow: 0 0 8px rgba(122, 173, 126, 0.5); }\n.negative-value { color: #c56a6a; font-weight: 700; text-shadow: 0 0 6px rgba(200, 80, 80, 0.5); }\n.moderate-value { color: #d4a83c; font-weight: 700; text-shadow: 0 0 6px rgba(212, 168, 60, 0.5); }\n.accent { color: #e2b660; font-weight: 600; text-shadow: 0 0 8px rgba(226, 182, 96, 0.5); }\n\n.author-card {\n background: linear-gradient(145deg, #1f1d18 0%, #151410 100%);\n border: 1px solid rgba(226,182,96,0.3);\n border-radius: 22px;\n padding: 37.5px;\n text-align: center;\n margin-top: 50px;\n box-shadow: 0 14px 36px rgba(0,0,0,0.6), 0 0 28px rgba(226,182,96,0.08);\n backdrop-filter: blur(12px);\n}\n.author-card .card-header { justify-content: center; border-bottom: none; margin-bottom: 22.5px; }\n.author-date { color: #908870; font-size: 12.5px; margin-top: 15px; }\n\n.card-animate.visible { opacity: 1; transform: translateY(0); }\n.ripple {\n position: absolute; border-radius: 50%;\n background: rgba(226, 182, 96, 0.5);\n transform: scale(0); animation: ripple 0.6s linear;\n pointer-events: none;\n}\n@keyframes ripple { to { transform: scale(4); opacity: 0; } }\n\n.volunteer-guide a,\n.guide-link {\n color: #e2b660; text-decoration: none; font-weight: 600;\n border-bottom: 1px solid rgba(226, 182, 96, 0.4);\n transition: color 0.2s ease, border-color 0.2s ease, text-shadow 0.2s ease;\n}\n.volunteer-guide a:hover,\n.guide-link:hover {\n color: #f5d98b; border-bottom-color: #f5d98b;\n text-shadow: 0 0 8px rgba(226, 182, 96, 0.4);\n}\n\n.supply-subtabs {\n display: flex; flex-wrap: wrap; gap: 8px; margin-bottom: 20px;\n justify-content: center;\n border-bottom: 1px solid rgba(226, 182, 96, 0.2);\n padding-bottom: 15px;\n}\n.supply-subtab {\n background: transparent;\n border: 1px solid rgba(226, 182, 96, 0.18);\n color: #b8b098;\n padding: 6px 16px;\n font-size: 14px;\n font-weight: 600;\n border-radius: 8px;\n cursor: pointer;\n transition: all 0.25s ease;\n white-space: nowrap;\n}\n.supply-subtab:hover {\n color: #f5e6c7;\n background: rgba(226, 182, 96, 0.08);\n border-color: rgba(226, 182, 96, 0.4);\n}\n.supply-subtab.active {\n color: #f7e3a8;\n background: rgba(226, 182, 96, 0.18);\n border-color: rgba(226, 182, 96, 0.55);\n box-shadow: 0 0 10px rgba(226, 182, 96, 0.15);\n}\n.supply-table-container { display: none; }\n.supply-table-container.active { display: block; }\n\n.tier-list { margin-top: 15px; }\n.tier-row {\n display: flex; align-items: stretch; margin-bottom: 8px;\n border-radius: 8px; overflow: hidden;\n box-shadow: 0 4px 10px rgba(0,0,0,0.3);\n}\n.tier-label {\n width: 50px; display: flex; align-items: center; justify-content: center;\n font-size: 1.6rem; font-weight: 800; color: #fff; flex-shrink: 0;\n}\n.tier-s .tier-label { background: #c49840; color: #1a1814; }\n.tier-g .tier-label { background: #6f9b7a; }\n.tier-r .tier-label { background: #5a8ab5; }\n.tier-b .tier-label { background: #8b7355; }\n.tier-items {\n padding: 10px 14px; background: rgba(15, 14, 12, 0.8);\n backdrop-filter: blur(4px); flex: 1;\n display: flex; flex-wrap: wrap; gap: 6px; align-items: center;\n}\n.tier-tag {\n display: inline-flex; align-items: center;\n padding: 4px 12px; border-radius: 16px;\n font-size: 14.4px; font-weight: 500; white-space: nowrap;\n border: 1px solid transparent; transition: all 0.2s ease;\n}\n.tier-tag:hover { transform: translateY(-1px); box-shadow: 0 2px 8px rgba(0,0,0,0.4); }\n.tier-tag-s { background: rgba(196, 152, 64, 0.15); color: #e0c880; border-color: rgba(196, 152, 64, 0.3); }\n.tier-tag-g { background: rgba(111, 155, 122, 0.15); color: #c0e6c8; border-color: rgba(111, 155, 122, 0.3); }\n.tier-tag-r { background: rgba(90, 138, 181, 0.15); color: #b8d8f0; border-color: rgba(90, 138, 181, 0.3); }\n.tier-tag-b { background: rgba(139, 115, 85, 0.15); color: #e0d0c0; border-color: rgba(139, 115, 85, 0.3); }\n\n.hq-selector {\n display: flex; justify-content: center; flex-wrap: wrap; gap: 8px;\n margin: 24px 0 28px; z-index: 999; position: relative;\n}\n.hq-tab {\n background: none; border: 1px solid rgba(226, 182, 96, 0.3);\n color: #b8b098; padding: 10px 22px; font-size: 15px;\n font-weight: 600; border-radius: 10px; cursor: pointer;\n transition: all 0.25s ease; white-space: nowrap;\n}\n.hq-tab:hover { color: #f0ead8; background: rgba(226, 182, 96, 0.08); }\n.hq-tab.active {\n color: #e2b660; background: rgba(226, 182, 96, 0.14);\n border-color: rgba(226, 182, 96, 0.5);\n box-shadow: 0 0 18px rgba(226, 182, 96, 0.15);\n}\n.hq-panels { margin-bottom: 20px; }\n.hq-panel { display: none; animation: fadeIn 0.3s ease; }\n.hq-panel.active { display: block; }\n@keyframes fadeIn {\n from { opacity: 0; transform: translateY(10px); }\n to { opacity: 1; transform: translateY(0); }\n}\n\n.card-img {\n display: block; max-width: 100%; height: auto;\n margin: 20px auto 0; border-radius: 8px;\n border: 1px solid rgba(226, 182, 96, 0.2);\n}\n.modal-img { cursor: zoom-in; }\n.table-icon {\n max-width: 50px; max-height: 50px;\n vertical-align: middle; margin-right: 6px;\n object-fit: contain;\n}\n\n.interactive-svg {\n margin-top: 20px;\n border-radius: 16px;\n border: 1px solid rgba(226, 182, 96, 0.2);\n background: #0f0f0d;\n}\n.interactive-svg title { pointer-events: none; }\n\n.stats-grid {\n display: flex;\n gap: 30px;\n flex-wrap: wrap;\n margin-top: 20px;\n}\n.stats-column {\n flex: 1 1 280px;\n background: rgba(18, 17, 12, 0.6);\n border-radius: 14px;\n padding: 18px;\n border: 1px solid rgba(226, 182, 96, 0.15);\n}\n.stats-column h3 {\n text-align: center;\n margin-bottom: 16px;\n color: #e2b660;\n font-size: 1.2rem;\n}\n.stats-list {\n list-style: none;\n padding: 0;\n text-align: center;\n}\n.stats-list li {\n margin-bottom: 10px;\n}\n.stat-name {\n position: relative;\n cursor: help;\n color: #c8c0a8;\n font-size: 15px;\n font-weight: 500;\n border-bottom: 1px dotted rgba(226, 182, 96, 0.3);\n display: inline-block;\n}\n.stat-name:hover {\n color: #f0ead8;\n border-bottom-color: #e2b660;\n}\n\n.custom-tooltip {\n position: fixed;\n background: #1a1a14;\n color: #f0ead8;\n padding: 8px 14px;\n border-radius: 8px;\n font-size: 13px;\n white-space: normal;\n max-width: 280px;\n width: max-content;\n border: 1px solid rgba(226, 182, 96, 0.5);\n box-shadow: 0 8px 24px rgba(0,0,0,0.8);\n z-index: 9999;\n pointer-events: none;\n line-height: 1.4;\n opacity: 0;\n transition: opacity 0.15s ease;\n}\n.custom-tooltip.show {\n opacity: 1;\n}\n\n.template-selector {\n display: flex;\n flex-wrap: wrap;\n gap: 8px;\n margin-bottom: 20px;\n justify-content: center;\n}\n\n.save-grid {\n display: flex;\n gap: 2rem;\n align-items: flex-start;\n flex-wrap: wrap;\n}\n\n.save-file-info {\n flex: 1 1 35%;\n min-width: 240px;\n}\n\n.save-file-details {\n margin-bottom: 1.5rem;\n}\n\n.save-file-name {\n font-size: 1.4rem;\n font-weight: 700;\n color: #faeec8;\n margin-bottom: 0.3rem;\n}\n\n.save-file-meta {\n font-size: 0.9rem;\n color: #908870;\n margin-bottom: 1.5rem;\n}\n\n.save-btn {\n display: inline-flex;\n align-items: center;\n gap: 0.5rem;\n background: rgba(226, 182, 96, 0.15);\n border: 1px solid rgba(226, 182, 96, 0.4);\n color: #f0ead8;\n font-weight: 600;\n font-size: 1rem;\n padding: 12px 28px;\n border-radius: 12px;\n text-decoration: none;\n transition: all 0.25s ease;\n cursor: pointer;\n margin-bottom: 1.8rem;\n}\n\n.save-btn:hover {\n background: rgba(226, 182, 96, 0.25);\n border-color: rgba(226, 182, 96, 0.7);\n box-shadow: 0 0 24px rgba(226, 182, 96, 0.3);\n color: #fff;\n}\n\n.instruction-block {\n margin-top: 0;\n}\n\n.save-virustotal {\n flex: 1 1 60%;\n min-width: 300px;\n text-align: center;\n}\n\n.save-virustotal p {\n margin-bottom: 0.8rem;\n font-weight: 600;\n color: #b8b098;\n}\n\n.save-virustotal img {\n max-width: 100%;\n height: auto;\n border-radius: 10px;\n border: 1px solid rgba(226, 182, 96, 0.2);\n}\n\n.interactive-screenshot {\n position: relative;\n width: 100%;\n max-width: 800px;\n margin: 20px auto 0;\n border-radius: 12px;\n overflow: hidden;\n border: 1px solid rgba(226, 182, 96, 0.25);\n box-shadow: 0 12px 30px rgba(0,0,0,0.6);\n}\n\n.interactive-screenshot-img {\n display: block;\n width: 100%;\n height: auto;\n}\n\n.hotspot {\n position: absolute;\n background: transparent;\n border-radius: 6px;\n cursor: help;\n transition: background 0.2s ease, box-shadow 0.2s ease;\n z-index: 2;\n}\n\n.hotspot:hover {\n background: rgba(226, 182, 96, 0.15);\n box-shadow: 0 0 0 2px rgba(226, 182, 96, 0.4);\n}\n\n@media (max-width: 768px) {\n .guide-tabs {\n position: static;\n margin-bottom: 25px;\n flex-wrap: nowrap;\n overflow-x: auto;\n white-space: nowrap;\n justify-content: flex-start;\n gap: 7.5px;\n padding: 10px 10px;\n -webkit-overflow-scrolling: touch;\n }\n\n\n .guide-tab {\n font-size: 13.2px;\n padding: 12.5px 20px;\n min-width: auto;\n flex-shrink: 0;\n }\n .hero-card { padding: 40px 20px; border-radius: 20px; }\n .hero-title { font-size: 1.9rem; }\n .hero-sub { font-size: 0.95rem; }\n .hero-grid { gap: 25px; }\n .hero-stat { min-width: 120px; padding: 20px 12.5px; }\n .hero-stat + .hero-stat::before { display: none; }\n .hero-stat-num { font-size: 1.9rem; }\n .hero-stat-label { font-size: 0.85rem; }\n .cards-grid,\n .cards-grid--fixed-2col,\n .cards-grid--full,\n .center-single-card {\n grid-template-columns: 1fr;\n max-width: 100%;\n margin: 0 0 40px 0;\n gap: 25px;\n }\n .full-width { grid-column: 1 / -1; }\n .card { padding: 25px; overflow-x: auto; overflow-y: visible; }\n .card-header h2 { font-size: 1.42rem; word-break: break-word; }\n .card p { font-size: 14.2px; }\n .styled-list li { font-size: 14.2px; padding: 15px; }\n .doctrine-table {\n display: block;\n width: 100%;\n overflow-x: auto;\n -webkit-overflow-scrolling: touch;\n border-spacing: 0 8px;\n margin: 20px 0;\n }\n .doctrine-table thead,\n .doctrine-table tbody,\n .doctrine-table tr,\n .doctrine-table th,\n .doctrine-table td { white-space: nowrap; }\n .doctrine-table tbody td { padding: 10px 12px; }\n .doctrine-table thead th { padding: 12px 12px; }\n .supply-subtabs {\n flex-wrap: nowrap;\n overflow-x: auto;\n justify-content: flex-start;\n padding-bottom: 10px;\n -webkit-overflow-scrolling: touch;\n }\n .supply-subtab { font-size: 12px; padding: 6px 12px; white-space: nowrap; flex-shrink: 0; }\n .checklist-items { column-count: 1; }\n .faq-question { font-size: 15px; padding: 15px 20px; }\n .faq-answer { padding: 0 20px; }\n .faq-item.open .faq-answer { padding: 15px 20px; }\n .cheats-toggle { font-size: 15px; padding: 15px 20px; }\n .cheats-content { padding: 0 20px; }\n .cheats-block.open .cheats-content { padding: 15px 20px; }\n .cheat-item { font-size: 12px; padding: 12px; }\n .copy-btn { padding: 4px 12px; font-size: 12px; }\n .card-img { max-width: 100%; height: auto; }\n .card svg { max-width: 100%; height: auto; }\n .author-card { padding: 25px; }\n .hq-row { gap: 8px; }\n .hq-slot { font-size: 12px; padding: 8px 12px; min-width: 80px; }\n .hq-slot.main-slot { min-width: 130px; }\n .hq-tab { font-size: 13px; padding: 8px 12px; }\n .tier-label { width: 40px; font-size: 1.4rem; }\n .tier-items { padding: 8px 10px; }\n .tier-tag { font-size: 13px; padding: 3px 10px; }\n .stats-grid { gap: 20px; }\n .stats-column { flex: 1 1 100%; }\n .save-grid {\n flex-direction: column;\n }\n .save-file-info,\n .save-virustotal {\n flex: 1 1 100%;\n min-width: 100%;\n }\n .save-virustotal img {\n max-width: 100%;\n height: auto;\n }\n}\n\n.template-modal-overlay {\n position: fixed;\n inset: 0;\n background: rgba(0, 0, 0, 0.85);\n backdrop-filter: blur(8px);\n display: flex;\n align-items: center;\n justify-content: center;\n z-index: 9999;\n cursor: pointer;\n}\n\n.template-modal-content {\n position: relative;\n max-width: 90vw;\n max-height: 90vh;\n overflow: auto;\n background: #1a1915;\n border: 1px solid rgba(226, 182, 96, 0.4);\n border-radius: 12px;\n padding: 16px;\n box-shadow: 0 25px 60px rgba(0, 0, 0, 0.9);\n display: flex;\n flex-direction: column;\n align-items: center;\n}\n\n.template-modal-content img {\n max-width: 100%;\n height: auto;\n display: block;\n border-radius: 4px;\n}\n\n.template-modal-close {\n align-self: flex-end;\n font-size: 32px;\n color: #e2b660;\n cursor: pointer;\n line-height: 1;\n margin-bottom: 8px;\n transition: color 0.2s;\n}\n\n.template-modal-close:hover {\n color: #f5d98b;\n}\n\n@keyframes fadeInUp {\n 0% { opacity: 0; transform: translateY(20px); }\n 100% { opacity: 1; transform: translateY(0); }\n}\n@keyframes fadeOut {\n 0% { opacity: 1; transform: translateY(0); }\n 100% { opacity: 0; transform: translateY(-10px); }\n}\n.template-fade-in {\n animation: fadeInUp 0.4s ease forwards;\n}\n.template-fade-out {\n animation: fadeOut 0.25s ease forwards;\n}"],"js":["(function () {\n 'use strict';\n\n if (!document.getElementById('guide-styles')) {\n var style = document.createElement('style');\n style.id = 'guide-styles';\n style.textContent =\n '.template-modal-overlay{position:fixed;inset:0;background:rgba(0,0,0,0.85);backdrop-filter:blur(8px);display:flex;align-items:center;justify-content:center;z-index:9999;cursor:pointer}' +\n '.template-modal-content{position:relative;max-width:90vw;max-height:90vh;overflow:auto;background:#1a1915;border:1px solid rgba(226,182,96,0.4);border-radius:12px;padding:16px;box-shadow:0 25px 60px rgba(0,0,0,0.9);display:flex;flex-direction:column;align-items:center}' +\n '.template-modal-content img{max-width:100%;height:auto;display:block;border-radius:4px}' +\n '.template-modal-close{align-self:flex-end;font-size:32px;color:#e2b660;cursor:pointer;line-height:1;margin-bottom:8px;transition:color 0.2s}' +\n '.template-modal-close:hover{color:#f5d98b}' +\n '@keyframes fadeInUp{0%{opacity:0;transform:translateY(20px)}100%{opacity:1;transform:translateY(0)}}' +\n '@keyframes fadeOut{0%{opacity:1;transform:translateY(0)}100%{opacity:0;transform:translateY(-10px)}}' +\n '.template-fade-in{animation:fadeInUp 0.4s ease forwards}' +\n '.template-fade-out{animation:fadeOut 0.25s ease forwards}' +\n '.custom-tooltip{position:fixed;background:#1a1a14;color:#f0ead8;padding:8px 14px;border-radius:8px;font-size:13px;white-space:normal;max-width:280px;width:max-content;border:1px solid rgba(226,182,96,0.5);box-shadow:0 8px 24px rgba(0,0,0,0.8);z-index:9999;pointer-events:none;line-height:1.4;opacity:0;transition:opacity 0.15s ease}' +\n '.custom-tooltip.show{opacity:1}';\n document.head.appendChild(style);\n }\n\n function initParticles() {\n var canvas = document.getElementById('particles-canvas');\n if (!canvas || canvas.dataset.initialized === 'true') return;\n canvas.dataset.initialized = 'true';\n var ctx = canvas.getContext('2d');\n var particles = [];\n var maxParticles = 28;\n var mouseX = window.innerWidth / 2;\n var mouseY = window.innerHeight / 2;\n\n function resizeCanvas() {\n canvas.width = window.innerWidth;\n canvas.height = window.innerHeight;\n initParticleArray();\n }\n\n var goldColors = [\n 'rgba(226,182,96,0.30)',\n 'rgba(196,152,64,0.35)',\n 'rgba(212,168,84,0.25)',\n 'rgba(180,140,50,0.28)'\n ];\n\n function drawEagle(x, y, size, color, angle) {\n ctx.save();\n ctx.translate(x, y);\n ctx.rotate(angle);\n ctx.strokeStyle = color;\n ctx.lineWidth = 0.7;\n ctx.lineCap = 'round';\n var s = size * 0.25;\n ctx.beginPath();\n ctx.arc(0, -s, s * 0.8, 0.2, Math.PI - 0.2);\n ctx.stroke();\n ctx.beginPath();\n ctx.moveTo(s * 0.5, -s * 1.2);\n ctx.lineTo(0, -s * 0.6);\n ctx.lineTo(-s * 0.5, -s * 1.2);\n ctx.stroke();\n ctx.beginPath();\n ctx.moveTo(0, -s * 0.6);\n ctx.quadraticCurveTo(0, s * 0.2, 0, s * 1.2);\n ctx.stroke();\n ctx.beginPath();\n ctx.moveTo(-s * 0.8, s * 0.2);\n ctx.quadraticCurveTo(-s * 1.5, 0, -s * 1.2, s * 0.8);\n ctx.stroke();\n ctx.beginPath();\n ctx.moveTo(s * 0.8, s * 0.2);\n ctx.quadraticCurveTo(s * 1.5, 0, s * 1.2, s * 0.8);\n ctx.stroke();\n ctx.restore();\n }\n\n function Particle() { this.init(); }\n\n Particle.prototype.init = function () {\n this.x = Math.random() * canvas.width;\n this.y = Math.random() * canvas.height;\n this.size = Math.random() * 24 + 16;\n this.baseSpeedX = (Math.random() - 0.5) * 0.12;\n this.baseSpeedY = (Math.random() - 0.5) * 0.12;\n this.rotationSpeed = (Math.random() - 0.5) * 0.004;\n this.angle = Math.random() * Math.PI * 2;\n this.opacity = Math.random() * 0.7 + 0.3;\n this.pulseSpeed = Math.random() * 0.005 + 0.002;\n this.pulseOffset = Math.random() * Math.PI * 2;\n this.color = goldColors[Math.floor(Math.random() * goldColors.length)];\n this.time = 0;\n };\n\n Particle.prototype.update = function () {\n var dx = mouseX - canvas.width / 2;\n var dy = mouseY - canvas.height / 2;\n this.speedX = this.baseSpeedX + dx * 0.00015;\n this.speedY = this.baseSpeedY + dy * 0.00015;\n this.x += this.speedX;\n this.y += this.speedY;\n this.angle += this.rotationSpeed;\n this.time += this.pulseSpeed;\n if (this.x canvas.width + this.size * 2) this.x = -this.size;\n if (this.y canvas.height + this.size * 2) this.y = -this.size;\n };\n\n Particle.prototype.draw = function () {\n var pulse = 0.5 + 0.5 * Math.sin(this.time + this.pulseOffset);\n var alpha = this.opacity * (0.6 + 0.4 * pulse);\n ctx.globalAlpha = alpha;\n drawEagle(this.x, this.y, this.size, this.color, this.angle);\n ctx.globalAlpha = 1;\n };\n\n function initParticleArray() {\n particles = [];\n for (var i = 0; i vw - 10) left = vw - tw - 10;\n else if (left - tw / 2 × ';\n document.body.appendChild(overlay);\n }\n\n function addRippleEffect() {\n document.addEventListener('click', function (e) {\n var tab = e.target.closest('.guide-tab');\n if (!tab) return;\n var ripple = document.createElement('span');\n ripple.className = 'ripple';\n var rect = tab.getBoundingClientRect();\n var size = Math.max(rect.width, rect.height);\n ripple.style.width = ripple.style.height = size + 'px';\n ripple.style.left = (e.clientX - rect.left - size / 2) + 'px';\n ripple.style.top = (e.clientY - rect.top - size / 2) + 'px';\n tab.appendChild(ripple);\n ripple.addEventListener('animationend', function () { ripple.remove(); });\n });\n }\n\n function animateValue(element, start, end, duration, prefix, suffix) {\n var startTime = performance.now();\n function update(currentTime) {\n var elapsed = currentTime - startTime;\n var progress = Math.min(elapsed / duration, 1);\n var current = start + (end - start) * progress;\n if (end 0) {\n stats[i].style.visibility = 'visible';\n animateValue(stats[i], 0, parsed.number, 750, parsed.prefix, parsed.suffix);\n }\n }\n }\n\n function typeWriter(element, text, speed, delay) {\n var i = 0;\n element.textContent = '';\n function type() {\n if (i < text.length) {\n element.textContent += text.charAt(i);\n i++;\n setTimeout(type, speed);\n }\n }\n setTimeout(type, delay || 0);\n }\n\n function initTypewriter() {\n var heroSub = document.querySelector('.hero-sub');\n if (heroSub) typeWriter(heroSub, heroSub.textContent.trim(), 7, 200);\n }\n\n document.addEventListener('click', function (e) {\n var guideTab = e.target.closest('.guide-tab');\n if (guideTab) {\n var target = guideTab.getAttribute('data-tab');\n if (target) {\n switchMainTab(target);\n updateHash(target);\n }\n return;\n }\n\n var faqTrigger = e.target.closest('.faq-question');\n if (faqTrigger) {\n var faqItem = faqTrigger.closest('.faq-item');\n if (faqItem) faqItem.classList.toggle('open');\n return;\n }\n\n var cheatsTrigger = e.target.closest('.cheats-toggle');\n if (cheatsTrigger) {\n var cheatsBlock = cheatsTrigger.closest('.cheats-block');\n if (cheatsBlock) cheatsBlock.classList.toggle('open');\n return;\n }\n\n var supplySubtab = e.target.closest('.supply-subtab');\n if (supplySubtab) {\n var card = supplySubtab.closest('.card');\n if (card) switchSubTab(supplySubtab, card);\n return;\n }\n\n var hqTab = e.target.closest('.hq-tab');\n if (hqTab) {\n var card = hqTab.closest('.card');\n var hqId = hqTab.getAttribute('data-hq');\n if (card && hqId) switchHqTab(hqId, card);\n return;\n }\n\n var modalImg = e.target.closest('.modal-img');\n if (modalImg) {\n e.preventDefault();\n e.stopPropagation();\n openImageModal(modalImg.src);\n return;\n }\n\n var modalClose = e.target.closest('.template-modal-close');\n var modalOverlay = e.target.closest('.template-modal-overlay');\n if (modalClose || (modalOverlay && e.target === modalOverlay)) {\n var overlay = document.querySelector('.template-modal-overlay');\n if (overlay) overlay.remove();\n return;\n }\n\n var copyBtn = e.target.closest('.copy-btn');\n if (copyBtn) {\n var command = copyBtn.getAttribute('data-command');\n if (command) {\n var originalHTML = copyBtn.innerHTML;\n var onCopied = function () {\n copyBtn.classList.add('copied');\n copyBtn.innerHTML = '✓';\n setTimeout(function () {\n copyBtn.classList.remove('copied');\n copyBtn.innerHTML = originalHTML;\n }, 1500);\n };\n if (navigator.clipboard && navigator.clipboard.writeText) {\n navigator.clipboard.writeText(command).then(onCopied).catch(function () {\n fallbackCopy(command, onCopied);\n });\n } else {\n fallbackCopy(command, onCopied);\n }\n function fallbackCopy(text, callback) {\n var ta = document.createElement('textarea');\n ta.value = text;\n ta.style.position = 'fixed';\n ta.style.left = '-9999px';\n document.body.appendChild(ta);\n ta.select();\n document.execCommand('copy');\n document.body.removeChild(ta);\n callback();\n }\n }\n return;\n }\n });\n\n document.addEventListener('keydown', function (e) {\n if (e.key === 'Escape') {\n var overlay = document.querySelector('.template-modal-overlay');\n if (overlay) overlay.remove();\n }\n });\n\n function init() {\n initParticles();\n addRippleEffect();\n initHeroCountUp();\n initTypewriter();\n activateTabFromHash();\n initTooltips();\n }\n\n if (document.readyState === 'loading') {\n document.addEventListener('DOMContentLoaded', init);\n } else {\n init();\n }\n})();"]}
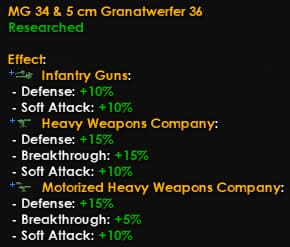 \n
\n 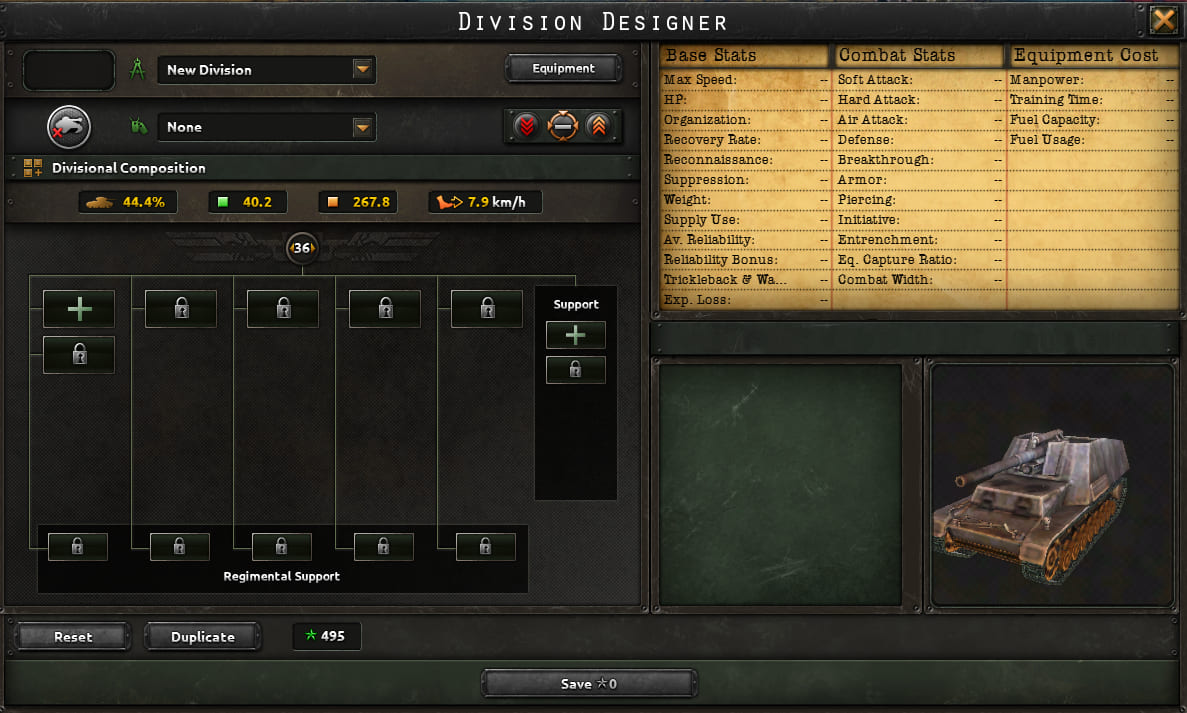 \n \n \n \n \n \n \n







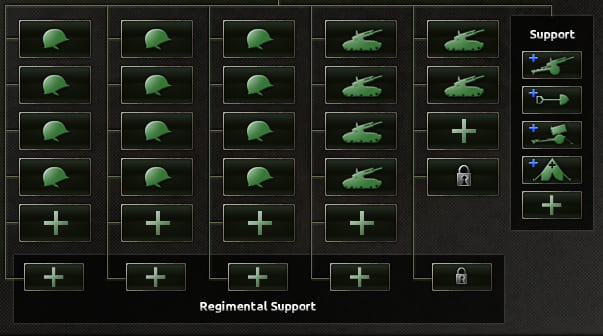


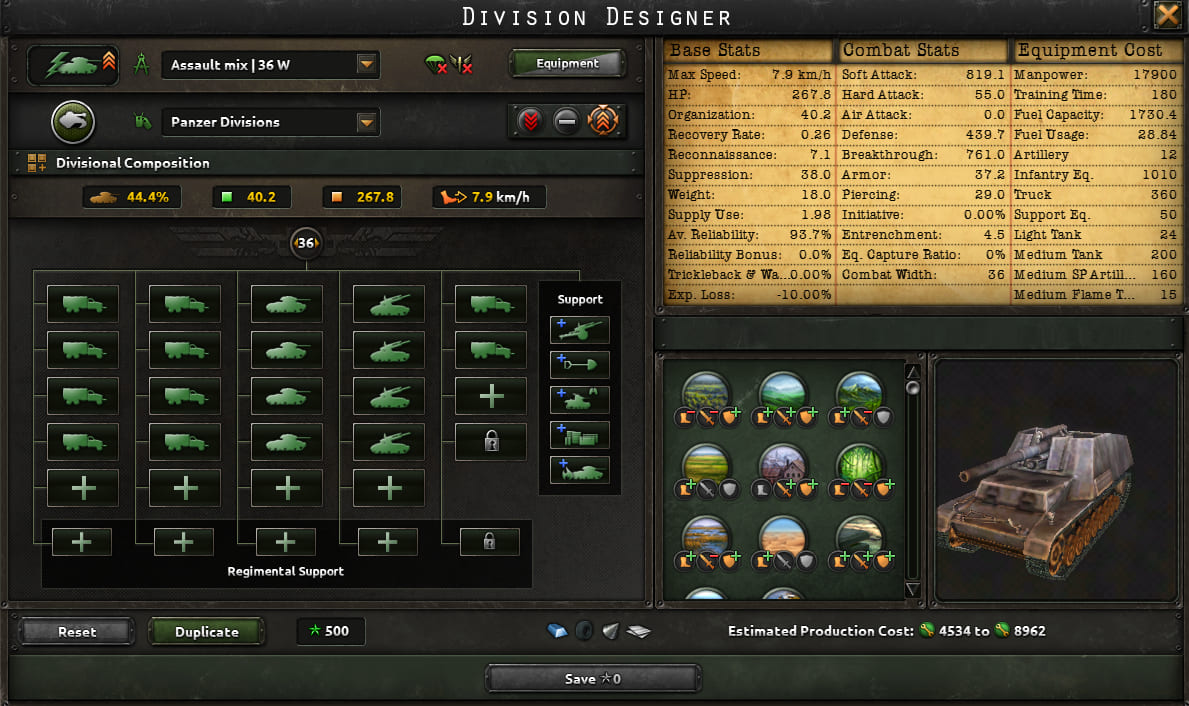 \n
\n 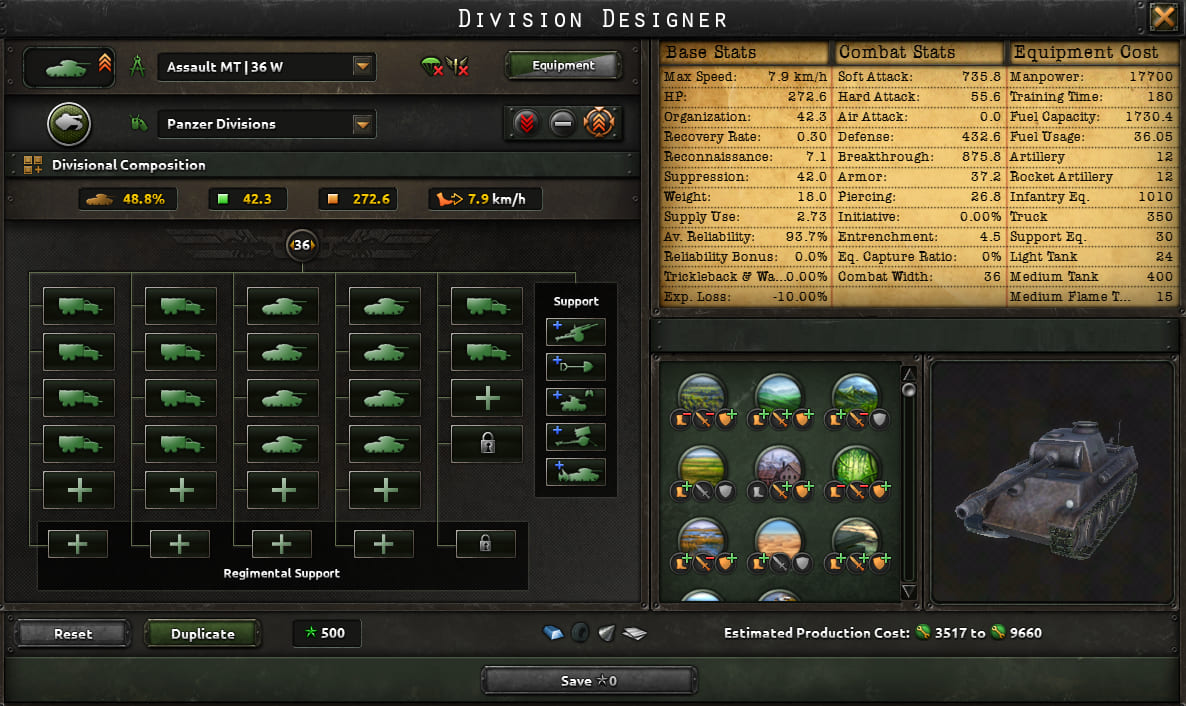 \n
\n 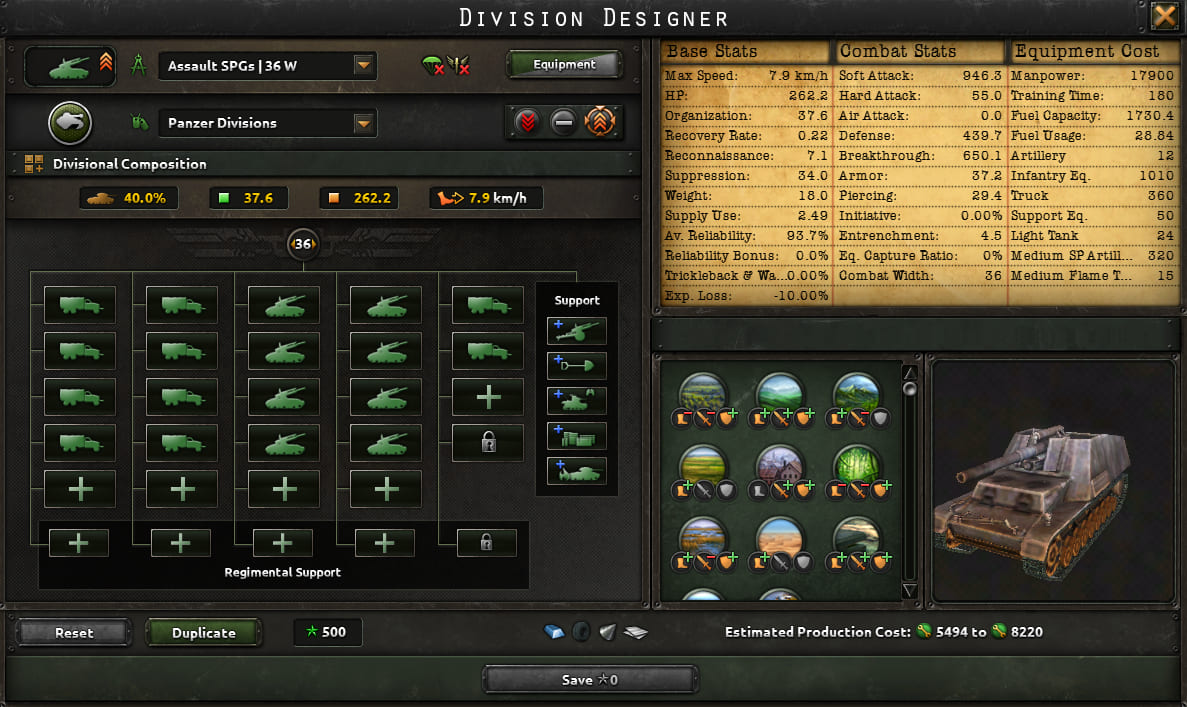 \n
\n 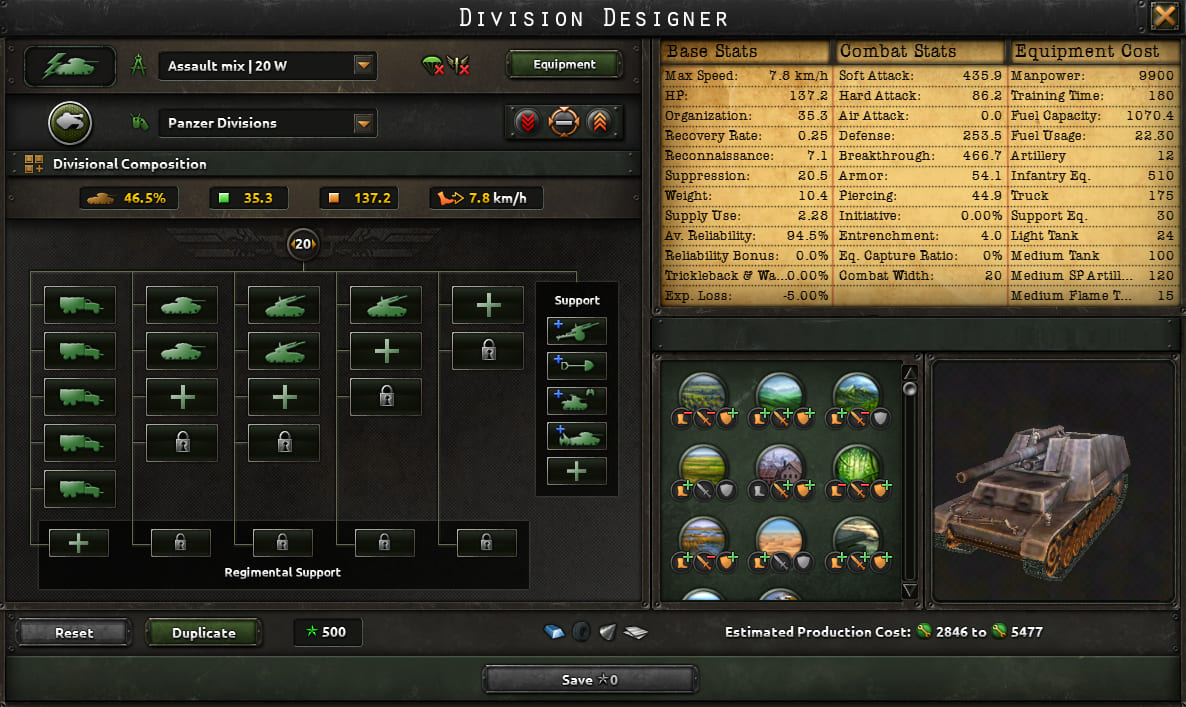 \n
\n 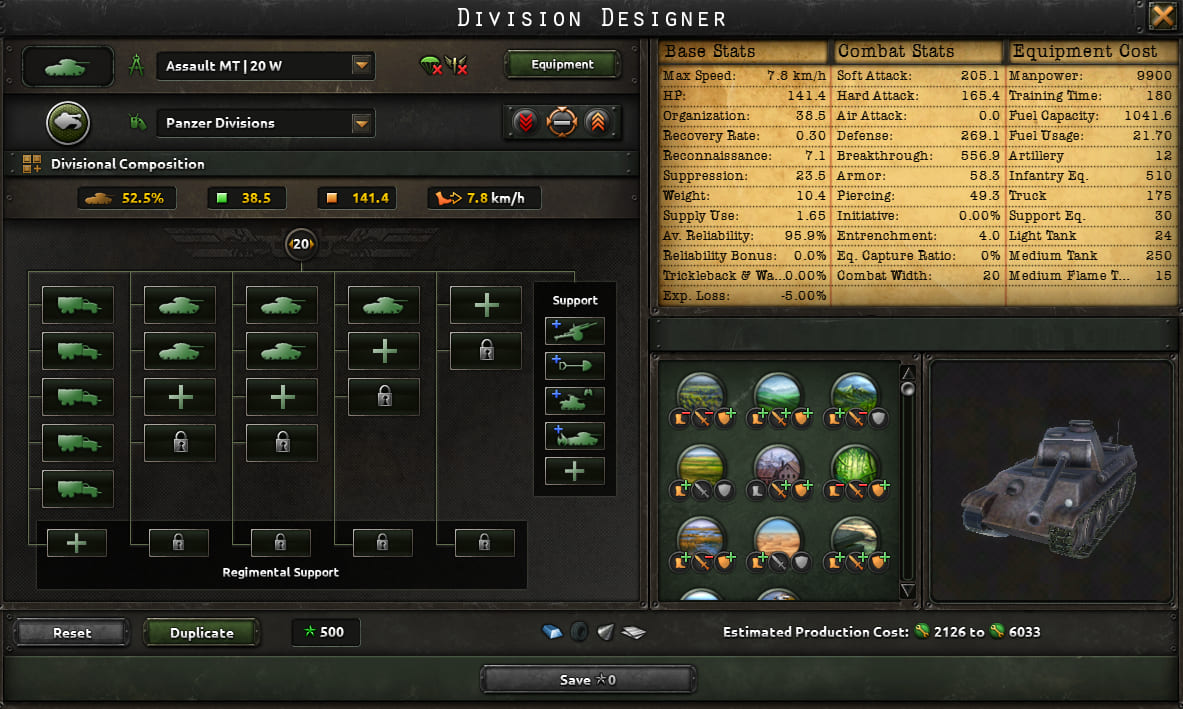 \n
\n 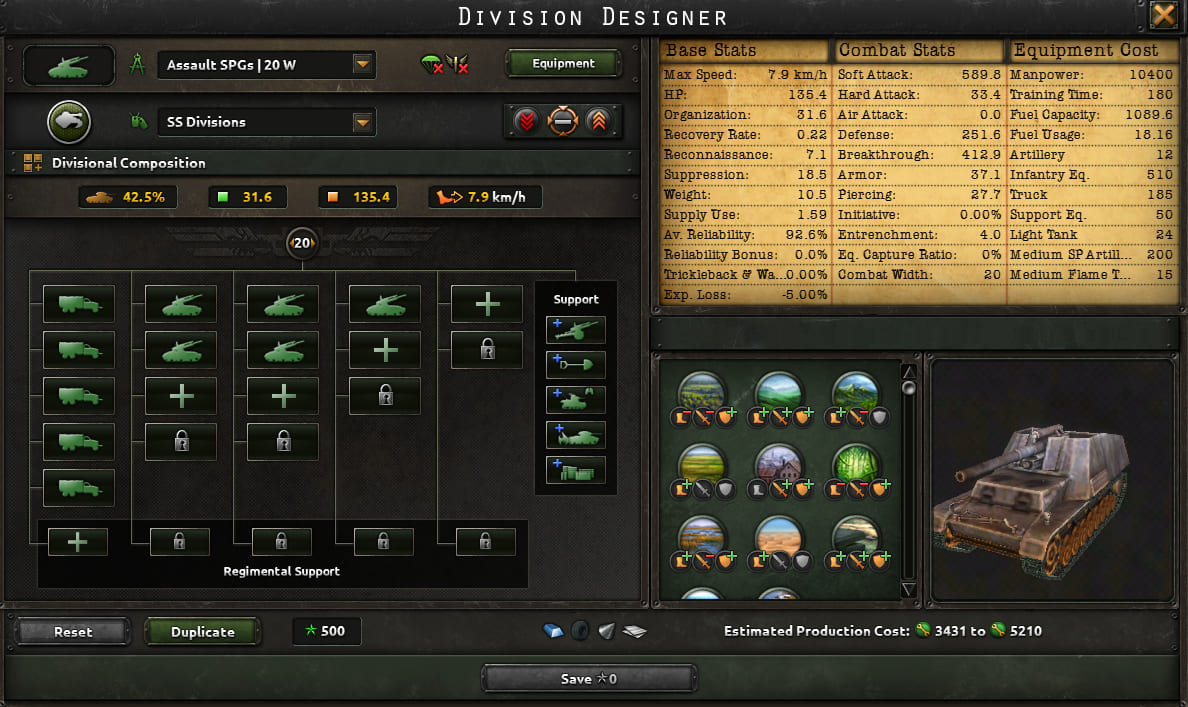 \n
\n 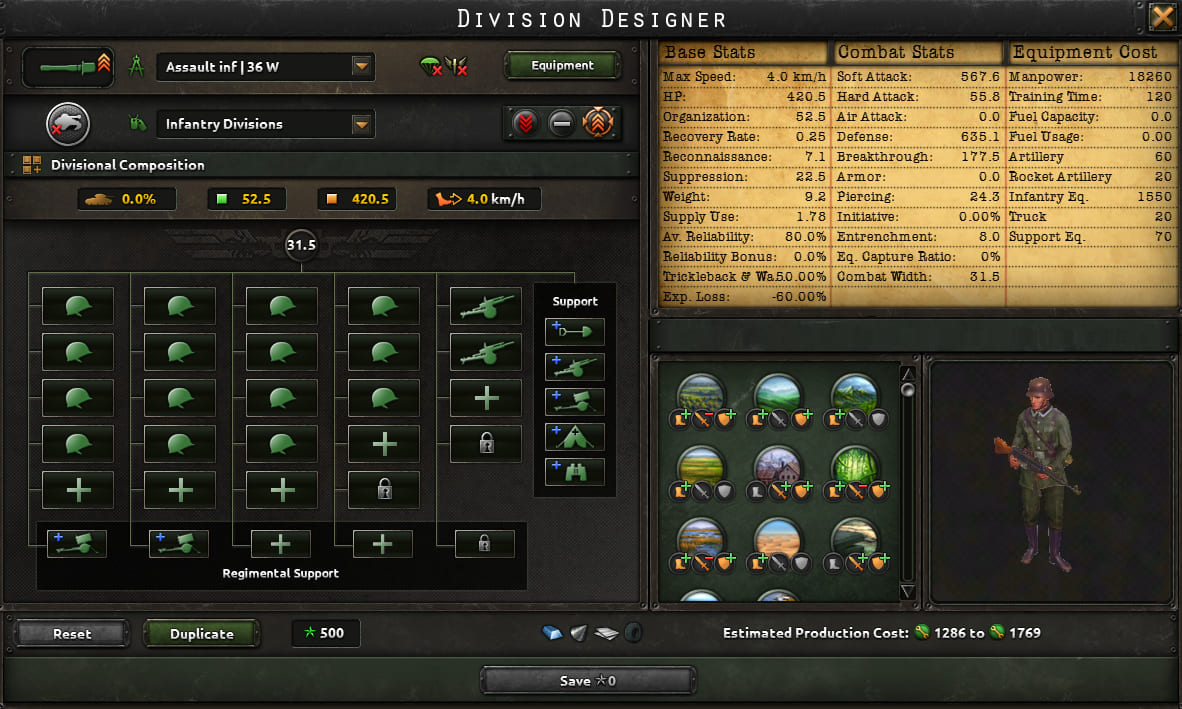 \n
\n 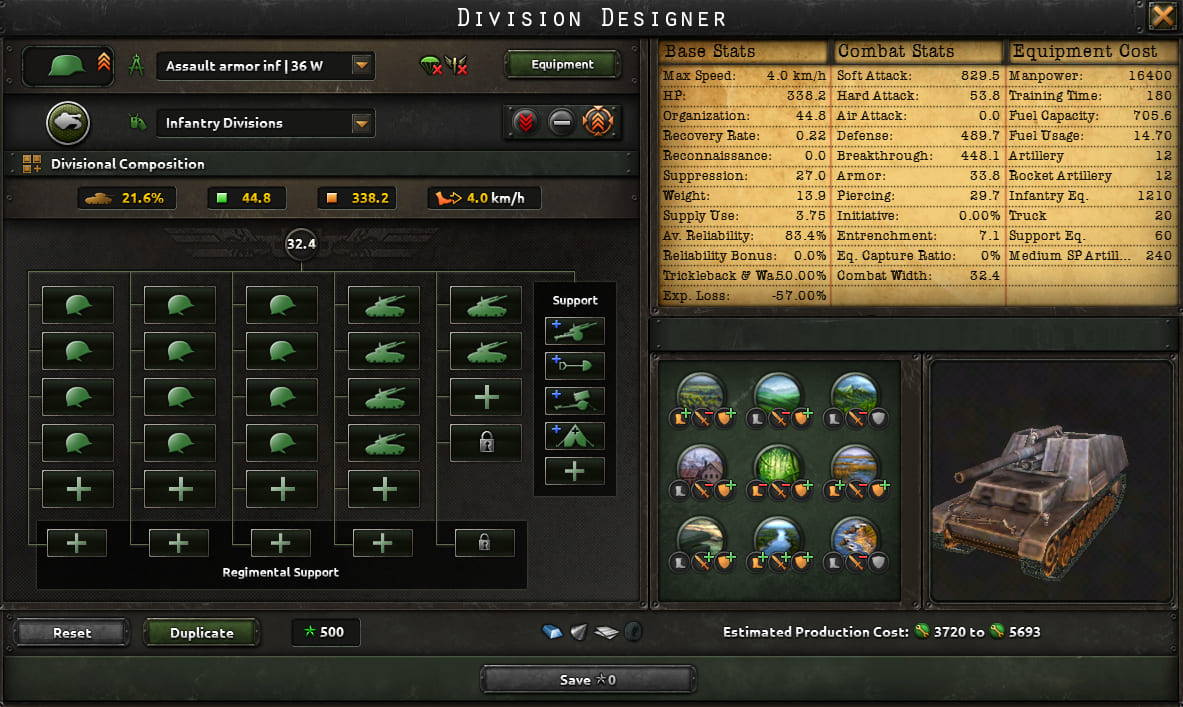 \n
\n 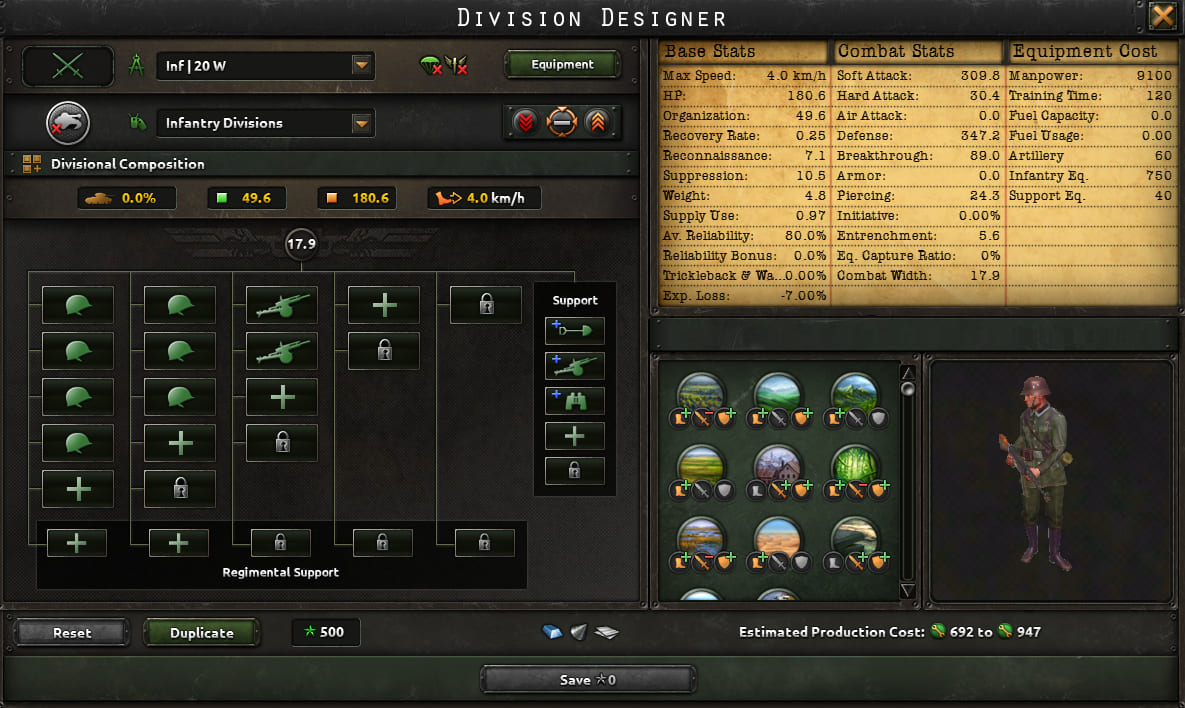 \n
\n 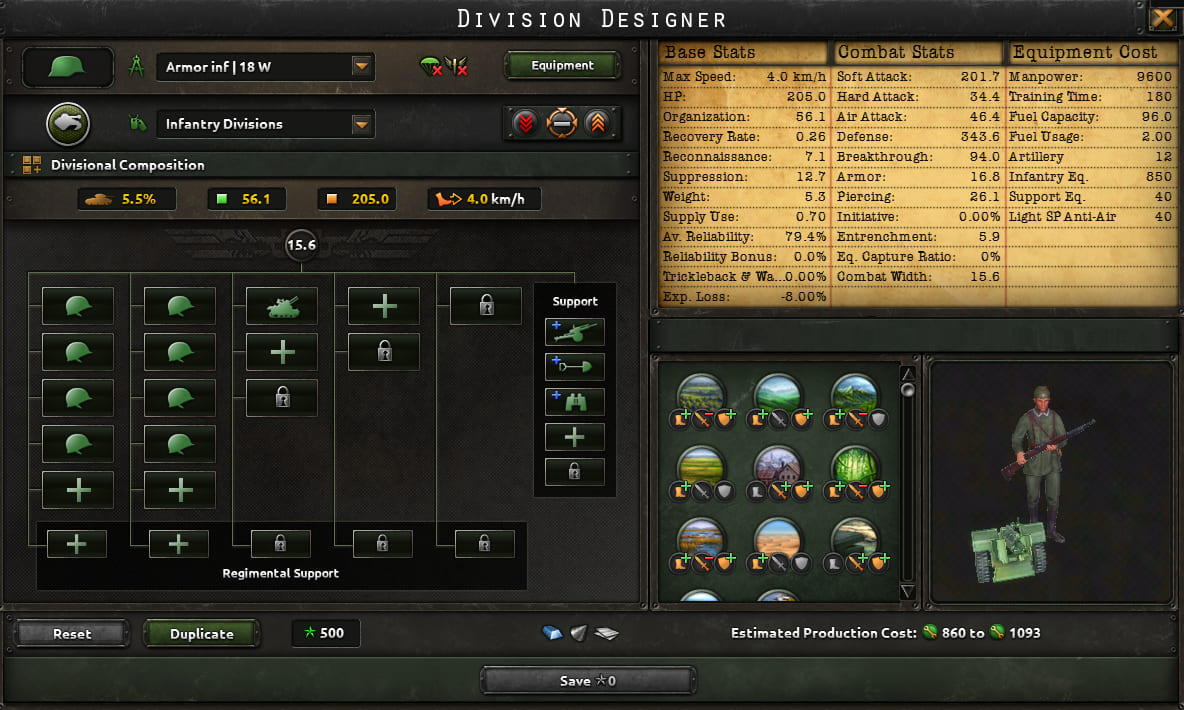 \n
\n 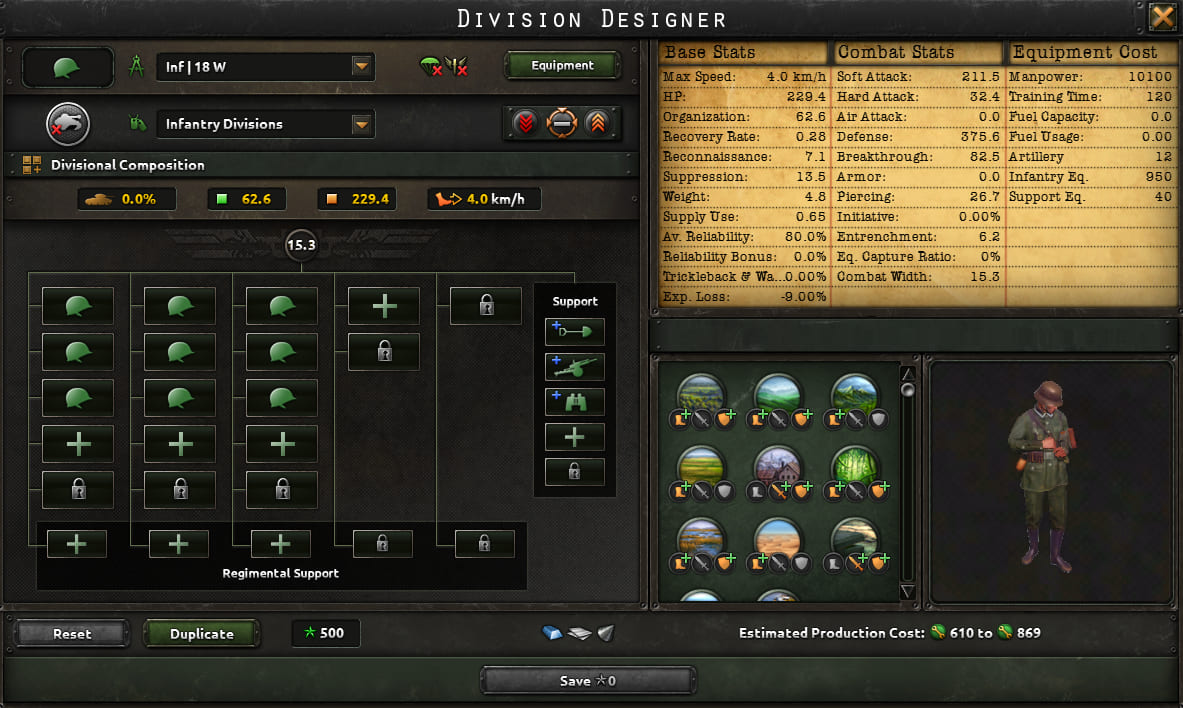 \n
\n 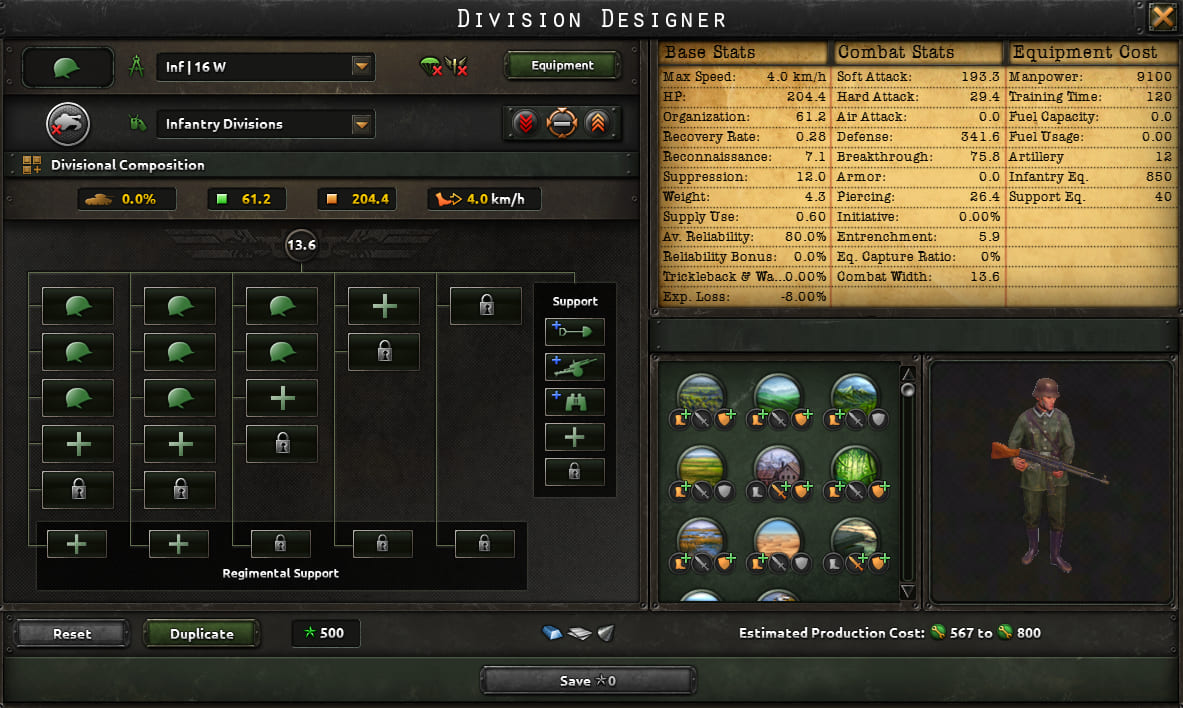 \n
\n 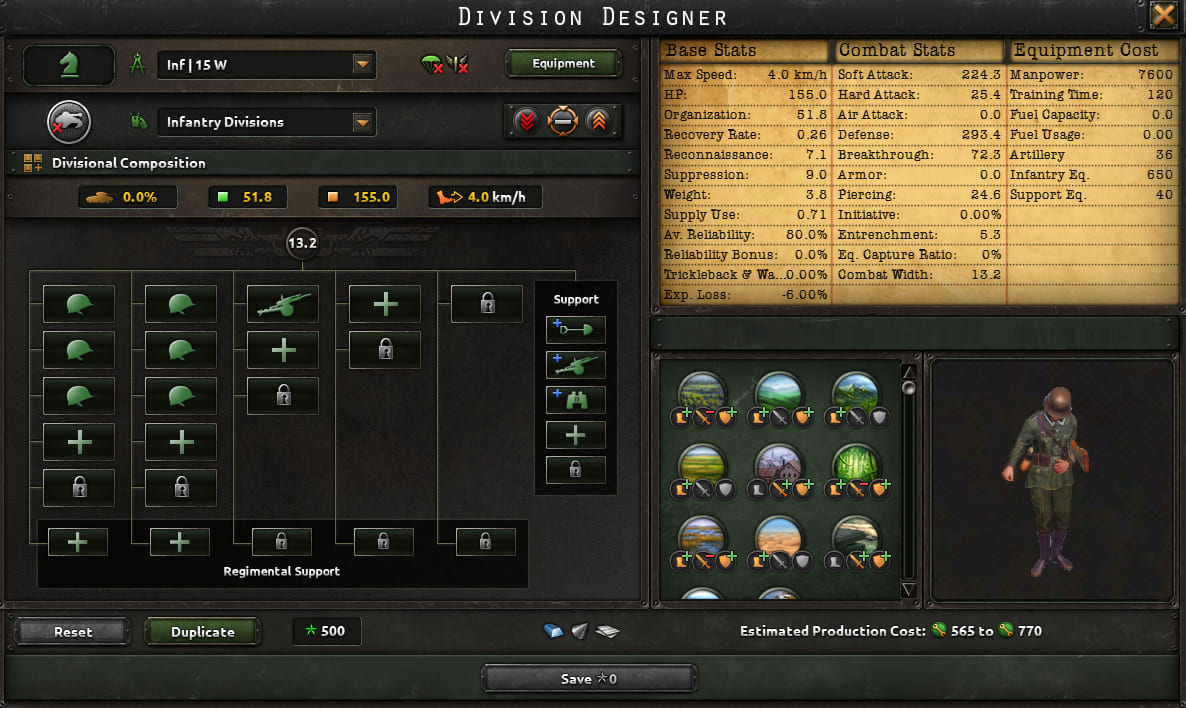 \n
\n 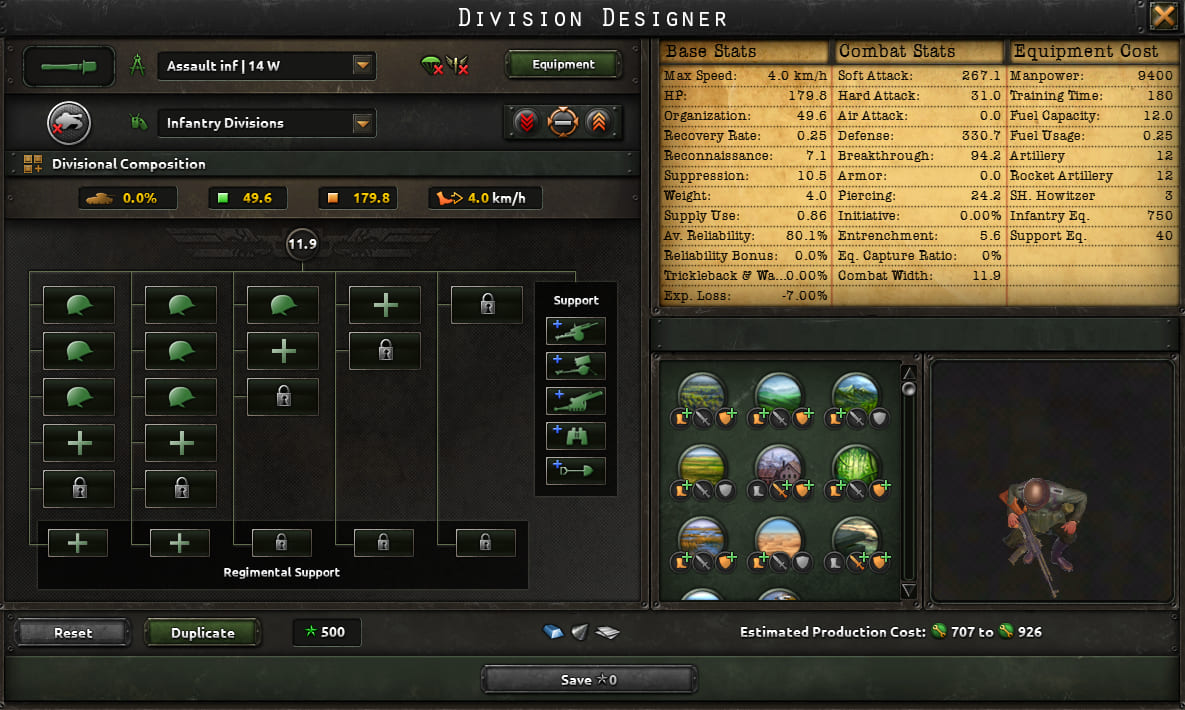 \n
\n 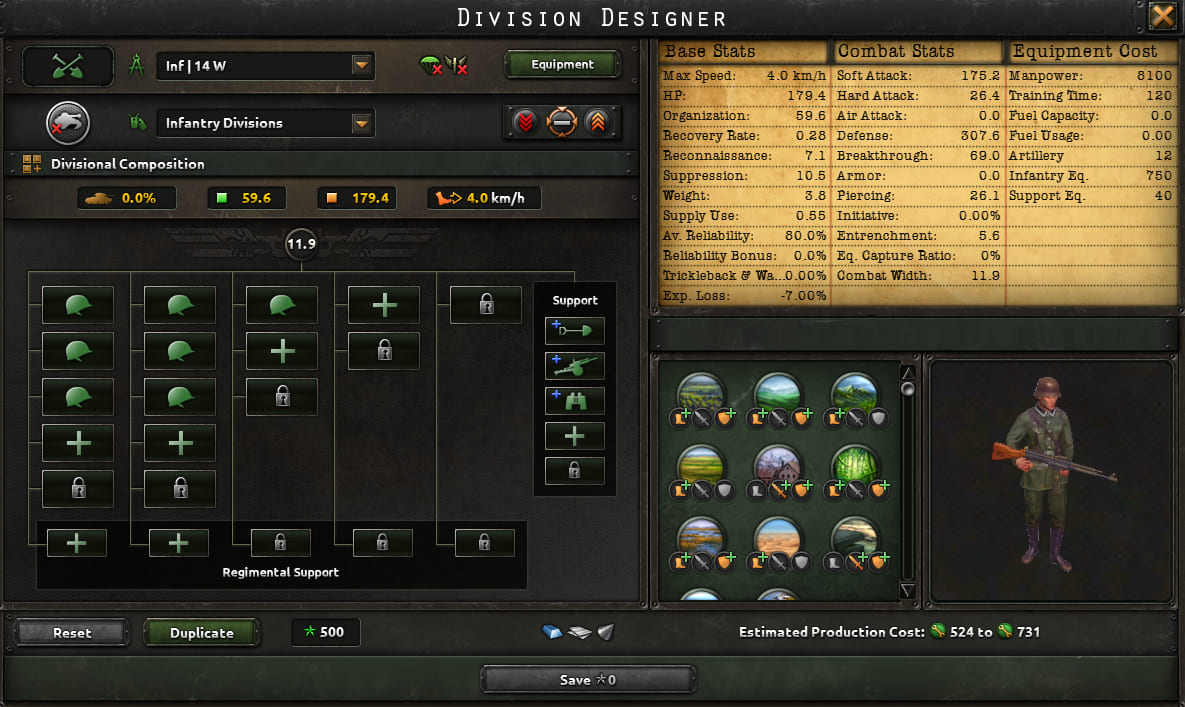 \n
\n 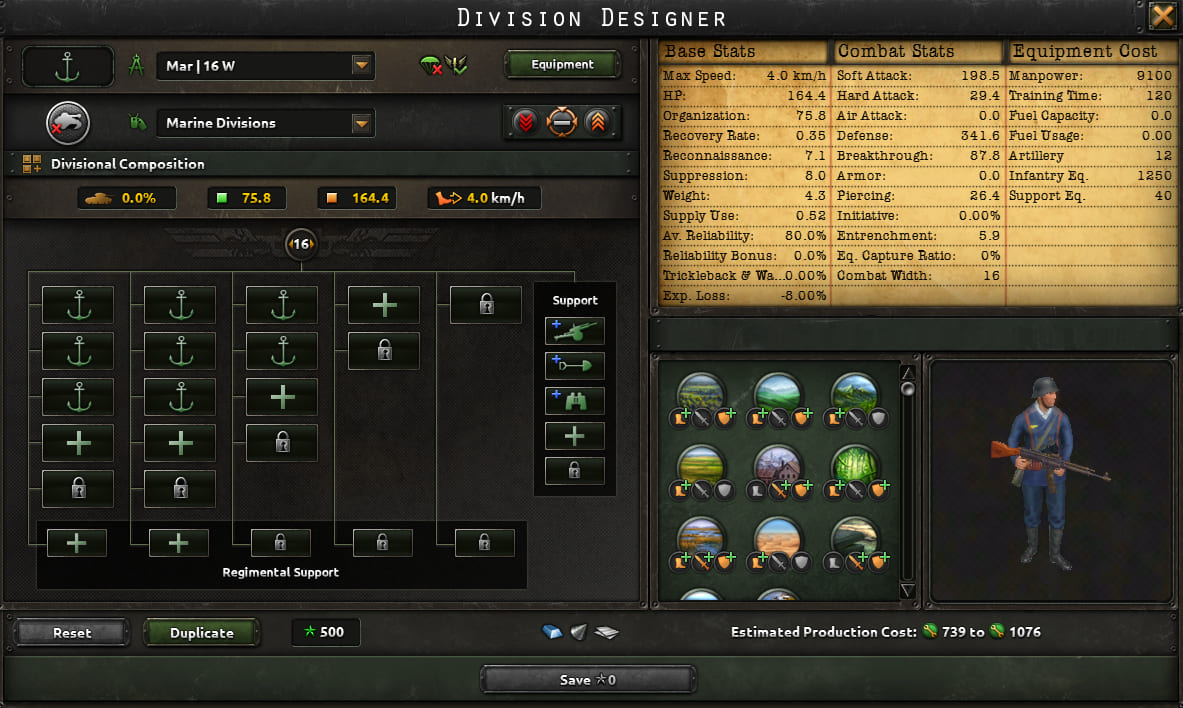 \n
\n 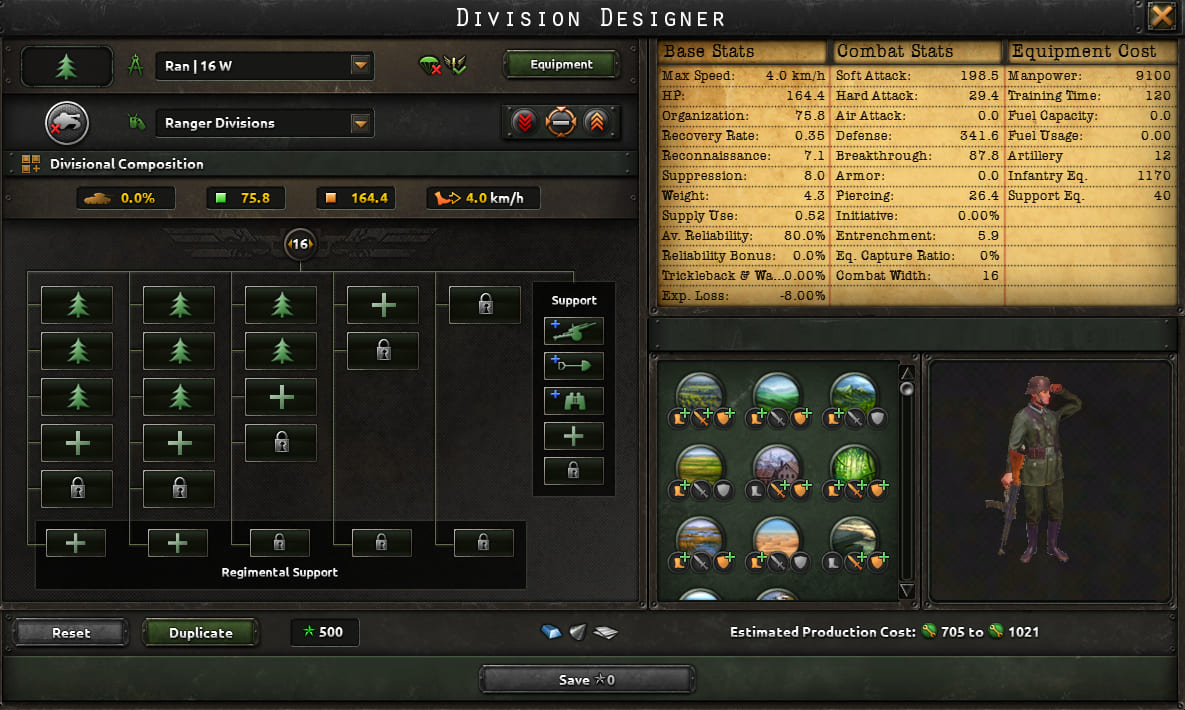 \n
\n 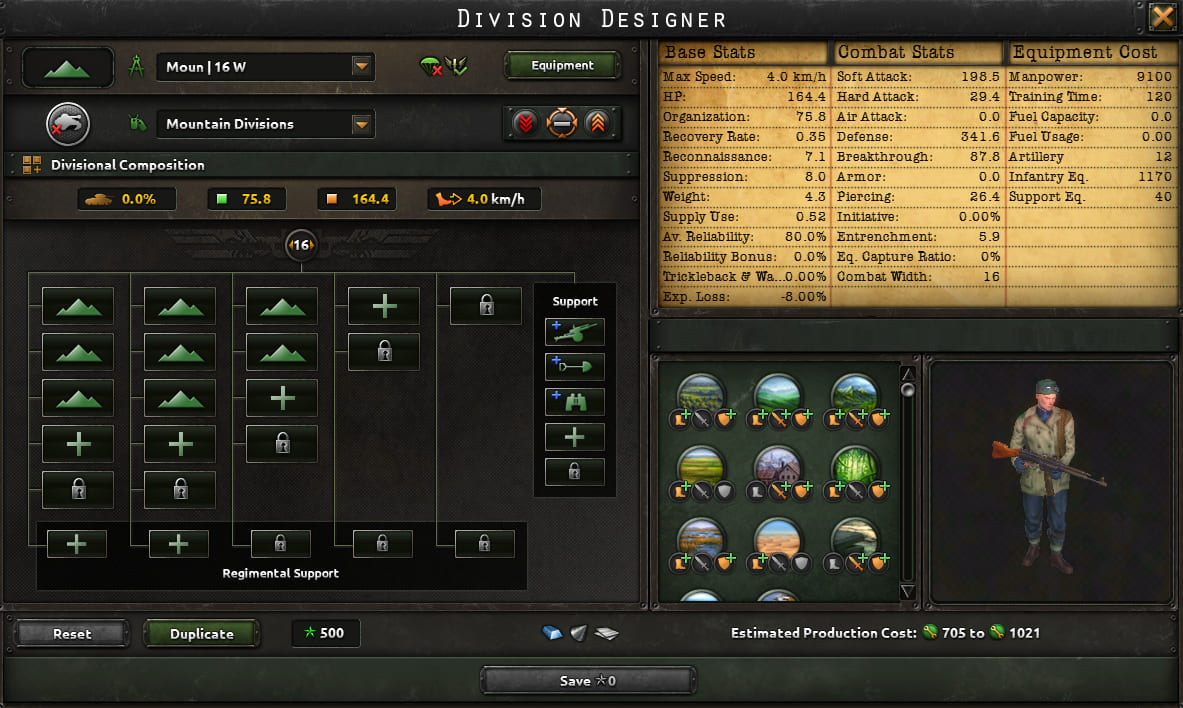 \n
\n 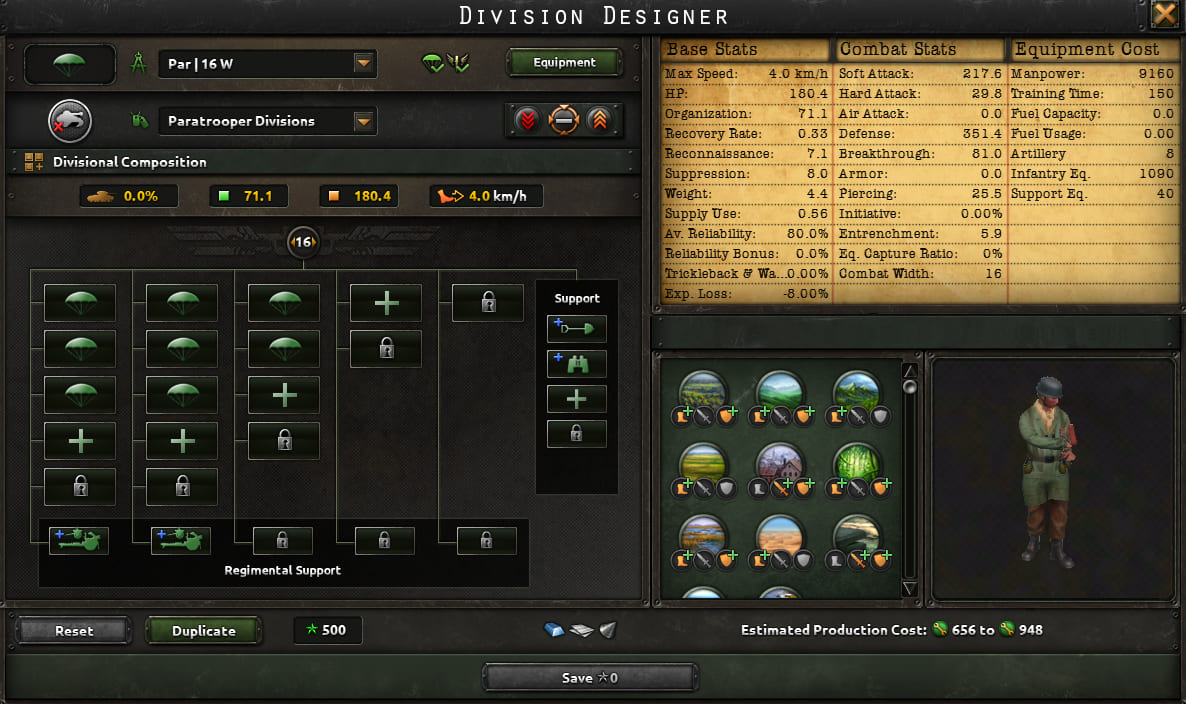 \n
\n 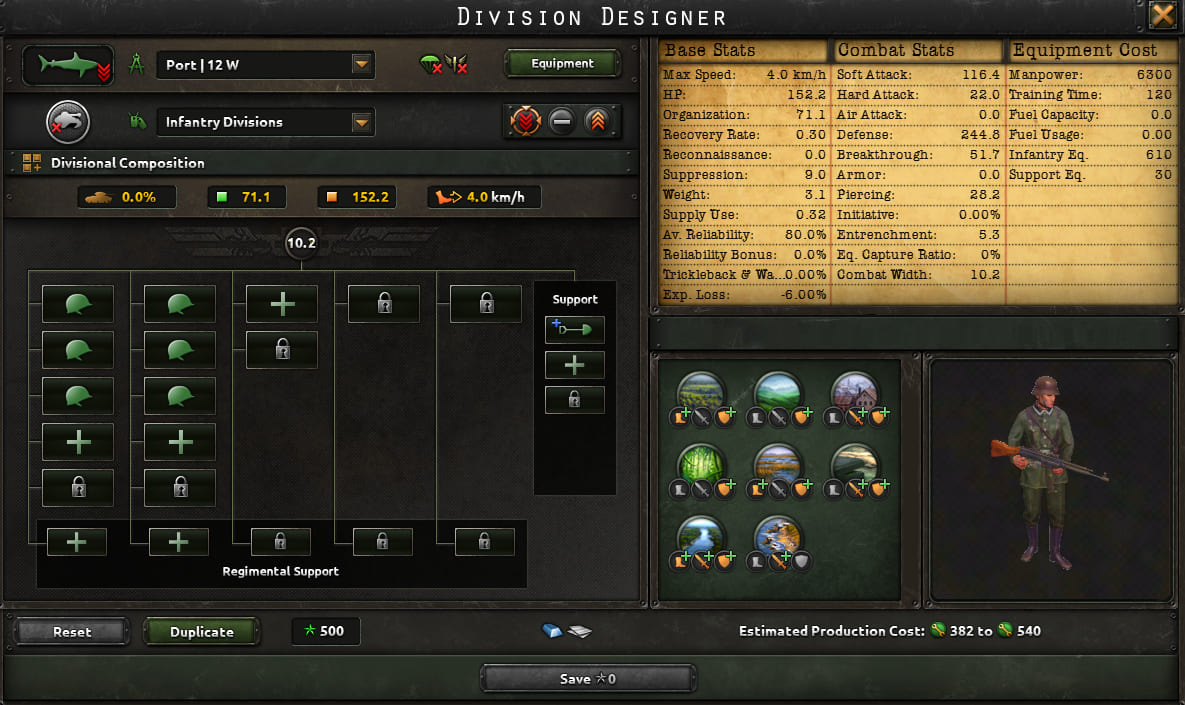 \n
\n 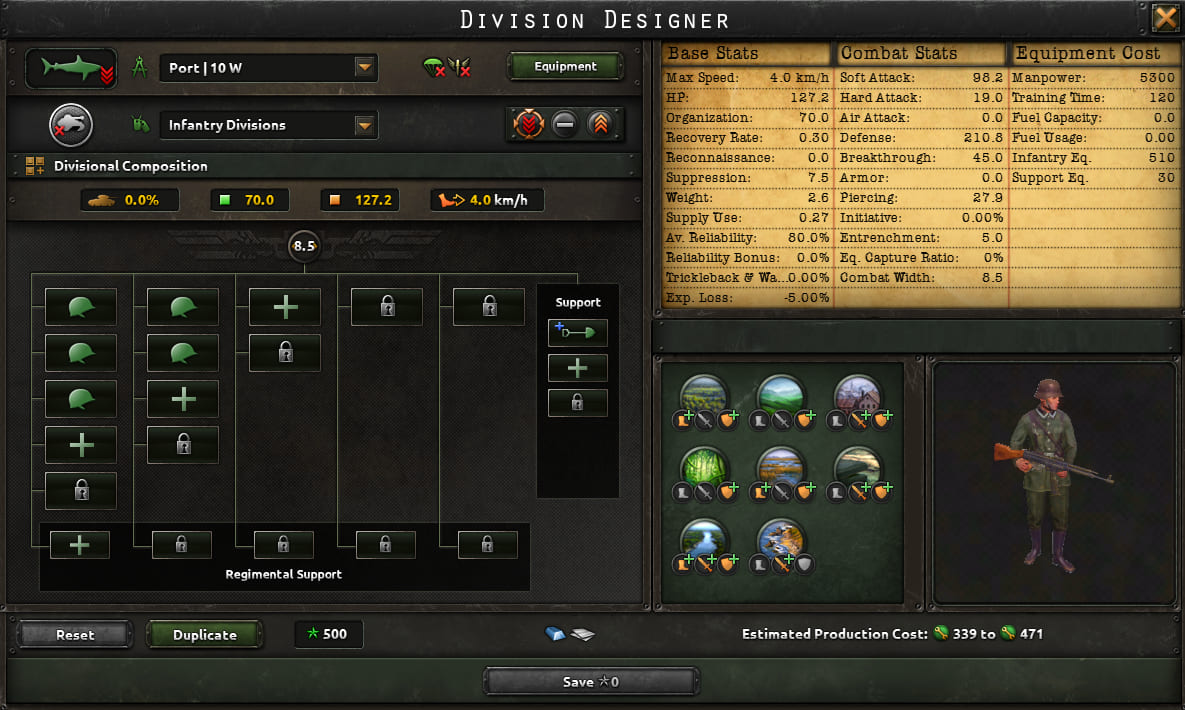 \n
\n 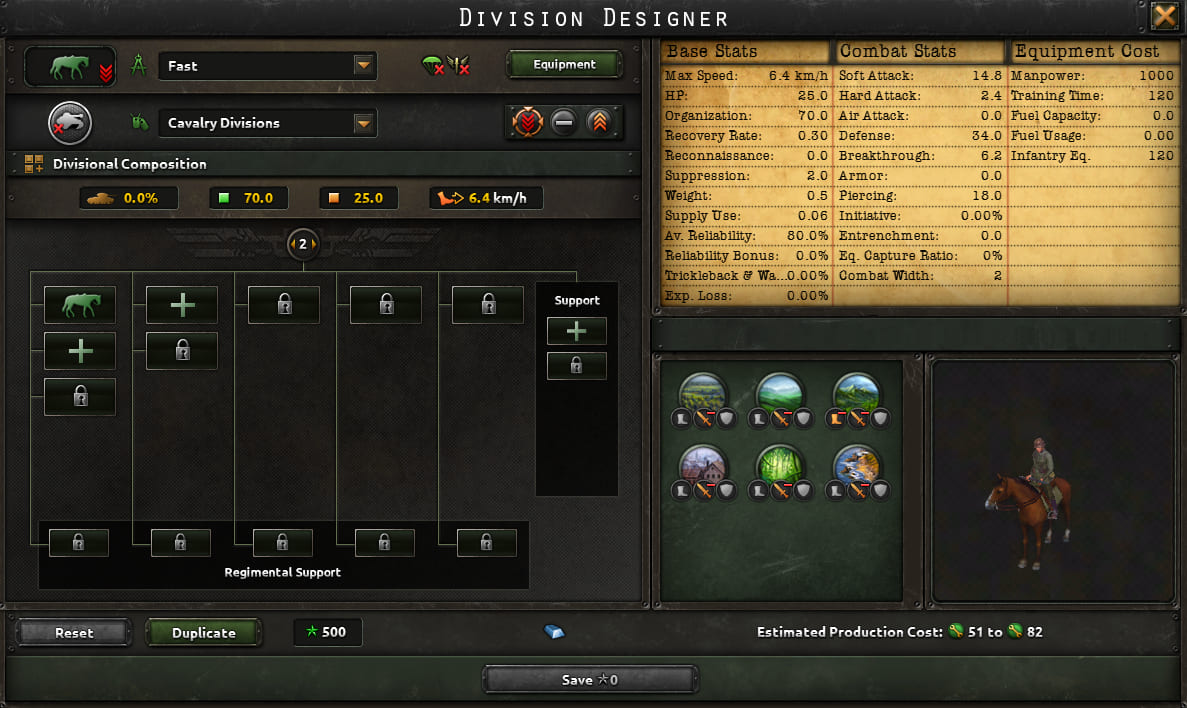 \n
\n 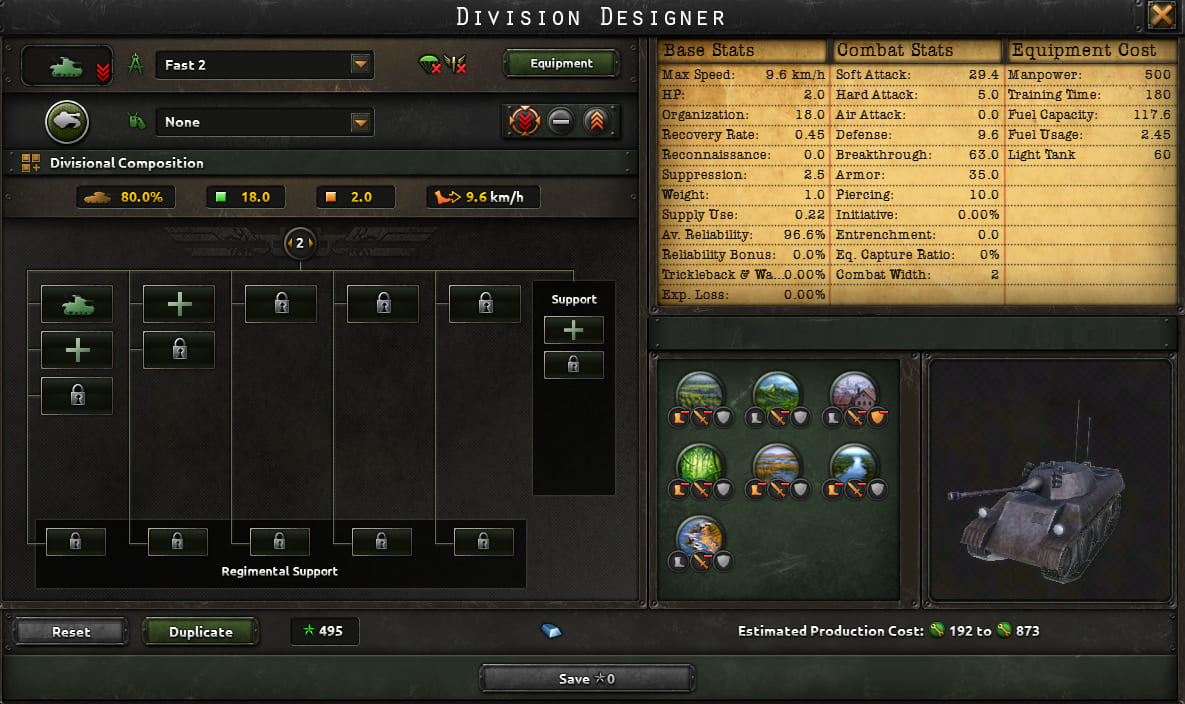 \n
\n 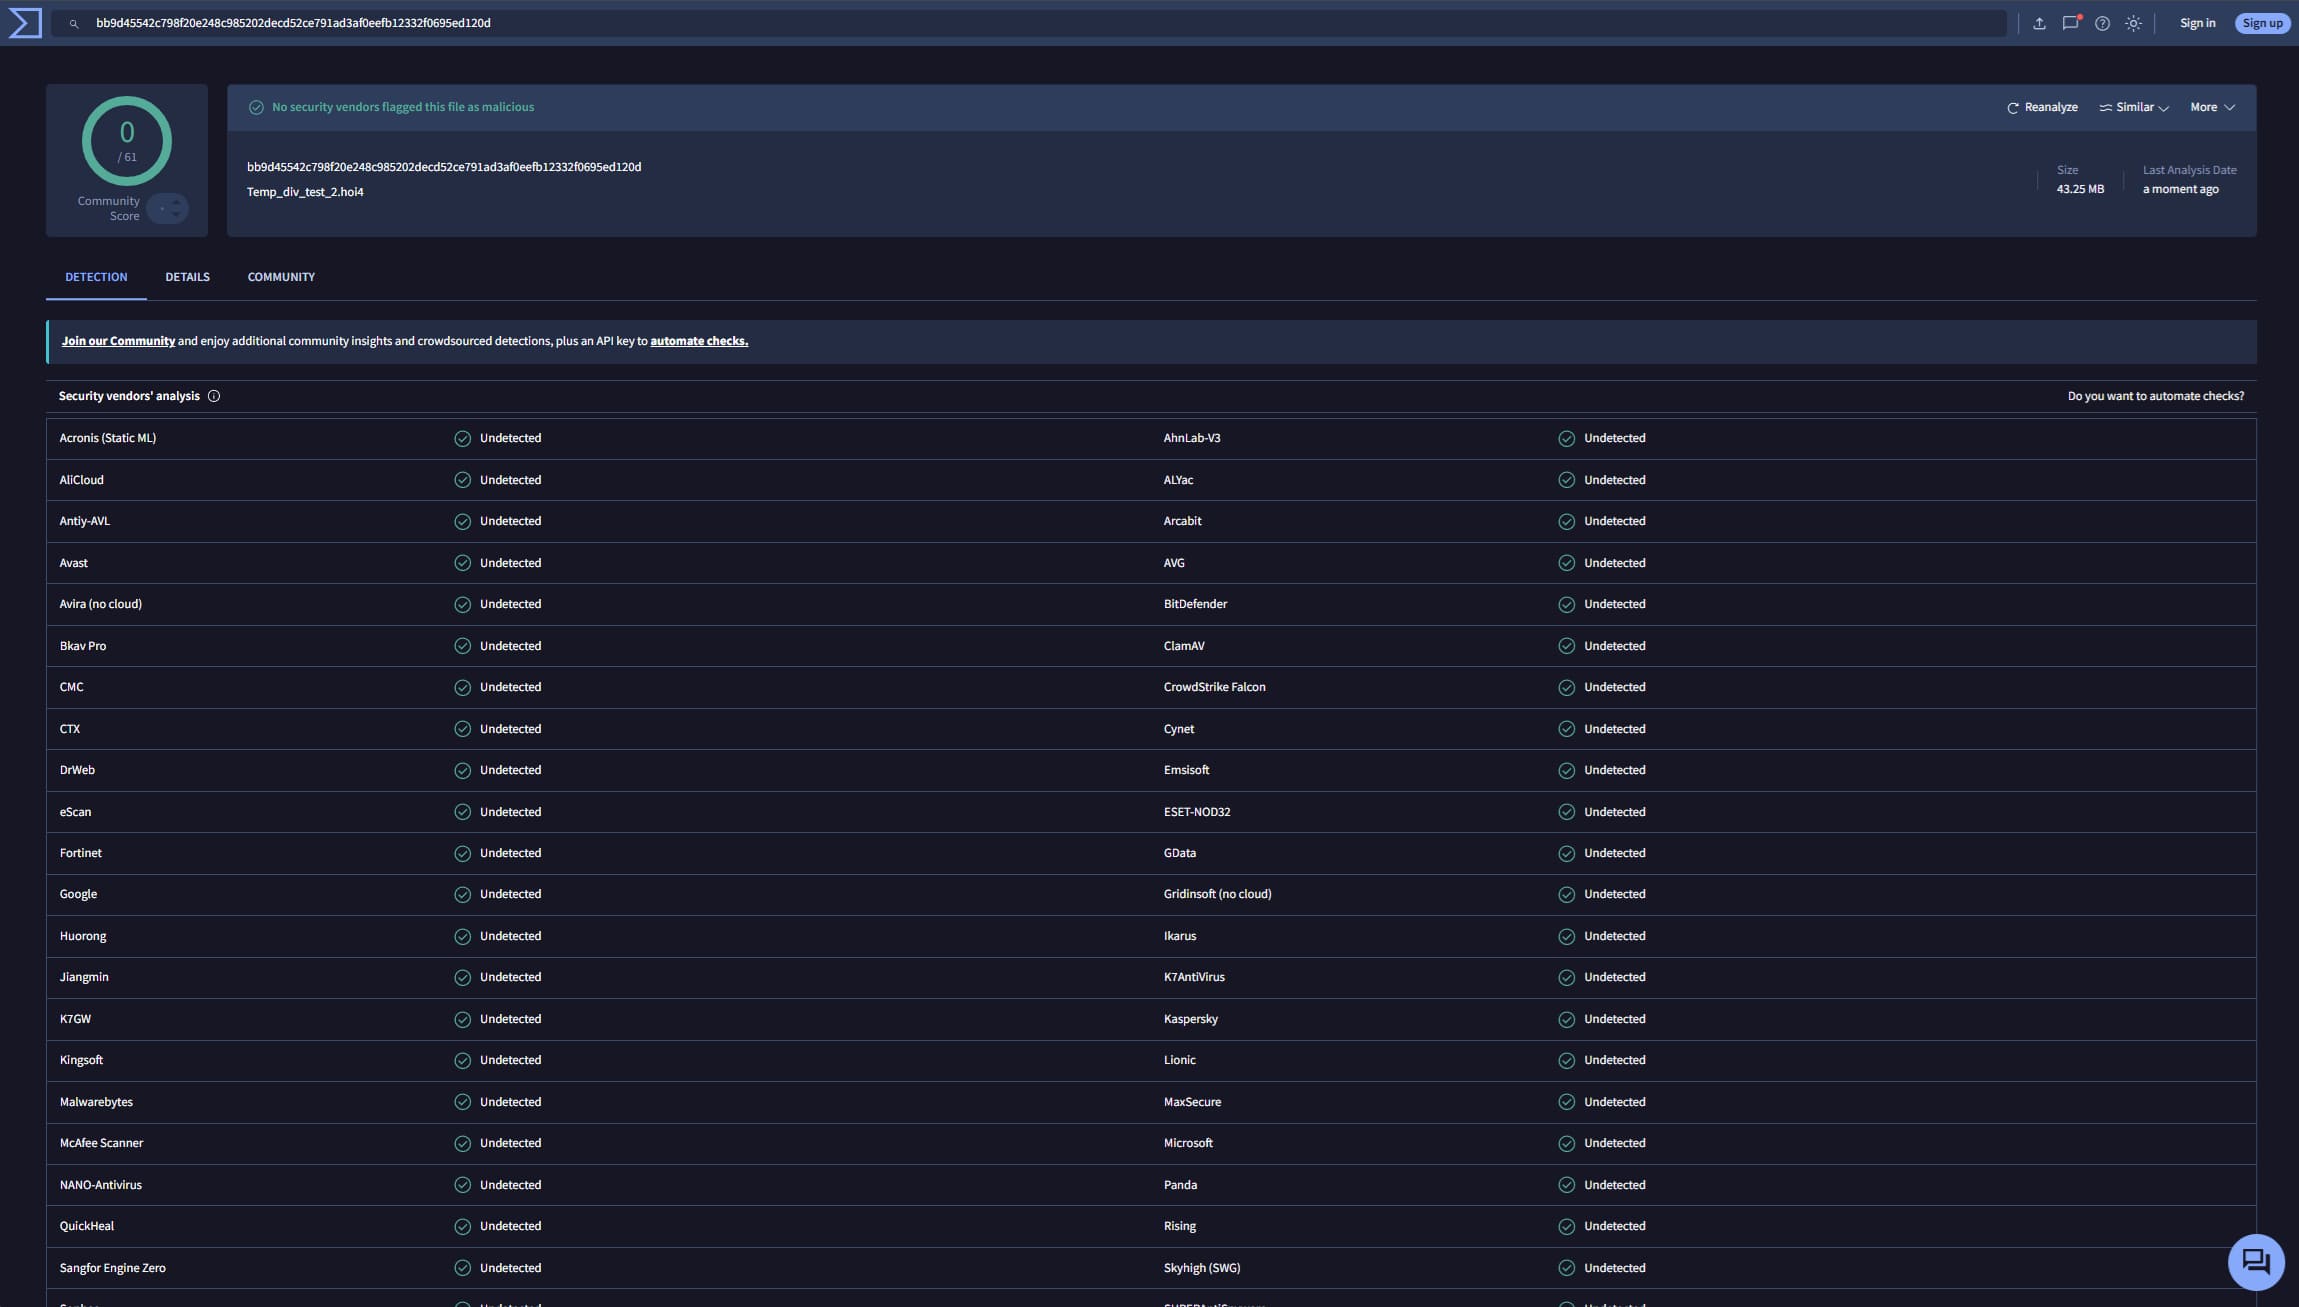 \n
\n