Meta offensive
How to grind the enemy on the offensive?
Meta Offensive in Hearts of Iron 4: How to Crush Any Enemy
A scientific approach to war: comparative tests, proven templates, encirclement tactics, and air superiority.
Briefly
- Key Factors for Victory
- Air superiority + CAS
- Tank divisions based on medium SPGs
- Creating huge pockets and breaking into the operational depth
- Proper division templates
- Researched doctrines and sub-doctrines
- Smart HQ placement and distance of 0–1 tiles
- Solid industry and economy
- Fighting on favorable terms
Not familiar with the interface? Game Interface Guide.
Who Can Afford It
- Majors
Germany, USSR, USA, and the like: massive industry, dozens of focuses, top-tier divisions and air force. - Minors
Argentina, Portugal, Turkey, etc.: fewer factories, more modest focuses, forced to use budget templates. - The Reality of the Matchup
In a fair fight, a minor vs a major in 1939–1940 has almost no chance. You can win later by building up power, or by striking unexpectedly when the enemy's main forces are tied down.
I recommend boosting your start with volunteers — guide to the Spanish Civil War and volunteers.
Key Objectives of the Offensive
- Destroying the enemy army is the main objective, not grabbing territory. Create pockets and grind down encircled divisions.
- Capturing supply hubs and airfields — without them the enemy loses supply and air support.
- Cutting railways — leaves the enemy without supply deliveries.
- Picking vulnerable points — attack weak tiles, arcs where enemy encirclement is brewing, avoiding frontal assaults with small forces.
- Be careful with breakthrough depth — don't send armor deep without infantry, otherwise tanks will get encircled.
Console Commands (for testing)
Six Rules for a Successful Offensive
| Rule | Explanation |
|---|---|
| Encirclements are a must | Encircle enemy divisions and destroy them. That’s the only way to quickly reduce enemy numbers. |
| Don't attack in difficult terrain | Mountains, forests, swamps severely reduce attack effectiveness. Look for plains and hills for breakthroughs. |
| First targets — supply hubs and airfields | Without them, the enemy is left without supplies and air support. |
| Cut the railways | This leaves enemy divisions without supply, sharply reducing their combat effectiveness. |
| Don't attack with small numbers against large ones | Pick the weakest enemy tiles in terms of defense and arcs where you can create a pocket. |
| Don't push armor deep without infantry | Infantry must occupy the resulting frontline, otherwise your tanks will end up encircled. |
Frequently Asked Questions
For infantry divisions, 15–20 width is optimal; for armored ones, 20 to 36. The guide provides specific templates that already account for these parameters.
For an effective breakthrough, 4–6 tank divisions concentrated on a 2–3 tile wide section is plenty. More will cause supply issues.
Make sure to put AA support companies in every infantry division. It's also highly advisable to produce your own fighters, at least in minimal numbers.
In single-player against the AI, this is the optimal choice. Medium SPGs have massive soft attack, which is ideal against the bot's infantry armies, plus they're cheaper than tanks and require fewer vehicles per battalion.
Break through the front with tanks on a narrow sector, immediately send infantry into the breach to widen the corridor, then send tanks on a deep raid to close the ring. Once closed, squeeze the pocket with infantry, and pull tanks into the operational depth.
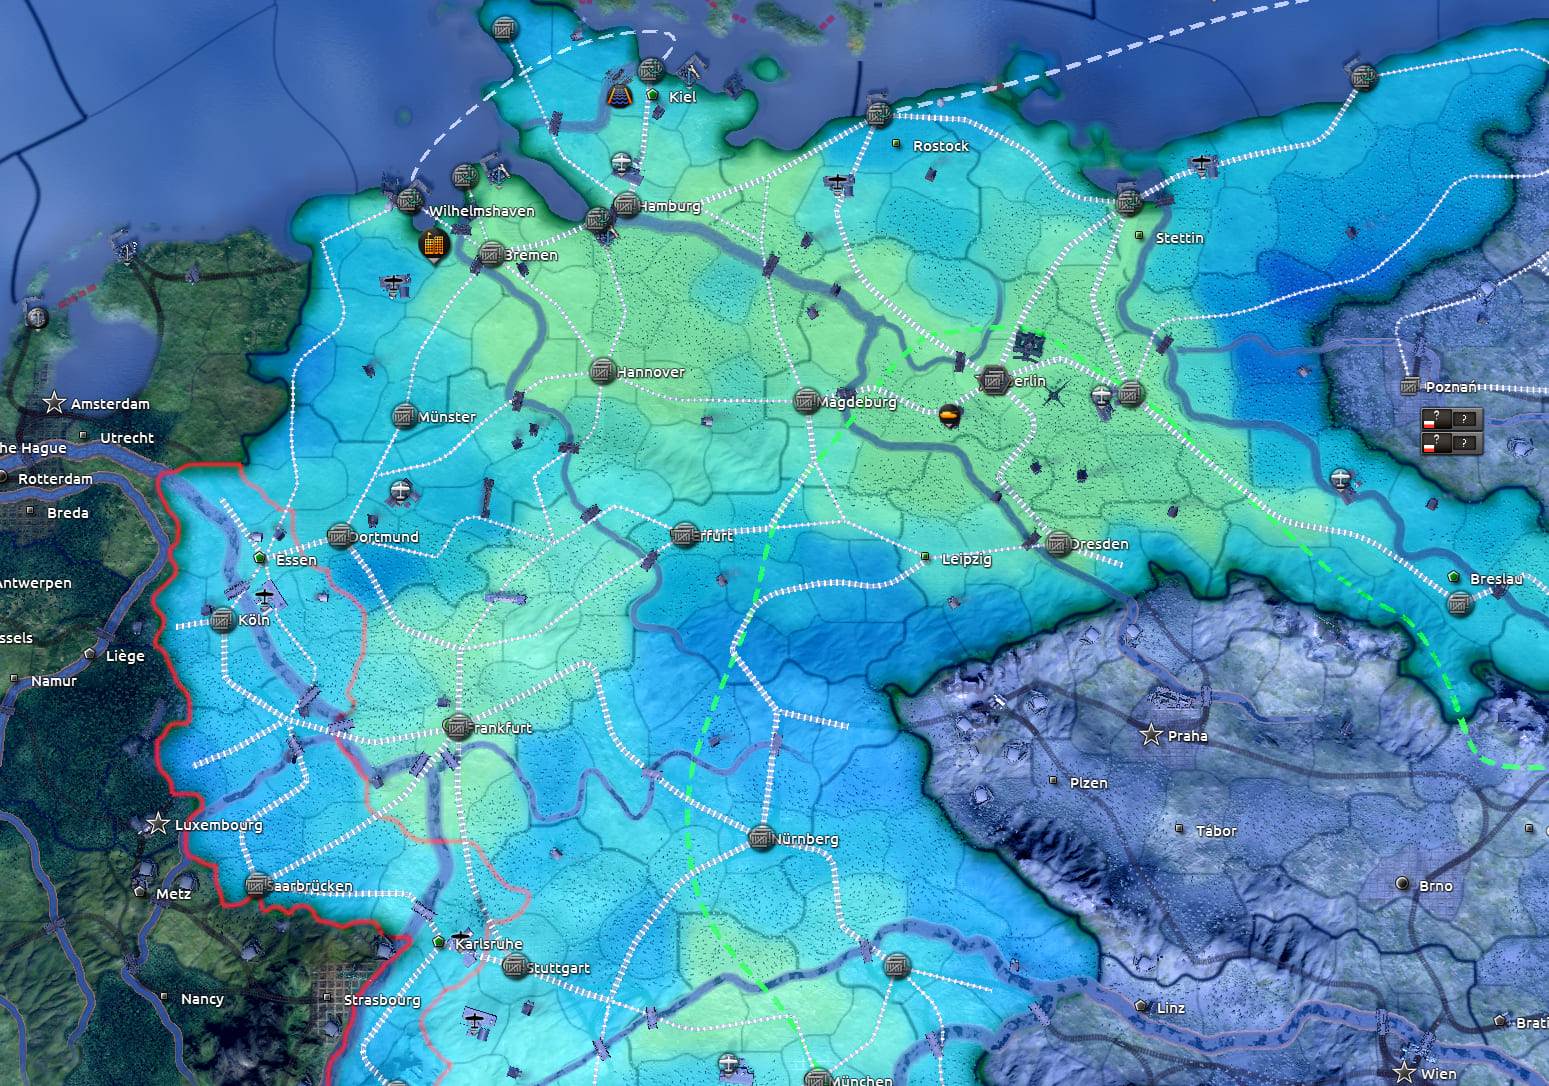
Press F4 to show the supply map — provinces with shortages are highlighted in yellow or red. Also look for the 'out of supply' icon above the division.
instanttraining (instant training), instantconstruction (instant construction), fow (fog of war off), research all (all technologies), ale [number] (add equipment), as well as st 100 and ws 100 for full stability and war support.
Immediately halt the offensive, let the tanks recover organization, check supply and air support. If the enemy counterattacks, dig in on the achieved positions and prepare a new strike on a different sector.
Likely there's not enough motorized infantry in the division. Tank battalions have low organization, so you must add motorized units to boost it.
Yes, they provide a valuable terrain bonus. They're essential in tank divisions; in infantry ones, not as critical.
Mud and snow give serious penalties to speed and attack, especially for tanks. Try to plan offensives for the dry season (spring–summer) and avoid fighting in bad regions.
Right after the breakthrough, send infantry into the corridor to widen the flanks. Don't leave narrow "corridors" unprotected — the enemy can cut them off.
Simply stop the attack and give divisions time to rest. If you're being counterattacked, it's better to temporarily pull divisions back one tile to recover.
In theory, breakthrough matters, but in single-player against the AI it's better to prioritize soft attack. Bots mostly use infantry, and high soft attack delivers more value.
The navy can bombard coastal provinces, applying a debuff to the enemy. It also enables landing troops in the rear to create a second front.
Whenever possible, bypass fortified areas from the flanks. If an attack is unavoidable, use exclusively armored divisions. Attacking forts with infantry is pointless and will cause massive casualties.
Stop when you've already created several large pockets and further advance risks getting your own divisions encircled. Dig in and prepare the next phase.
Stability boosts political power gain and production efficiency. To keep stability high during war, you need high war support.
Separate divisions — no. But in armored divisions, motorized infantry is a must. Mechanized infantry isn't cost-effective due to its high price, so stick with motorized.
Build or capture railways to the front line, as well as enemy logistics hubs and ports. As a last resort, use air supply with transport planes.
Planning is an attack bonus that accumulates while a division stands and prepares to execute a drawn offensive plan. Always give troops time to prep — it provides huge buffs.
Too narrow a corridor (not widening flanks), not closing the ring fast enough, incomplete clearing of the pocket — as a result, the enemy can break out and escape.
Capture a bridgehead on the far bank using tanks, not infantry. Tanks break through defenses better and take fewer losses. After securing the bridgehead, develop the offensive from there.
Technically possible, but effectiveness will be much lower. Tanks without air support lose a significant chunk of their striking power.
The enemy starts pulling reserves to the front line, especially noticeable when enemy tank divisions appear on the flanks of your breakthrough. At that point, it's worth reinforcing your cover.
Industry and Construction
- Early game (1936–1938)
Prioritize civilian factories. Build infrastructure in the first half of 1936, before you change the "Civilian Economy" law. Build where there are more factory slots and infrastructure is 40%+. Infrastructure also boosts resource extraction by 15–20% per level. - Military factories and safety
From 1938 switch to military factories. Place them in safe regions, away from the front. If there's a risk, fortify the frontline with bunkers (level 2-4). - Fuel and Refineries
If short on fuel and rubber, build refineries, especially in a war against the Allies, where fuel is often scarce.
Advisors, Generals, and Field Marshals
- Army Commanders
In peacetime, prioritize experience; in war, attack. For the air force similarly: peace — experience, war — ground support or air superiority. - High Command
- Infantry Expert (+15% infantry defense, +10% infantry attack)
- Armor Expert (+15% armor defense, +10% armor attack)
- Third — air support (if skies are always green) or air superiority (if yellow or red)
- Political Advisors
Heavily depend on the country and situation, no universal template.
Key Research by 1940
- Improved Radio 1939 — level 2 and 3 radios greatly increase armor breakthrough.
- Improved Artillery 2 1941 — gives the improved medium howitzer for SPGs.
- AA Modernization 1939 — if you're not confident in green skies.
- AT Modernization 1 1939 — only if the enemy masses tanks.
- Medium Tank Model 1940 — top-tier medium tank, a must for majors.
- Engineer Company 2 1939 — significantly increases defense.
- Improved Infantry Equipment 2 1940 — buffs attack and breakthrough.
- Improved Small Airframe 1940 — the basis for meta fighters and CAS.
- Engines 3 1939 — to mount modules without exceeding thrust.
- Heavy Machine Gun 1937 — for the meta fighter template.
- Range Improvements 1936 — extra fuel tanks.
- Signal Company, Field Hospital, Recon Company 1936 — essential support technologies.
How to Maximize Bonuses
- Right field marshals, advisors, and army commanders.
- Meta equipment and division templates.
- Proper placement and management of divisions (death stacks, rotation).
- General's HQ on the frontline or 1 tile away.
- Division level — regular (3) and above.
- Researched sub-doctrines.
- Offensive in the right season (not winter).
- Managing fighters and CAS (green skies + attack buffs).
War Preparation Checklist
Regimental Support in Offense
- For infantry
You can add a rocket battery if organization is above 50 and you have strong industry. - For tanks (SPGs)
Motorized heavy company, if organization is above 40, helps hold captured tiles. Rocket battery is a no-go for tanks — it cuts speed to 4 km/h. - Exceptions
Everything else in regimental support is mostly designed for defense. Almost unnecessary in offense.
Support Companies for Infantry and Tanks
- For infantry
- Artillery company
- Engineer company
- Recon company (preferably armored)
- AA (if no air superiority)
- Super-heavy artillery for mega-majors
- For tanks (SPGs)
- Artillery company
- Armored or motorized recon
- Engineer company
- Rocket artillery support
- Medium tank flamethrower company (cheap flamethrower tank for terrain buff)
- Minimal setup
- Infantry: artillery, engineer company, cavalry recon, AT/AA situationally
- Tanks: artillery, engineer company, motorized recon, AA situationally
Infantry Templates
Minor
- 6 infantry
- 1 artillery
- engineer company
- artillery
- AA
Major
- 7 infantry
- 2 artillery
- engineer company
- artillery
- any recon
- rocket artillery
Infantry division organization should be 45–50. If higher, add a heavy regimental support company; if lower, remove excess battalions.
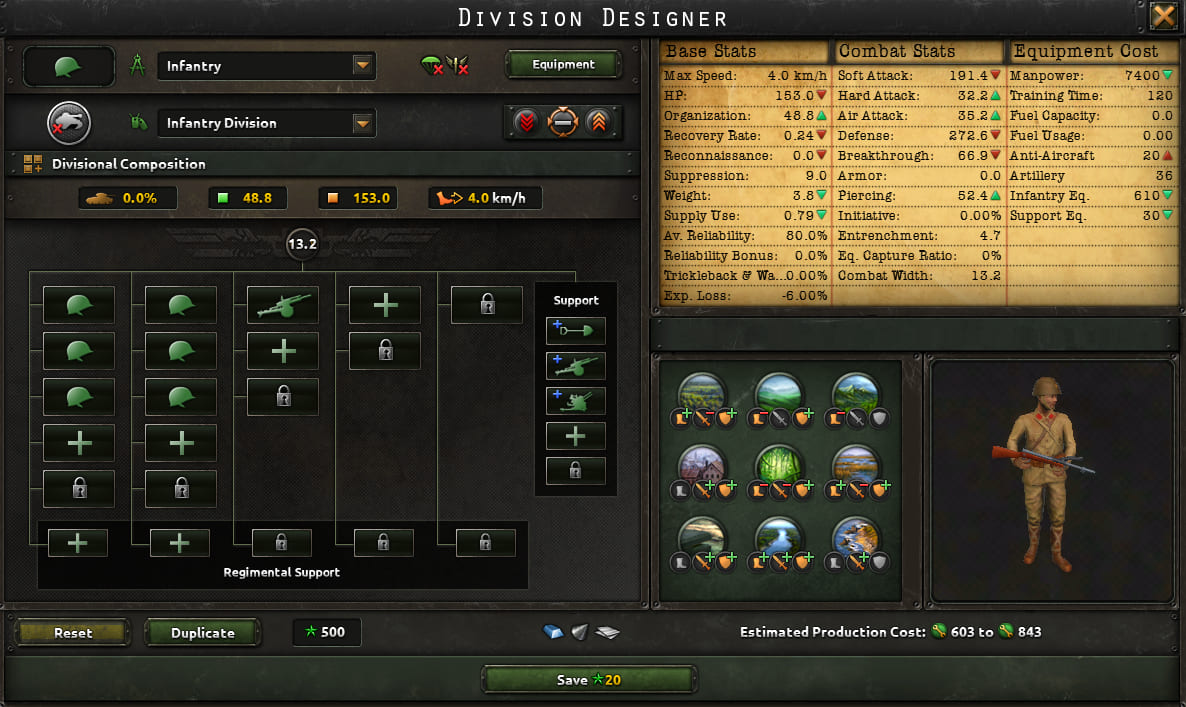
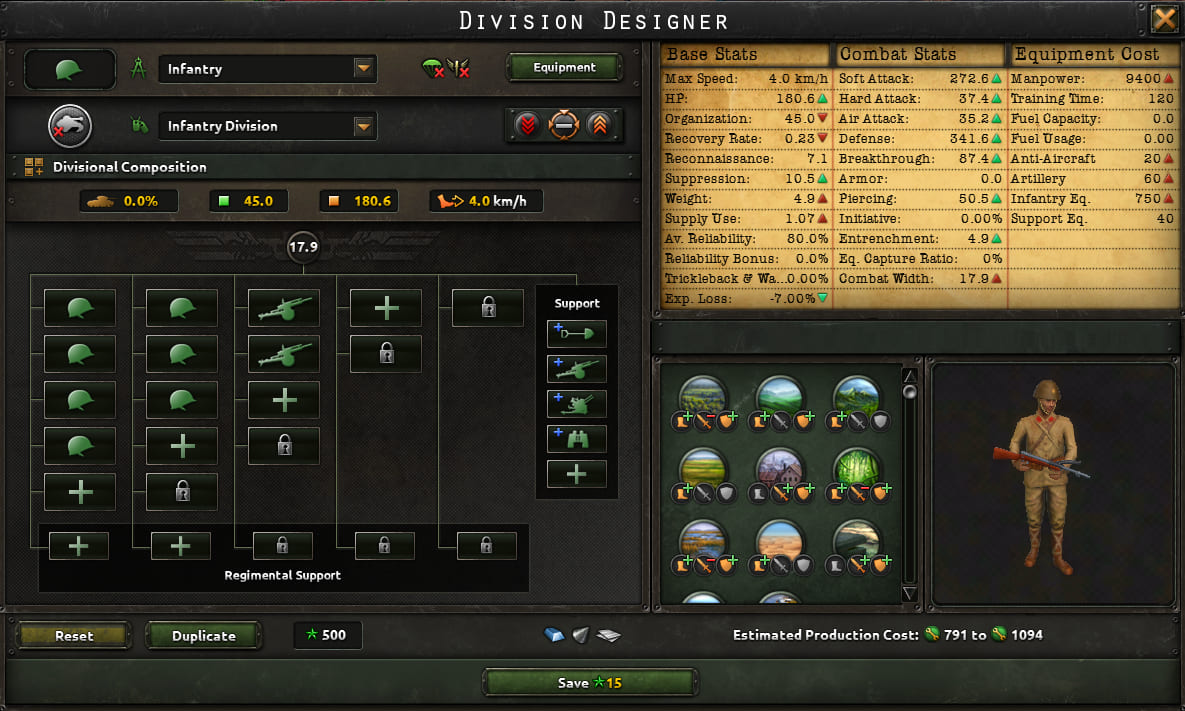
I highly recommend checking out the Best Division Templates →
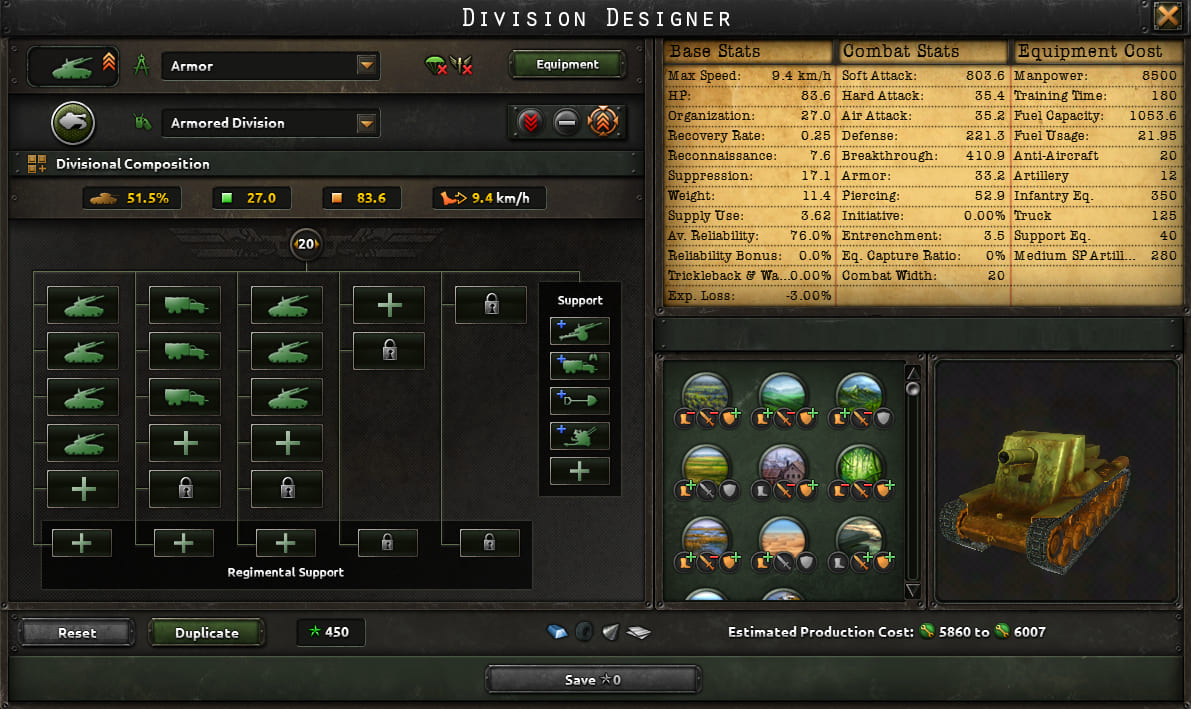
Armored Templates (SPGs)
Minor
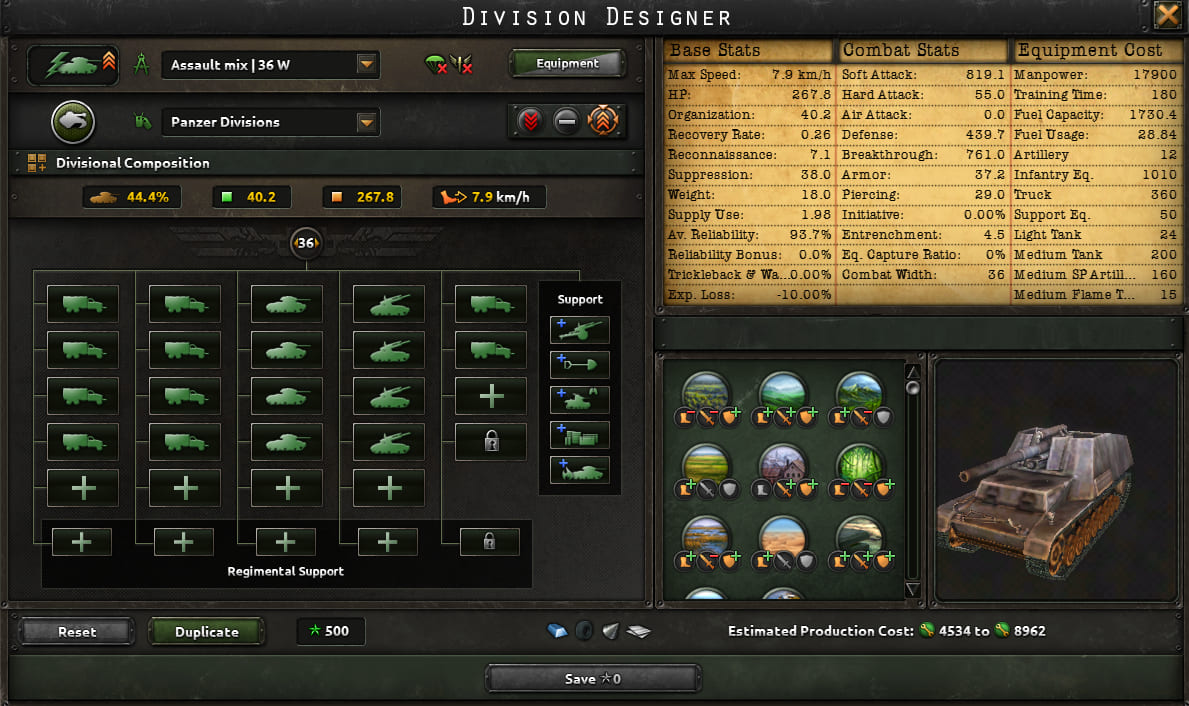
- 7 medium SPGs
- 3 motorized infantry
- armor recon
- engineer company
- artillery
- AA
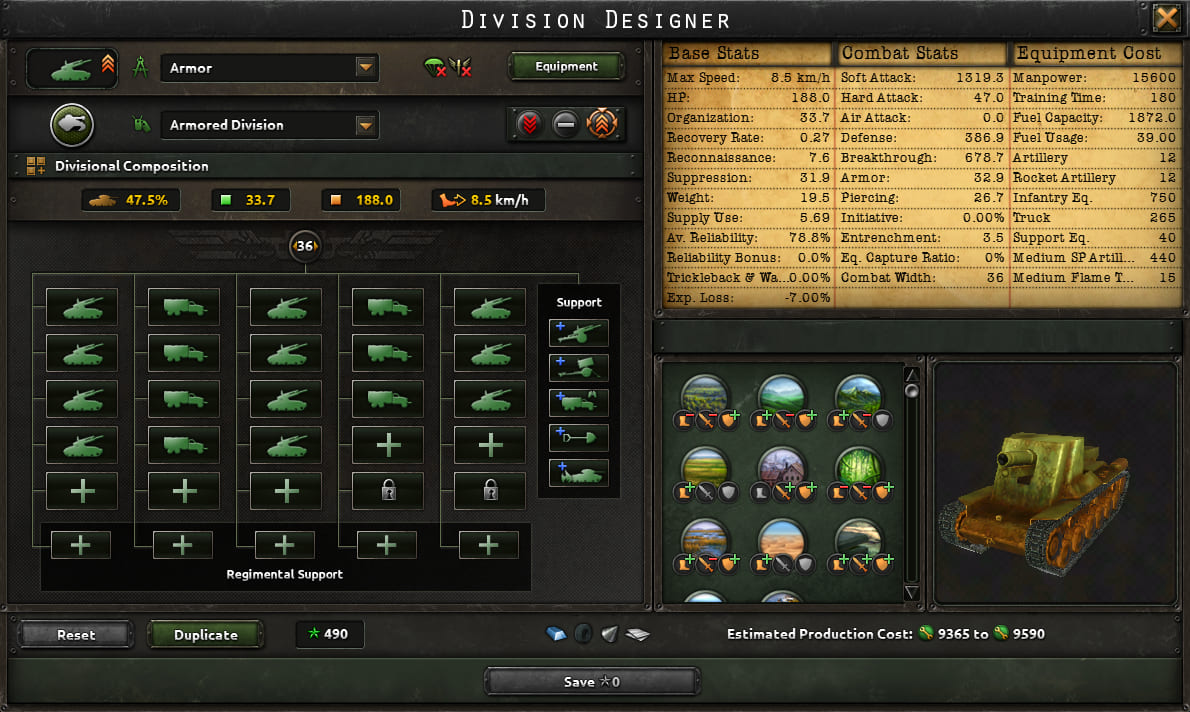
Major
- 10 medium SPGs
- 8 motorized infantry
- armor recon
- engineer company
- artillery
- rocket artillery
- medium flamethrower tank
Why SPGs and not tanks? In single-player, bots mainly use infantry, so soft attack is more important than breakthrough. Medium SPGs have insane soft attack, plus they’re cheaper than tanks and require fewer vehicles per battalion (40 vs 50 for medium tanks). Make sure to take the artillery and support sub-doctrine 'Self-Propelled Support'.
Equipment Designer
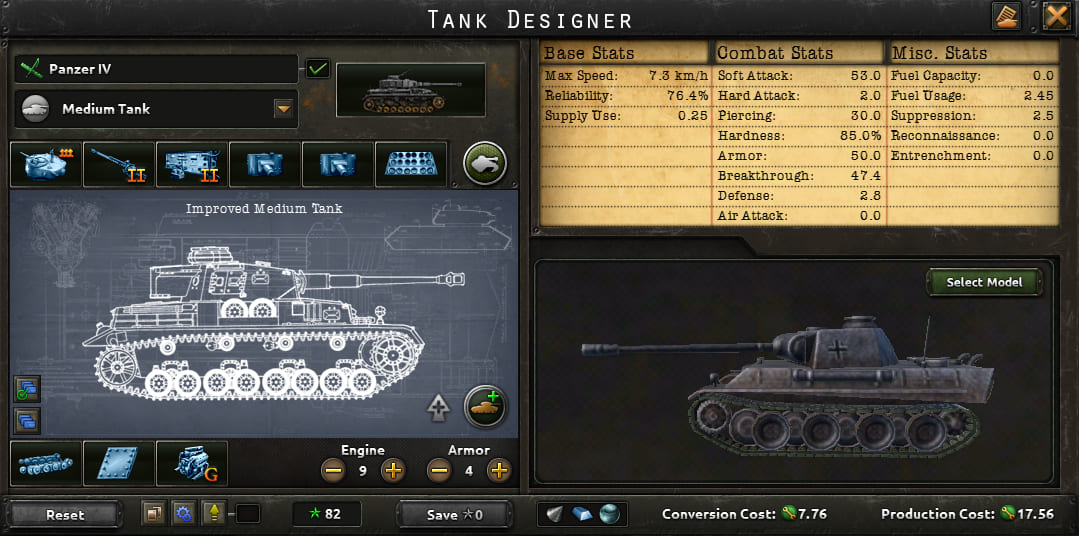
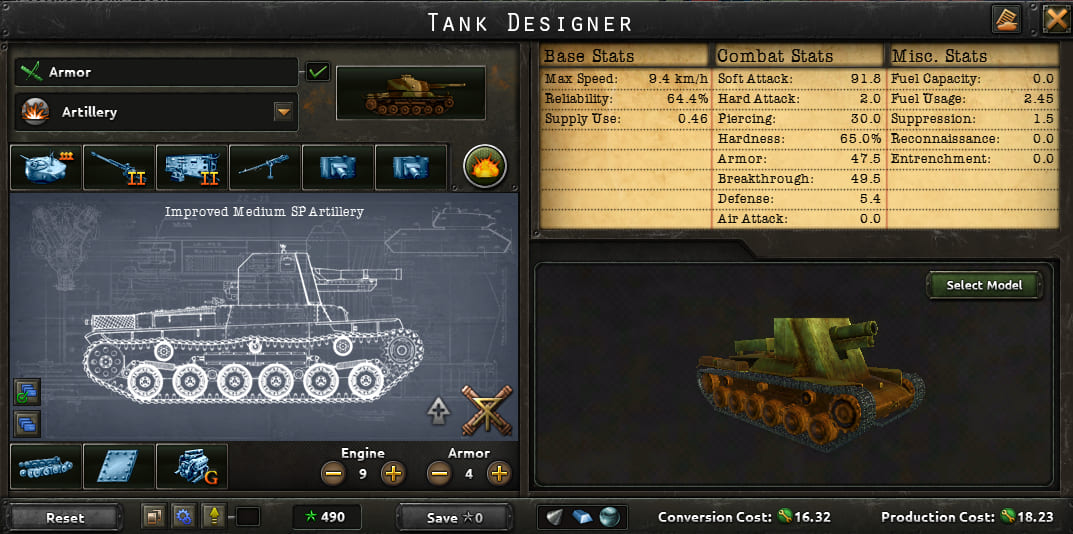
- SPG
- Medium three-man turret
- Medium howitzer (improved for majors)
- Basic radio (upgraded for majors)
- Interleaved roadwheels
- Engine 9, armor 4
- Majors add heavy machine gun ×2 and extra machine gun
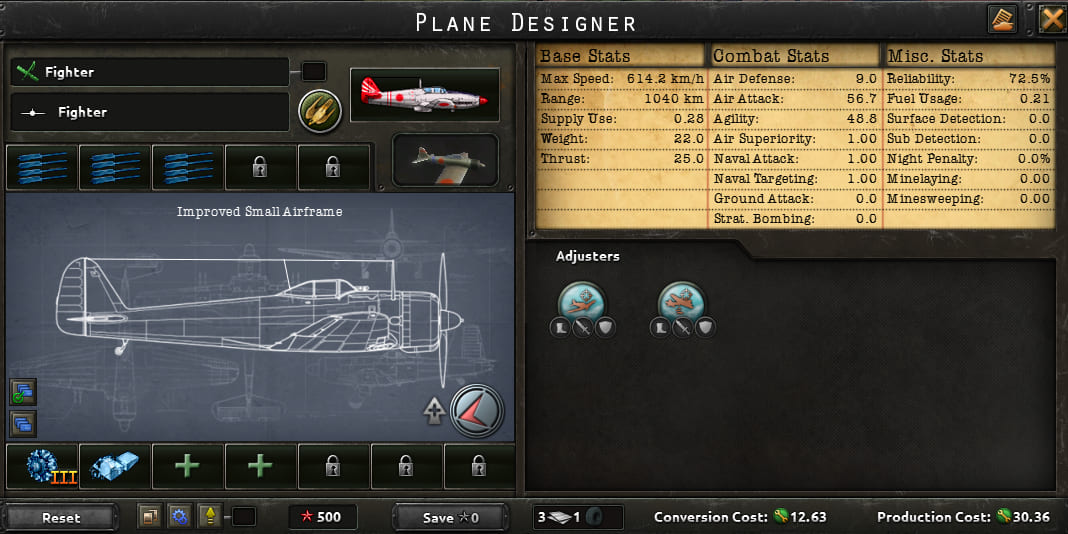
- Fighter
- 4x heavy machine gun ×3
- 1x engine level 3
- Extra fuel tanks
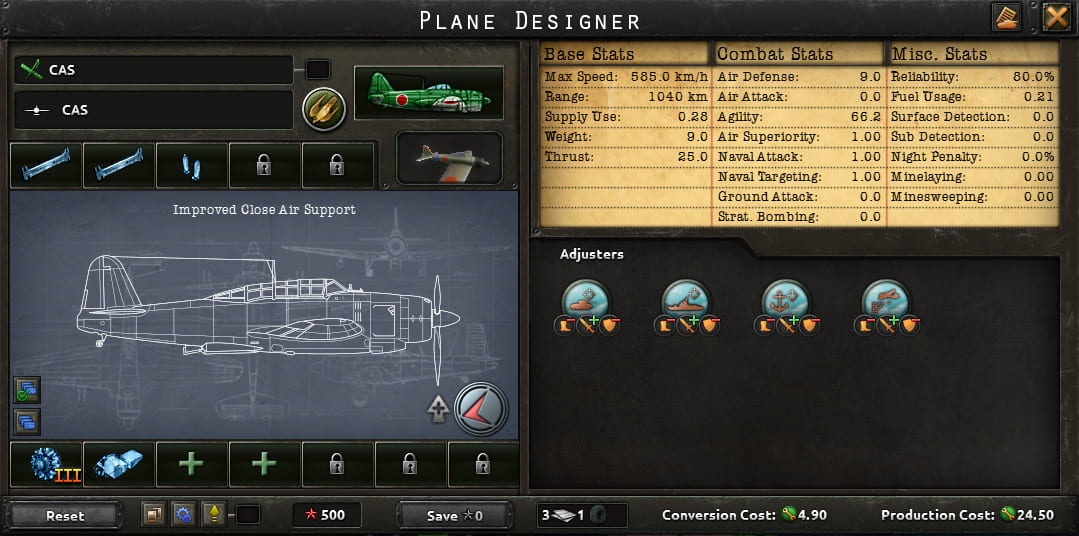
- CAS
- Heavy bomb locks ×2
- Bomb locks ×1
- 1x engine level 3
- Extra fuel tanks
- Engine rule
Always use one engine. Installing two or more sharply increases cost without a justified gain.
Glossary
- Infantry Expert
- Commander who buffs infantry troops.
- Armor Expert
- Commander who buffs armored units.
- Organization
- Division's staying power in combat — when it runs out, the division retreats.
- Soft attack
- Damage against infantry-type targets.
- Hard attack
- Damage against armored targets.
- Breakthrough
- Attack stat: the higher it is, the less organization damage your division takes when advancing.
- Weather
- Local tile modifiers, usually debuffs.
- Encirclement / Pocket
- Surrounding enemy forces and then destroying them.
- Tile
- The smallest territorial unit on the map.
- HQ
- The division containing the general; the closer to the front, the more buffs it provides.
Air Power in Offense: Mechanics
- CAS
They only buff tiles within their range and if you have air superiority. If a tile isn't covered, no buff. They only join battles during active ground combat. - Fighters
The enemy debuff to defense and breakthrough applies across the whole air region, even if the fighters physically can't reach the battle tile. - Peculiarities
CAS have their own front width: the smaller the tile's width, the fewer planes participate in the attack.
Fighter and CAS Templates
- Fighter
- 4x heavy machine gun ×3
- 1x engine level 3
- Extra fuel tanks
- CAS
- Heavy bomb locks ×2
- Bomb locks ×1
- 1x engine level 3
- Extra fuel tanks
- General rule
Always one engine. Two or more unjustifiably jack up the cost.
Navy for Support
- Naval Bombardment
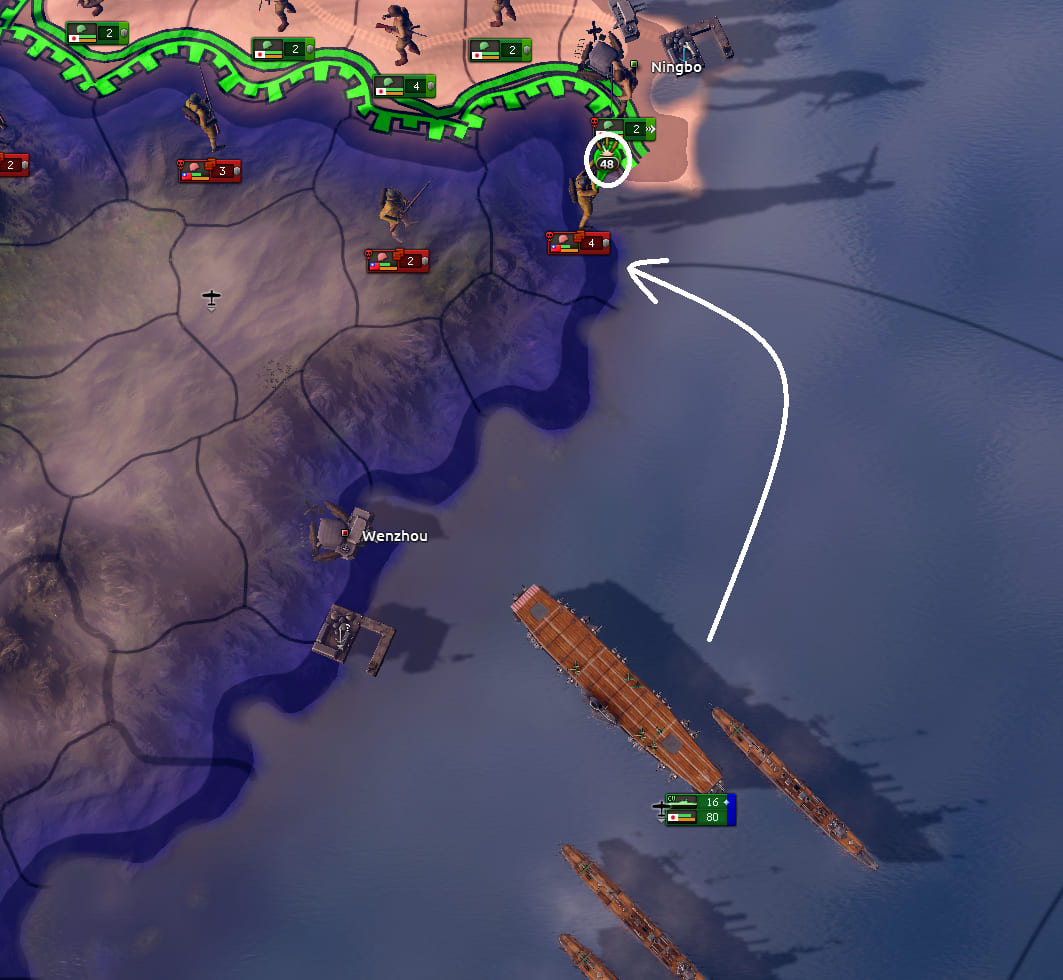
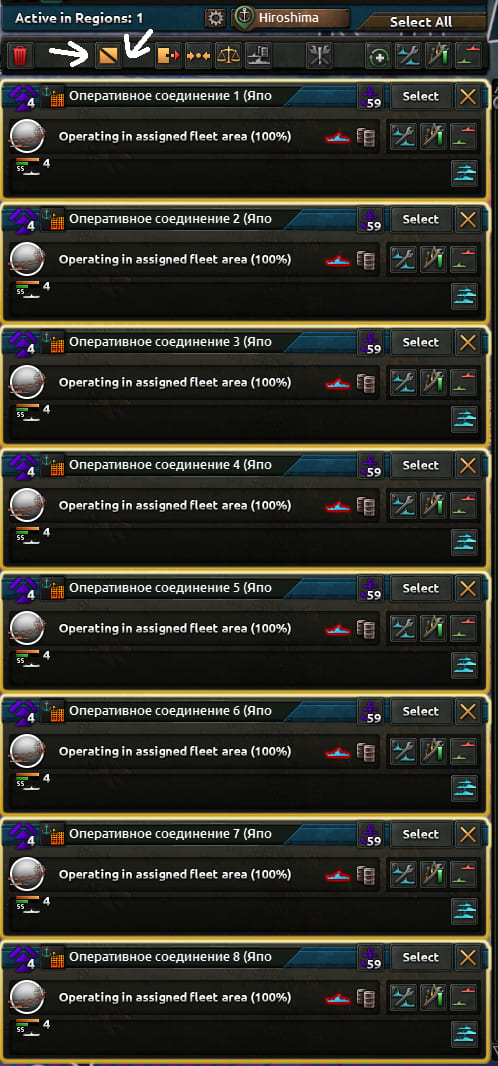
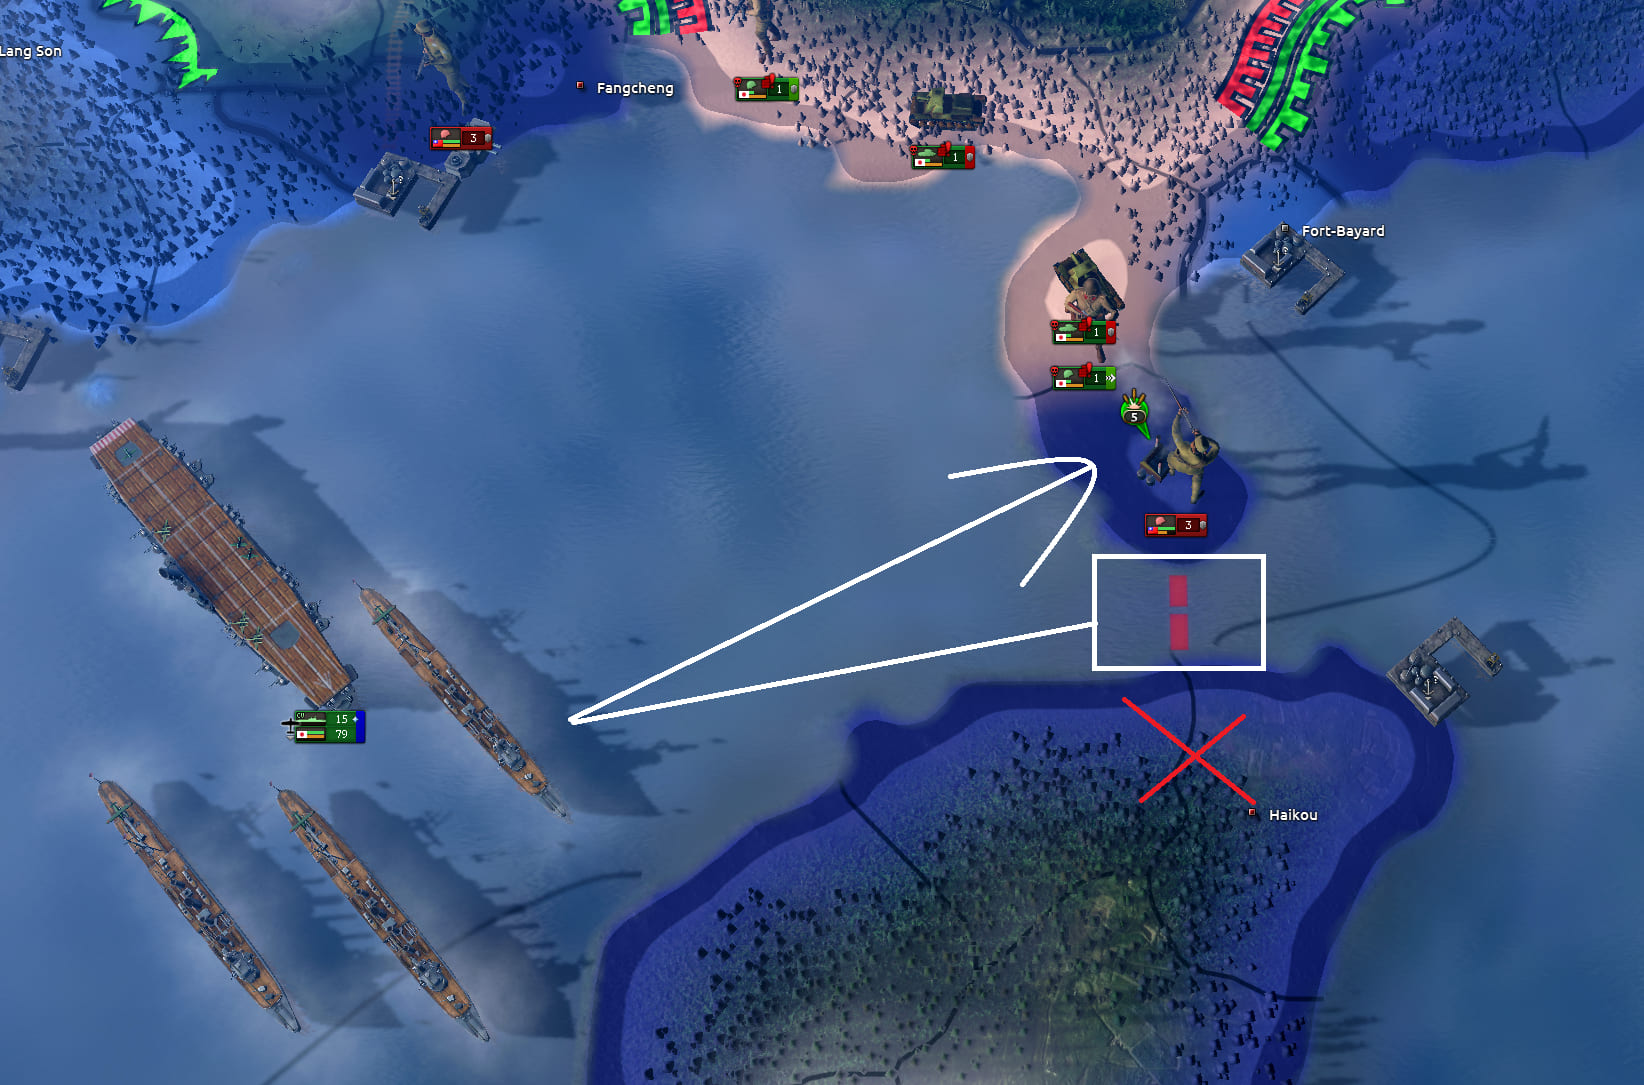
Cancel all orders, select the fleet, and right-click on the sea zone adjacent to the target tile. It applies a debuff to the enemy. - Submarines
Split into groups of 2–3, send them to hunt convoys around the enemy country, avoiding proximity to the coast (danger from naval bombers). - Blocking Straits
By placing a fleet in a strait (e.g., Denmark–Sweden), you can block the enemy's passage. This way you can lure the enemy to your side and lock them in, creating a voluntary pocket.
AA as a Substitute for Air Power?
- Why it's bad
Even with AA battalions, the debuff from enemy air superiority remains huge. CAS without green skies are useless. - When it's appropriate
AA in the support company when skies are red. But replacing artillery with AA battalions is unprofitable: they cut organization and give less soft attack.
Pockets and Encirclements
- Creating a pocket
Concentrate armored death stacks on a narrow sector, break through the front, and close the ring behind the enemy. - Pinning the enemy
If the enemy starts pulling back divisions, attack his front-line tiles with 1–2 infantry divisions. The enemy will get bogged down in combat and won't be able to retreat. Don't hit with more than 2–3 divisions, so you don't break the defense prematurely.
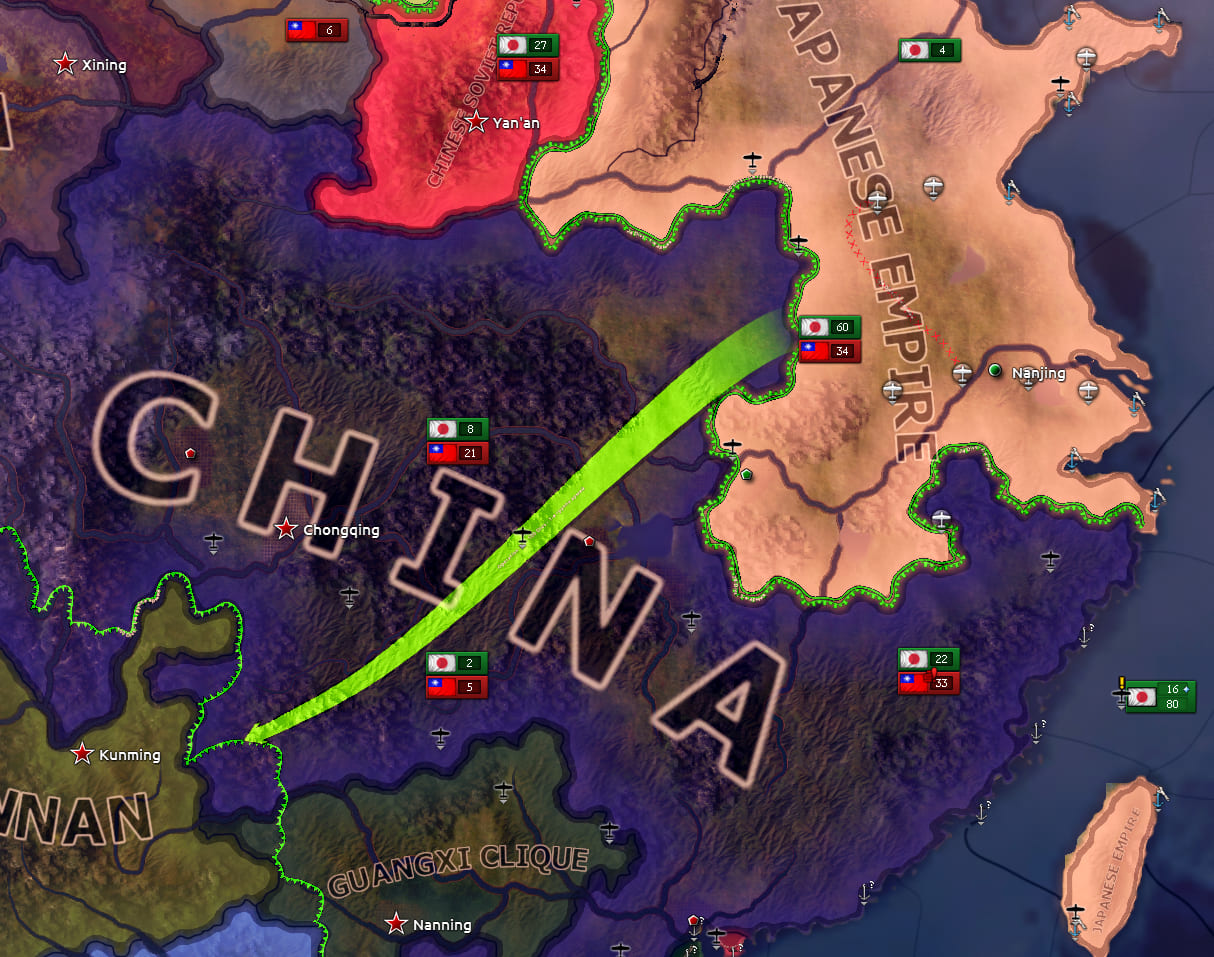
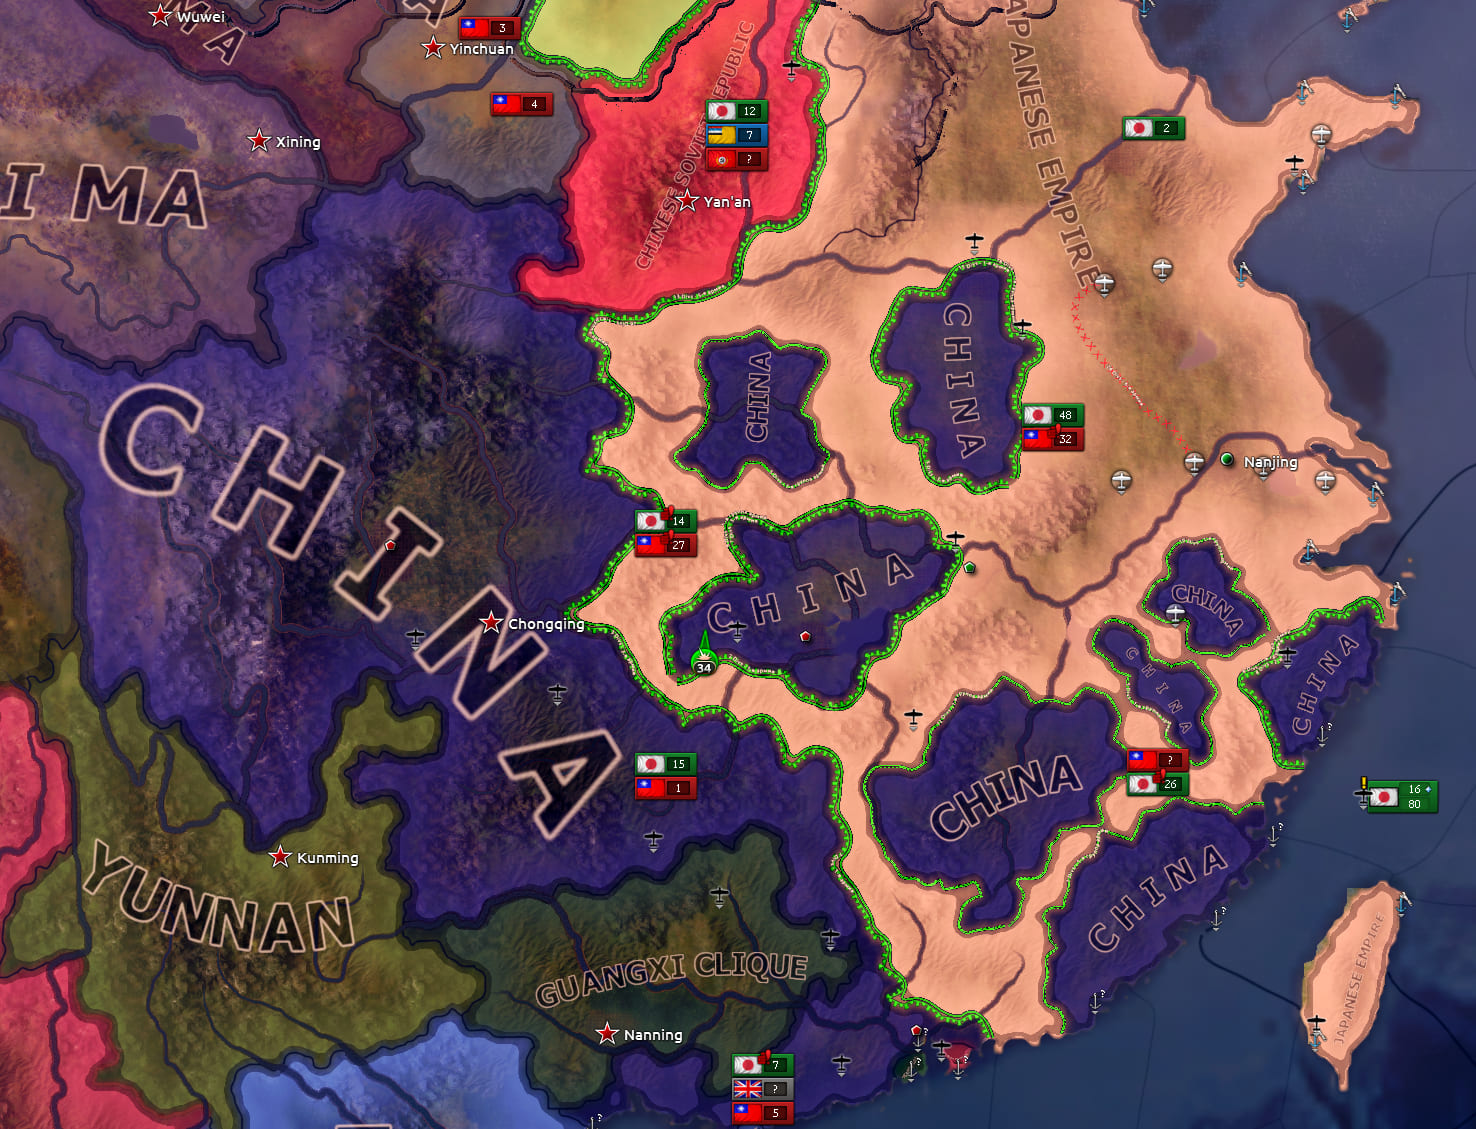
Distribution of Forces
- Death stacks, not a single point
Don't cram all your armor into one spot. Optimal: groups of 4–6 armored divisions on different front sectors with a prospective objective. - Tank supply
Must be at least normal. Poor supply will sharply reduce combat capability. - Separating armies
Infantry and tanks in different armies with their own generals: Infantry Expert for infantry, Armor Expert for armor.
Infantry Tactics
- Mopping up pockets
Once the pocket is formed, infantry handles destroying the encircled perfectly. Tanks are overkill. - Difficult terrain
Mountains, forests. Armor is ineffective there, but infantry can attack. - Covering tanks
If your armor is counterattacked, use infantry to attack the tiles they're firing from. The enemy will lose the ability to move. - Follow-up after enemy attack
When the enemy loses organization in a failed attack, your infantry can take the tile with almost no losses.
Armor Tactics (SPGs)
- Death stacks of 4–6 divisions
Break through the front on weak tiles, move into the operational depth, and close the pocket. - Breakthrough depth
Don't push deep without infantry, otherwise tanks will get encircled. - After the pocket
Pull tanks to a new sector, leave cleanup to infantry.
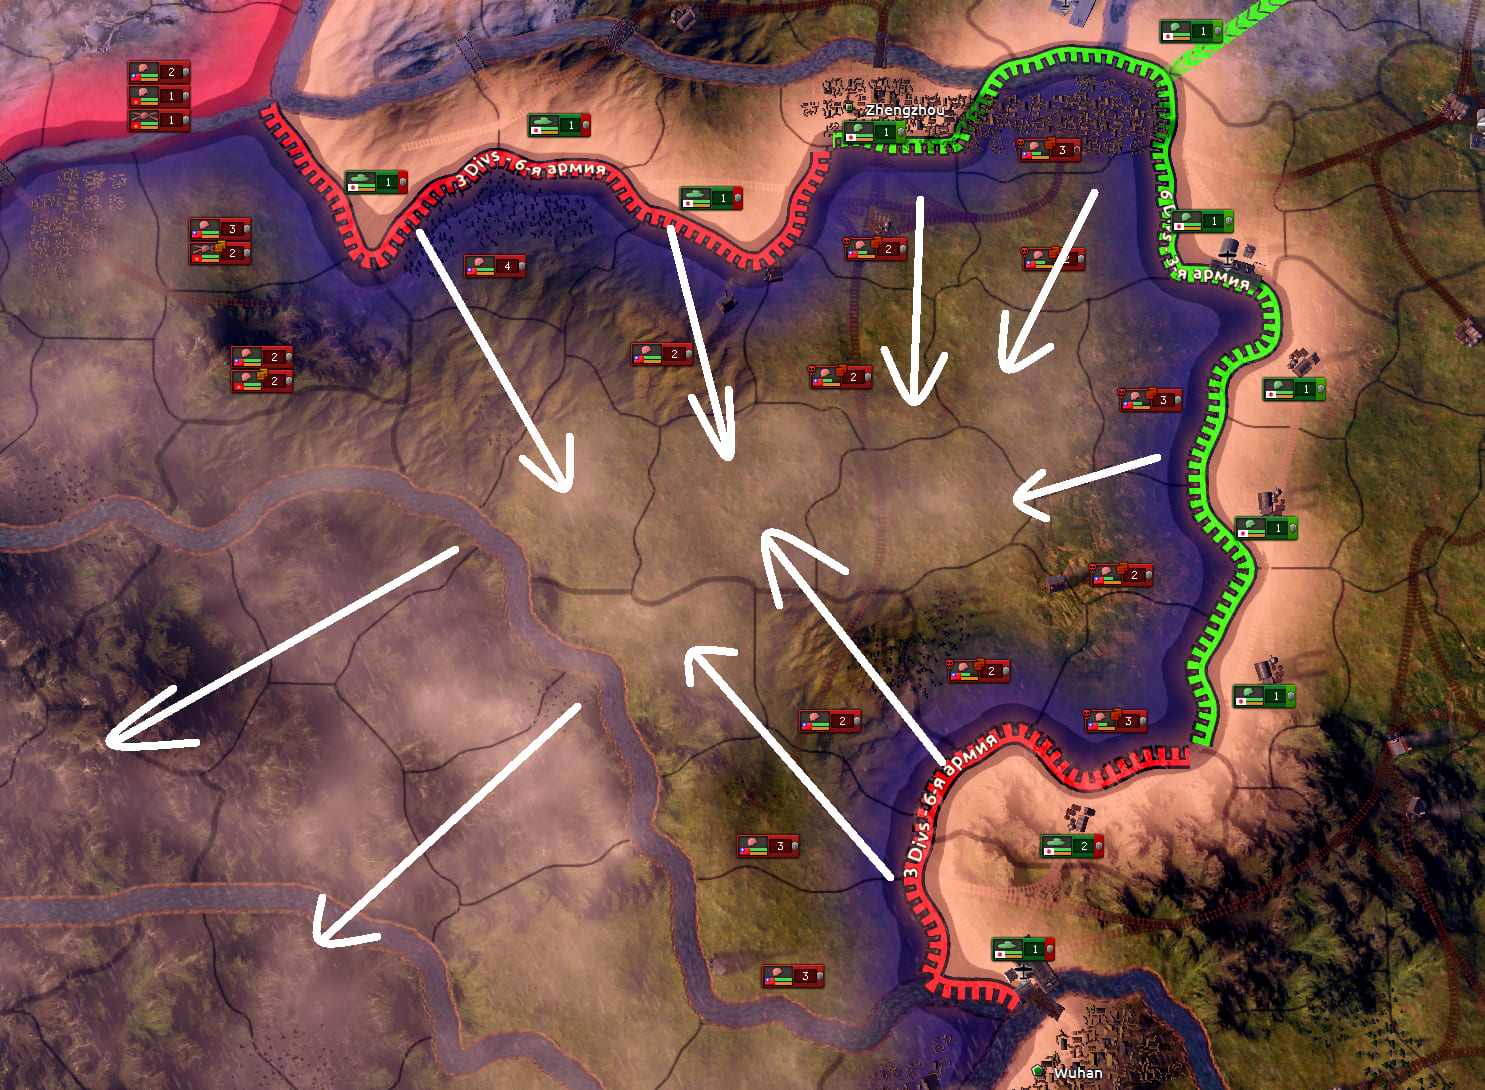
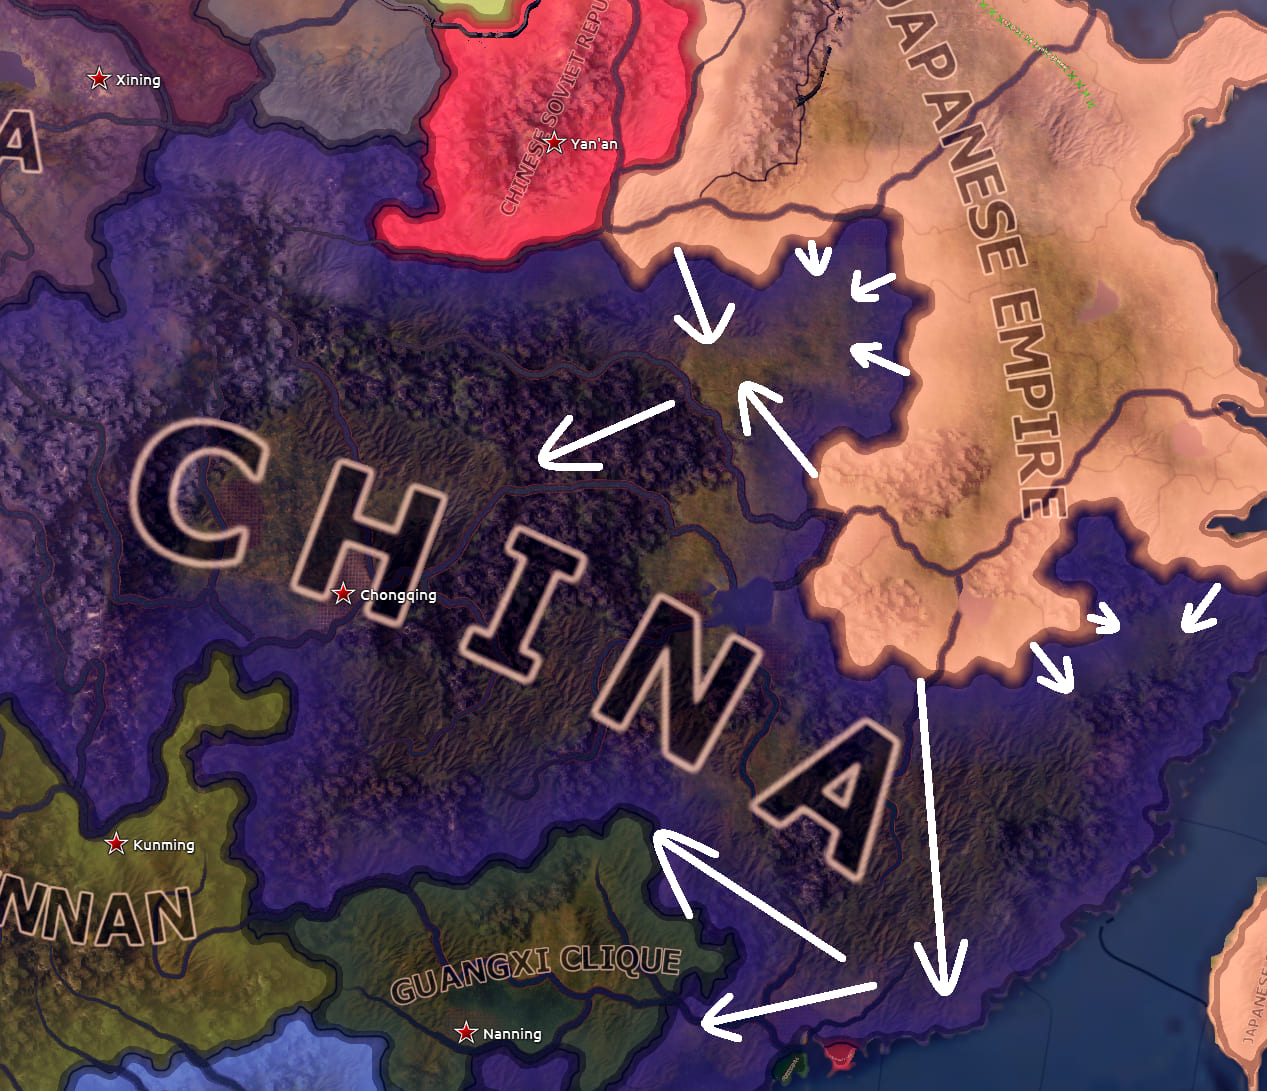
HQ Distance
- On the frontline (0) — maximum buffs, but the HQ can be attacked. For tank armies when you're stronger than the enemy.
- Short (1) — moderate buffs, safer. Ideal for infantry armies and minors.
- Medium (2) — planning debuff (−10%). If the front is unstable.
- Long (3) — severe planning debuff (−15%). Only if the enemy is successfully blitzkrieging.
- Manual control — full control, handy when the frontline is short.
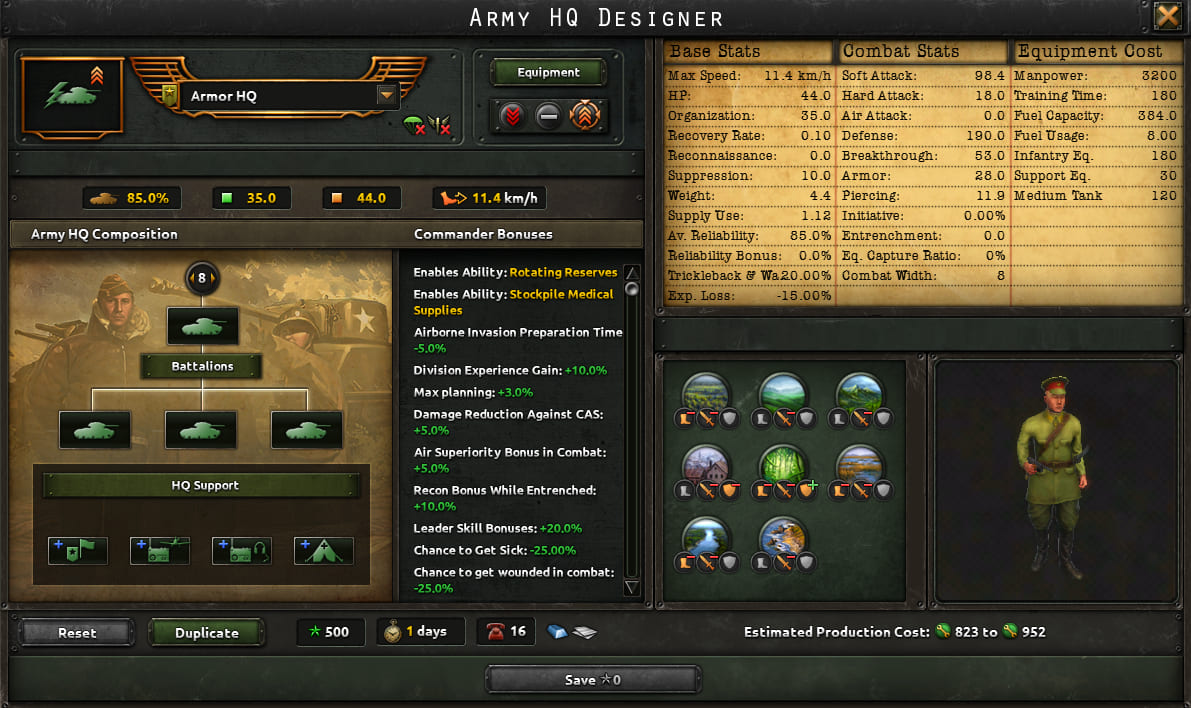
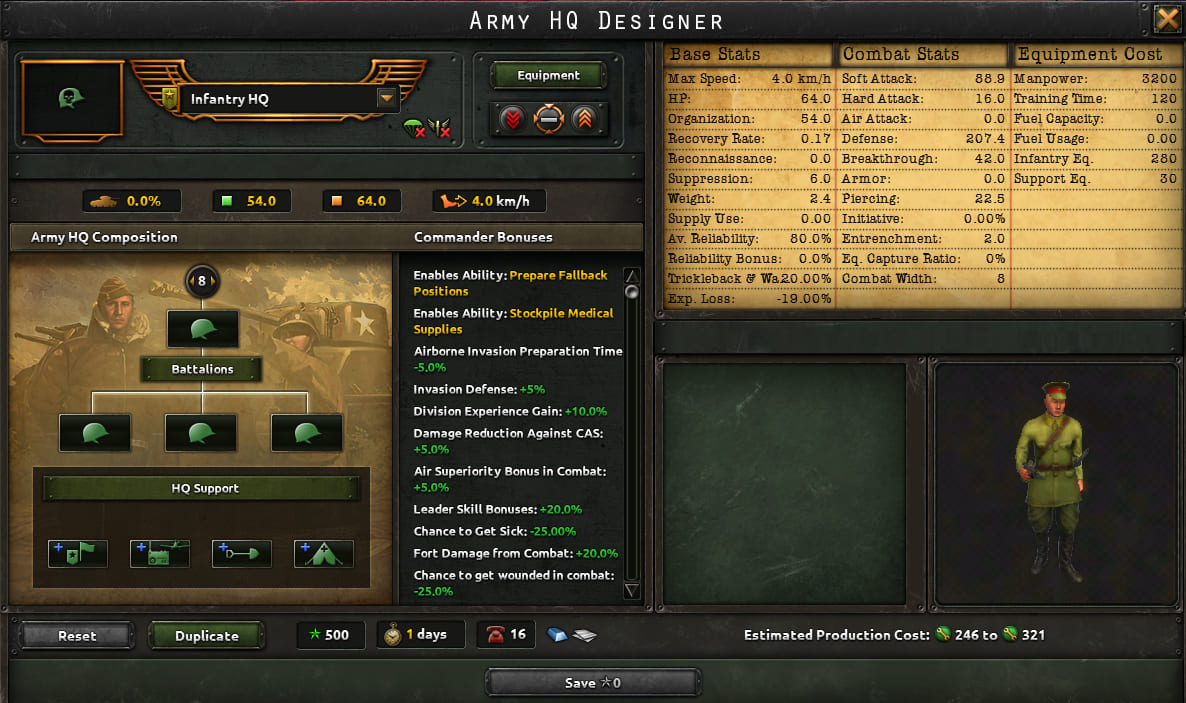
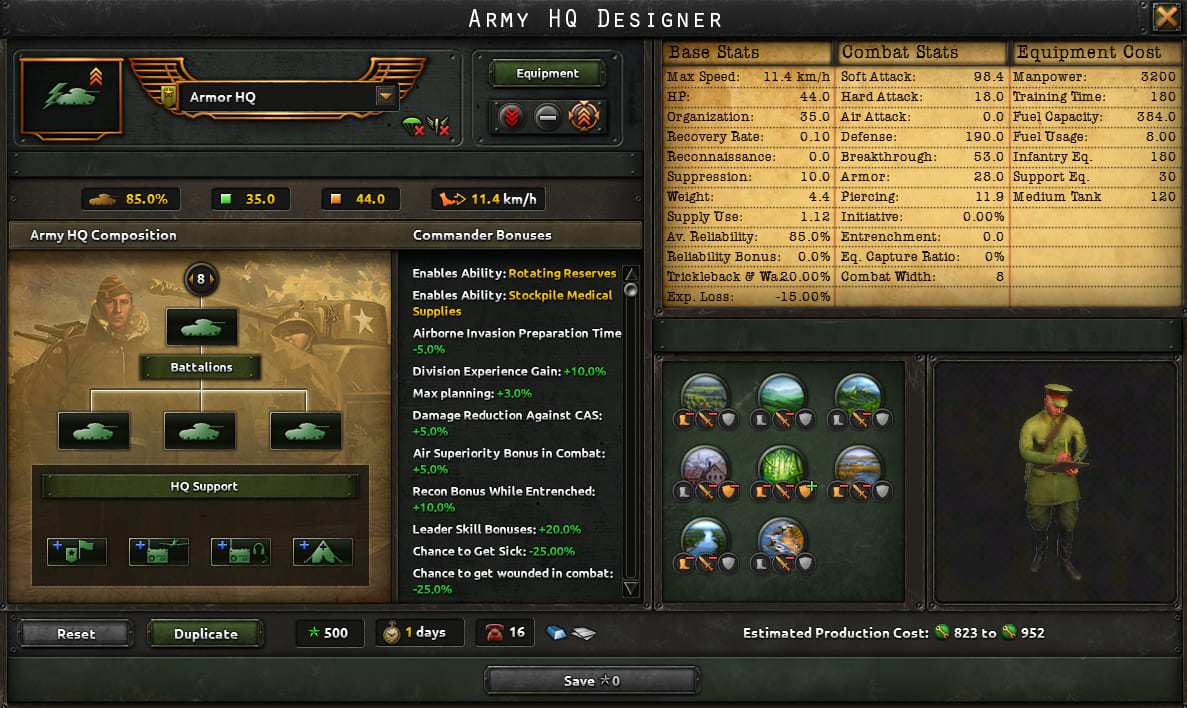
HQ Templates
- Infantry HQ
- 4 infantry battalions
- Staff personnel, forward air controller, engineer personnel, medical personnel
- Tank HQ
- 4 medium tanks
- Staff personnel, forward air controller, signals and reconnaissance personnel, medical personnel
What to Expect from the Enemy
- Rotation and escaping pockets
The enemy will constantly try to pull divisions out of harm's way. Use infantry to pin them in combat. - Counterattacks
Enemy armored divisions may counterattack your breakthrough. Keep reserves to parry. - Don't let the enemy retreat
Every saved enemy division will later face you on another sector.
Overall Strategy
The offensive is built on destroying the enemy army through encirclements (pockets). Don't chase territory — hit vulnerable points, cut supply, capture hubs and airfields. Infantry holds, armor breaks through. Knowing how to defend allows you to hold pockets and protect flanks: defense guide.
Army and Equipment
Use meta templates: medium SPGs with motorized infantry (soft attack is king), infantry divisions with artillery and engineer companies. Always keep organization in the 45–50 range, pick the right support companies, and get the 'Self-Propelled Support' sub-doctrine.
Battlefield Tactics
Assemble armored death stacks of 4–6 divisions at different points. Break through the front, close pockets, and destroy them with infantry. Don't spread out tanks. Keep HQs close to the front (0–1 tiles) for max buffs, infantry covers tanks.
Supply and Air Force
Green skies are the priority. Fighters debuff the enemy, CAS buffs you. Watch supply, capture hubs, improve infrastructure. AA companies won't replace air power. One engine per plane is the golden rule. For large theaters, extra fuel tanks are a must.
10 Common Mistakes
Save for Practice
1. Download the file and place it in Documents/Paradox Interactive/Hearts of Iron IV/save games.
2. Launch the game and load the save "Test_Off_1".
3. You'll find yourself in perfect conditions to practice the offensive: a weak enemy, ready templates, equipment, and air force.
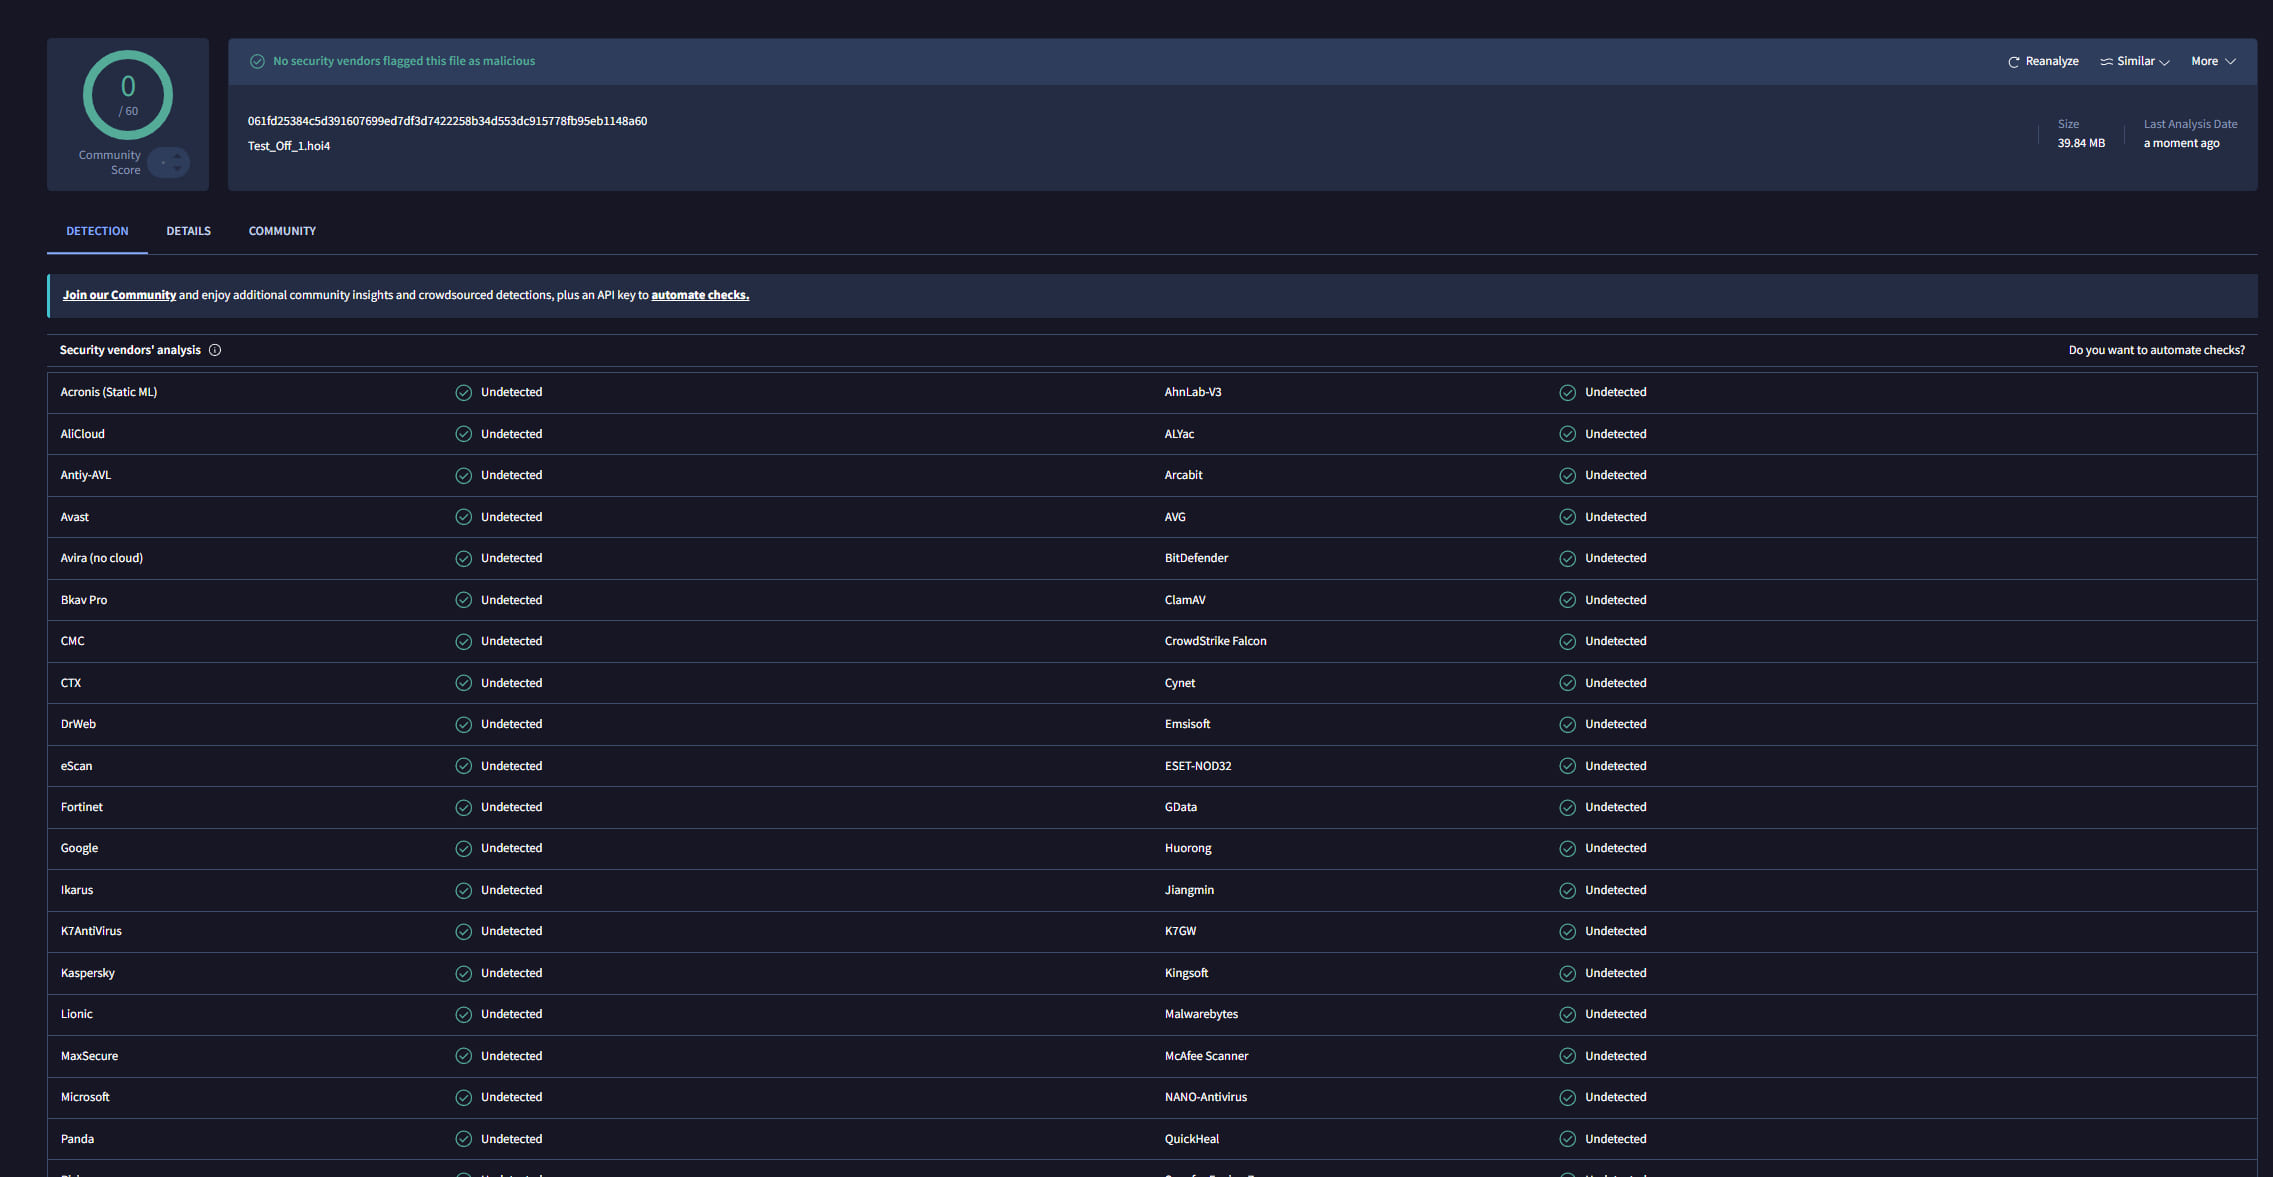
VirusTotal scan