How to win in the air?
How to Win the Air War in Hearts of Iron 4
A step-by-step guide to achieving air supremacy: from fighter design and air base logistics to regional tactics, air doctrines, and capitalizing on dominance with CAS.
Summary
1. Fighters and their quality decide air warfare: 300 top-tier fighters consistently beat 1,000 inferior planes thanks to superior stats.
2. Fighter templates must match the mission: offensive fighters prioritize operational range, while defensive interceptors focus on maximum survivability over friendly territory.
3. Overcrowded air bases crush mission efficiency down to zero, and insufficient range penalizes combat effectiveness directly in proportion to the coverage deficit.
4. Keep your main force on “Air Superiority”, assigning “Interception” selectively to counter enemy bomber and CAS raids.
5. Deploy CAS only after fighters have cleared the skies, turning air dominance into a crushing breakthrough on the ground.
This step-by-step guide walks you through a clear roadmap to air supremacy in Hearts of Iron 4. It covers configuring fighter stats for offensive and defensive operations, basing air wings without penalties, turning the tide against numerically superior foes, and timing CAS deployment.
Detailed coverage formulas, specific designer module setups, and in-depth anti-air calculations are covered in dedicated standalone guides to keep this overview clean and actionable.
Step 1: Designing a High-Performance Fighter
Which Stats Determine Aerial Combat?
Winning the air war starts in the aircraft designer—in HoI4, fighters secure the sky, not any other aircraft type. Aerial combat revolves around 4 core stats: Air Attack, Air Defense, Agility, and Maximum Speed. Air Attack dictates raw damage per engagement tick, while Air Defense reduces the risk of taking unrecoverable losses. Speed and Agility amplify both stats: a faster, more agile fighter gains a decisive positioning edge and evades enemy counterattacks far more effectively.
The stat priority is: Speed -> Air Attack -> Air Defense -> Agility. In dogfights, +10% Speed yields +6.5% Air Attack, whereas +10% Agility grants +4.5% Air Attack.
You also gain a relative combat bonus whenever you outspeed the enemy. The mechanic works roughly as follows: each 1% speed advantage over the opponent grants +0.65% bonus damage to your base attacks. That is why top players prioritize speed and pick aircraft MIOs that maximize speed buffs, such as Avia, MiG, or Supermarine.
Veteran players follow a proven rule: even 300 top-tier fighters will systematically shred 1,000 enemy planes if your key stats and operational conditions (speed, mission efficiency, and air zone coverage) are far superior. Trying to drown the enemy in cheap, obsolete fighters with weak engines always results in catastrophic industrial waste.
Which Fighter Template Should You Build?
There is no single universal fighter template for every scenario in HoI4. Fighter designs split into two primary operational roles: defensive interceptors and offensive escort fighters.
In defensive warfare (such as France or the USSR repelling an invasion), air battles take place directly above friendly soil. Air bases sit right behind the frontline, meaning you can trade operational range for pure survivability: equip Armor Plates and Self-Sealing Fuel Tanks instead of drop tanks.
 and Self-Sealing Fuel
 instead of drop tanks.
When pushing on the offensive (a classic Germany or Italy run), the situation is reversed. You must contest airspace over enemy territory, while your air bases often sit far behind the front. For offensive fighters, operational range is the top priority via Extra Fuel Tanks (drop tanks) ; otherwise, your wings cannot even cover half the air zone. In both setups, balancing weight and engine thrust is crucial to keep speed and attack high.
 ; otherwise, your wings cannot even cover half the air zone. In both setups, balancing weight and engine thrust is crucial to keep speed and attack high.
Yet even the best fighter design is useless if its air wings are crammed onto an overcrowded airfield. Let’s look at proper air base management in the next step.
Step 2: Air Base Management and Air Zone Coverage
How to Avoid Air Base Overcrowding Penalties
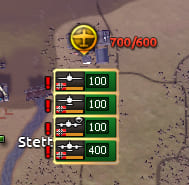
Air base overcrowding is one of the most punishing mistakes in HoI4 air warfare. Every air base on the map has a fixed capacity scaling by 200 planes per level (level 1 = 200 planes, level 2 = 400, etc.).
If you base more aircraft than capacity allows, the game instantly applies a severe mission efficiency penalty to every wing stationed there. For every 1% of capacity exceeded, you suffer a -2% penalty to mission efficiency, capping out at -100%. For example, if an air base supports 1,000 planes and you deploy 1,350, your efficiency drops by -70%, effectively sidelining roughly 900 of those 1,350 aircraft.
Always keep your air wings strictly within capacity limits. If an airfield gets congested, rebase part of your squadrons elsewhere immediately to prevent devastating penalties.
How to Achieve 100% Mission Efficiency
Mission Efficiency dictates what portion of your air wing's theoretical strength actually participates in combat. If your efficiency is only 50%, half of your deployed fighters are effectively sitting idle during dogfights.
 dictates what portion of your air wing's theoretical
The decisive factor in HoI4 is operational range. If a fighter's combat radius covers only 60% of an air zone, your squadrons' combat output drops accordingly. The second vital requirement is uninterrupted fuel supply to your airfields: stranded without fuel, aircraft lose speed and agility, turning into sitting ducks.
In my campaigns, I follow an ironclad rule before any major air clash: air zone coverage must be as close to 100% as possible, or you will suffer unacceptable casualty ratios in trades.
Once your air bases are secured and fighters can reach every corner of the zone, it is time for smart tactical mission management.
Step 3: Tactical Fighter Management in the Air Zone
Which Missions Should You Assign?
Mission orders dictate how your pilots engage targets in the sky. For fighters, two primary orders matter: “Air Superiority” and “Interception” .
 and “Interception”
 .
The “Air Superiority” mission keeps fighters patrolling continuously, putting pressure on enemy wings and locking hostile aircraft in combat. This order fills the green superiority bar and slaps penalties onto enemy ground divisions, but it burns fuel constantly. This is how you fight enemy fighters.
The “Interception” mission is reactive: fighters scramble from runways only when radar or spotters detect incoming enemy bombers or CAS. In this stance, wings conserve airframe wear and fuel while prioritizing bombers over fighter sweeps. This is how you fight bombers and ground attack planes.
The standard setup for most fronts is to keep 60–80% of fighters on Air Superiority, setting the remaining 20–40% to Interception if the enemy operates CAS or tactical bombers in the area.
How to Handle Being Outnumbered
If you face 2,000 enemy fighters while possessing only 500–600 planes, spreading your air wings evenly along the front line ensures swift defeat.
Concentrate all your force: pull every available squadron into the single decisive air zone where key ground battles are taking place. Backed by superior templates and high mission efficiency, you will inflict disproportionate casualties on the enemy. In short: when outnumbered, concentrate your air power rather than scattering it.
This is how skilled players win tough wars: they dismantle the enemy air fleet piecemeal, baiting them over friendly radar coverage with 100% mission efficiency. With top-tier designs, winning the air war is merely a question of time until enemy stockpiles run completely dry.
In my Germany games, this scenario plays out constantly: when World War II kicks off, I commit 80% of my fighters to Poland and leave roughly 20% in the West facing France. While Poland is quickly overrun, those few fighters in the West bleed the French air force dry over German soil. Because of superior design, home radar coverage, and pristine mission efficiency, 200 German fighters wipe out 1,000 French planes thanks to quality and situational advantages.
Locking in aerial supremacy comes down to picking the right air doctrine and unleashing CAS at the right moment.
Step 4: Air Doctrines and Capitalizing on Supremacy
Which Air Doctrine Should You Choose?
Air doctrines provide passive bonuses across key flight metrics. Picking the right sub-branch should depend on whether you are attacking or defending.
For offensive nations, the premier fighter path is “Airspace Dominance” . It grants major buffs to core fighter combat stats and enemy air detection.
 . It grants major buffs to core fighter combat stats and enemy air detection.
For defensive nations, the best choice is “Knights of the Air” . It focuses on pilot veterancy retention, boosting air superiority values and interceptor detection.
 . It focuses on pilot veterancy retention, boosting air superiority values and interceptor detection.
The strategic takeaway is straightforward: pushing into foreign territory — pick “Airspace Dominance”; defending your homeland — pick “Knights of the Air”.
How to Close the Deal with CAS
Air superiority alone does not move the frontline—it merely secures the airspace for Close Air Support (CAS). CAS inflicts massive organization and HP damage on enemy divisions, shredding entrenched defenses and letting your armor and infantry slice through.
The golden rule of combined arms: deploy CAS only when your fighters firmly control the skies. Sending bombers into contested airspace with active enemy interceptors results in heavy aircraft losses and wasted industrial capacity.
In my runs, CAS wings take flight only after air superiority is fully established. In those conditions, they break the combat effectiveness of hostile divisions within days.
To know exactly when the opposing air fleet is broken and superiority is secured, you need to read the combat log metrics.
Key Numbers and Trade Ratio Benchmarks
Which Loss Ratios Signal Victory?
The air combat statistics window is your primary diagnostic tool. Do not focus on raw kill counts—what matters is the trade ratio.
| Loss Ratio “Yours : Enemy” |
Effectiveness Rating | Practical Impact |
|---|---|---|
| 1:0.1 – 1:0.5 | Critical | Severe losses; military factories cannot keep pace with attrition |
| 1:1 – 1:5 | Mediocre | Average performance; not optimal, but maintains a baseline |
| 1:6 – 1:10 | Good | Solid attrition pace; steadily grinding down enemy reserves |
| 1:20+ | Outstanding | Total dominance; the enemy air fleet is obliterated within weeks |
If your trade ratio dips below 1:1, check your air zone coverage and air base capacities immediately—hidden mission efficiency penalties are almost always the culprit.
How Many Planes Do You Need Per Region?
Fighter requirements depend on the theater's geography and the industrial capacity of your opponent.
Across European air zones against standard AI, 500 to 1,000 fighters per region is usually enough to maintain uncontested air superiority.
On wider fronts or against industrialized majors, target 1,000 to 2,000 top-tier aircraft per zone. Stacking more planes in a single region rarely pays off: air bases become congested, and diminishing returns set in.
Using these benchmarks, you can allocate military factories efficiently and win the air war without wasting industrial output.
Beginner FAQ
Stats are the numerical combat and technical attributes of military units in HoI4. For fighters, the essential stats are Air Attack, Air Defense, Speed, Agility, and Range. Having superior stats allows a smaller force of quality fighters to easily dismantle large enemy swarms. You can review all stats in the aircraft designer.
MIOs (Military Industrial Organizations, formerly Design Companies) are national industrial firms assigned in your country overview, such as MiG, Supermarine, or Messerschmitt. Each aircraft designer grants permanent passive bonuses (such as extra speed or agility) to your airframes during research and production.
It is the progress bar in the air zone interface showing the balance of aerial power. A green bar indicates that you hold air superiority. When you control the skies, enemy ground units suffer significant defense and movement speed debuffs, while your CAS can safely pound hostile divisions.
Sub-branches are mutually exclusive paths within the air doctrine tree. They let you specialize your air force for specific operational goals—such as “Airspace Dominance” or “Knights of the Air”. Similar branching options exist for ground support aircraft and land doctrines.
Key Takeaways
Fighters win the skies—not any other aircraft type.
- Quality beats quantity: 300 modern fighters with high attack, defense, and speed will tear through 1,000 outdated enemy planes.
- Specialize for your frontline: Prioritize range for offensive thrusts into enemy territory, and focus on pure survivability when defending your homeland.
- Monitor air base capacity: Overcrowded airfields trigger brutal mission efficiency penalties that can completely paralyze your air wings.
- Concentrate against numbers: When outnumbered, mass your squadrons in a single critical zone to bleed enemy air reserves piecemeal.
- CAS delivers the final blow: Launch close air support only after securing air dominance, translating control of the skies into decisive ground victories.