A step-by-step guide for beginners: from your first template to deployment on the battlefield.
\n \n\n
\n
\n
📋 What You Need to Create a Division
\n
To create and deploy a division, you'll need two things: army experience and equipment in stockpiles. Army experience is spent on creating or modifying a division template. We recommend figuring out how to farm experience beforehand (for example, in the Spanish Civil War). You'll need equipment to hand out to your soldiers during training — without it, the division simply won't deploy.
\n
\n\n
\n
🚶 Step 1: Open the Designer
\n
Click on the "Recruit & Deploy" tab — it looks like a tank with a downward arrow and is located on the left in the top panel (for more on navigation, see the game interface guide).
\n \n
After clicking, you'll see all your ready-made templates. Most often they're not the best, so you should either upgrade your current ones or create a new one. To upgrade, find the template in the right column and click "Edit". You'll enter the division designer, where you can change battalions, support companies, and regimental support.
\n
\n\n
\n
🆕 Step 2: Create a New Template From Scratch
\n \n
If you want to build a division completely on your own, in the same designer click the downward arrow next to the division name and select "Create New".
\n
Now you can pick the right battalions, regimental and support companies, change the division's name and icon, specify exact equipment and vehicle models, and immediately see its stats and combat width.
\n
We strongly recommend checking out the division creation guide — it explains in detail how to use the designer and which templates are considered top-tier + it includes ready-made best division templates.
\n \n
\n\n
\n
📦 Step 3: Deploy the Division
\n
Once the template is ready, go back to the "Recruit & Deploy" tab. Visually find the template you need and click the "Train" button below it. This is how you start creating the division. You can choose a deployment location by clicking "No Location Set" and selecting any tile on your territory.
\n
To deploy multiple divisions at once, click the plus sign to the right of the template name in the deployment card. By default it's set to infinity — divisions will train as long as equipment is available (not recommended, you might lose track of your stockpiles). The "Add To..." button lets you queue up one more division, and Shift + LMB on it adds five at once.
\n
\n\n
\n
⚡ Console Commands for Fast Deployment
\n
If you don't want to wait, open the console with the ~ (tilde) key and type it — training will become instant. Just make sure you have enough equipment in stockpiles. To add 5,000 of everything, use the command ale 5000. After that, pick a tile for your divisions to appear — they'll deploy right away.
\n\n
\n
\n Instant training and deployment of divisions\n
\n it\n \n
\n
\n
\n Add 5,000 of each equipment and vehicle type\n
\n ale 5000\n \n
\n
\n
\n
\n\n
\n
💡 Now you know how to create a division in HoI4. Once you've mastered this, you'll be able to build your own army and start conquering. Good luck!
{"html":[" \n \n How to Create a Division in Hearts of Iron 4 \n A step-by-step guide for beginners: from your first template to deployment on the battlefield. \n \n\n \n \n 📋 What You Need to Create a Division \n To create and deploy a division, you'll need two things: army experience and equipment in stockpiles . Army experience is spent on creating or modifying a division template. We recommend figuring out how to farm experience beforehand (for example, in the Spanish Civil War). You'll need equipment to hand out to your soldiers during training — without it, the division simply won't deploy. \n \n\n \n 🚶 Step 1: Open the Designer \n Click on the "Recruit & Deploy" tab — it looks like a tank with a downward arrow and is located on the left in the top panel (for more on navigation, see the game interface guide ). \n \n After clicking, you'll see all your ready-made templates. Most often they're not the best, so you should either upgrade your current ones or create a new one. To upgrade, find the template in the right column and click "Edit" . You'll enter the division designer, where you can change battalions, support companies, and regimental support. \n \n\n \n 🆕 Step 2: Create a New Template From Scratch \n \n If you want to build a division completely on your own, in the same designer click the downward arrow next to the division name and select "Create New" . \n Now you can pick the right battalions, regimental and support companies, change the division's name and icon, specify exact equipment and vehicle models, and immediately see its stats and combat width. \n We strongly recommend checking out the division creation guide — it explains in detail how to use the designer and which templates are considered top-tier + it includes ready-made best division templates . \n \n \n\n \n 📦 Step 3: Deploy the Division \n Once the template is ready, go back to the "Recruit & Deploy" tab. Visually find the template you need and click the "Train" button below it. This is how you start creating the division. You can choose a deployment location by clicking "No Location Set" and selecting any tile on your territory. \n To deploy multiple divisions at once, click the plus sign to the right of the template name in the deployment card. By default it's set to infinity — divisions will train as long as equipment is available (not recommended, you might lose track of your stockpiles). The "Add To..." button lets you queue up one more division, and Shift + LMB on it adds five at once. \n \n\n \n ⚡ Console Commands for Fast Deployment \n If you don't want to wait, open the console with the ~ (tilde) key and type it — training will become instant. Just make sure you have enough equipment in stockpiles. To add 5,000 of everything, use the command ale 5000 . After that, pick a tile for your divisions to appear — they'll deploy right away. \n\n \n \n Instant training and deployment of divisions \n \n it \n \n \n \n \n \n \n Add 5,000 of each equipment and vehicle type \n \n ale 5000 \n \n \n \n \n \n \n \n\n \n 💡 Now you know how to create a division in HoI4 . Once you've mastered this, you'll be able to build your own army and start conquering. Good luck! \n \n \n "],"css":["* {\n box-sizing: border-box;\n margin: 0;\n padding: 0;\n}\n\nhtml, body {\n width: 100%;\n overflow-x: hidden !important;\n scroll-behavior: smooth;\n}\n\nbody {\n --gold-light: #f5d98b;\n --gold: #e2b660;\n --gold-dim: #b5943e;\n --green: #7aad7e;\n --red: #c56a6a;\n --card-bg: rgba(22, 21, 18, 0.8);\n --card-border: rgba(226, 182, 96, 0.15);\n --text-primary: #f0ead8;\n --text-secondary: #c8c0a8;\n --text-muted: #908870;\n --shadow-card: 0 12px 28px rgba(0,0,0,0.6), 0 0 0 1px rgba(226,182,96,0.08);\n background: radial-gradient(ellipse at 50% 20%, rgba(226, 182, 96, 0.08) 0%, #0a0906 80%);\n background-attachment: fixed;\n color: #f0ead8;\n font-family: 'Segoe UI', 'Inter', system-ui, sans-serif;\n line-height: 1.6;\n -webkit-font-smoothing: antialiased;\n min-height: 100vh;\n}\n\n.how-to-war-article {\n max-width: 1000px;\n margin: 0 auto;\n padding: 40px 20px;\n user-select: text;\n}\n\n.war-hero {\n text-align: center;\n margin-bottom: 40px;\n}\n\n.war-title {\n font-size: 2.6rem;\n font-weight: 800;\n color: #faeec8;\n line-height: 1.2;\n margin-bottom: 15px;\n text-shadow: 0 4px 20px rgba(0,0,0,0.8);\n}\n\n.war-subtitle {\n font-size: 1.15rem;\n color: #c8c0a8;\n font-weight: 400;\n}\n\n.war-content-card {\n background: linear-gradient(160deg, rgba(30, 28, 22, 0.98) 0%, rgba(20, 18, 13, 0.98) 100%);\n border: 1px solid rgba(226, 182, 96, 0.25);\n border-radius: 22px;\n padding: 40px;\n box-shadow: var(--shadow-card);\n backdrop-filter: blur(4px);\n}\n\n.war-section {\n margin-bottom: 35px;\n}\n\n.war-section:last-of-type {\n margin-bottom: 30px;\n}\n\n.war-section-title {\n font-size: 1.6rem;\n font-weight: 700;\n color: #faeec8;\n margin-bottom: 18px;\n padding-bottom: 8px;\n border-bottom: 1px solid rgba(226, 182, 96, 0.2);\n letter-spacing: 0.3px;\n}\n\n.war-section p {\n font-size: 16px;\n color: #c8c0a8;\n line-height: 1.7;\n margin-bottom: 15px;\n}\n\n.war-section p strong {\n color: #f0ead8;\n font-weight: 600;\n}\n\n.key-term {\n border-bottom: 1px solid rgba(240, 234, 216, 0.7);\n}\n\n.war-section a {\n color: #e2b660;\n text-decoration: none;\n font-weight: 600;\n border-bottom: 1px solid rgba(226, 182, 96, 0.4);\n transition: color 0.2s ease, border-color 0.2s ease;\n}\n\n.war-section a:hover {\n color: #f5d98b;\n border-bottom-color: #f5d98b;\n}\n\n.war-highlight {\n color: #f5d78c;\n font-weight: 700;\n text-shadow: 0 0 6px rgba(226,182,96,0.4);\n}\n\n.war-screenshot {\n display: block;\n max-width: 100%;\n margin: 15px 0;\n border-radius: 8px;\n border: 1px solid rgba(226, 182, 96, 0.2);\n}\n\n.war-screenshot-float {\n float: right;\n margin: 0 0 20px 25px;\n width: 60%;\n max-width: 400px;\n border-radius: 8px;\n border: 1px solid rgba(226, 182, 96, 0.2);\n}\n\n.war-note {\n background: rgba(226, 182, 96, 0.06);\n border-left: 4px solid rgba(226, 182, 96, 0.4);\n border-radius: 8px;\n padding: 16px 20px;\n font-size: 15px;\n color: #c8c0a8;\n margin-top: 20px;\n}\n\n.war-note p {\n margin: 0;\n}\n\n.war-note a {\n color: #e2b660;\n text-decoration: none;\n font-weight: 600;\n border-bottom: 1px solid rgba(226, 182, 96, 0.4);\n transition: color 0.2s ease, border-color 0.2s ease;\n}\n\n.war-note a:hover {\n color: #f5d98b;\n border-bottom-color: #f5d98b;\n}\n\n@media (max-width: 600px) {\n .war-title {\n font-size: 2rem;\n }\n .war-content-card {\n padding: 25px 20px;\n }\n .war-section-title {\n font-size: 1.3rem;\n }\n .war-screenshot-float {\n float: none;\n display: block;\n width: 100%;\n max-width: 100%;\n margin: 15px 0;\n }\n}\n\n.cheats-scroll {\n max-height: 380px;\n overflow-y: auto;\n padding-right: 6px;\n scrollbar-width: thin;\n scrollbar-color: #4a4a3a #0d0c09;\n margin-top: 15px;\n}\n\n.cheats-scroll::-webkit-scrollbar { width: 6px; }\n.cheats-scroll::-webkit-scrollbar-track { background: #0d0c09; border-radius: 4px; }\n.cheats-scroll::-webkit-scrollbar-thumb { background: #4a4a3a; border-radius: 4px; }\n.cheats-scroll::-webkit-scrollbar-thumb:hover { background: #6b6b55; }\n\n.cheat-item {\n background: rgba(15, 14, 10, 0.9);\n border: 1px solid rgba(226,182,96,0.2);\n border-radius: 10px;\n padding: 10px 12px;\n margin-bottom: 8px;\n font-family: 'Cascadia Code', 'Fira Code', 'Consolas', monospace;\n font-size: 14.4px;\n color: #c9d1d9;\n transition: all 0.25s ease;\n backdrop-filter: blur(6px);\n}\n\n.cheat-item:hover {\n border-color: #e2b660;\n box-shadow: 0 0 18px rgba(226,182,96,0.2);\n}\n\n.cheat-desc {\n font-size: 13.2px;\n color: #8b949e;\n margin-bottom: 6px;\n display: block;\n}\n\n.cheat-row {\n display: flex;\n align-items: center;\n justify-content: space-between;\n}\n\n.cheat-command {\n flex: 1;\n word-break: break-all;\n}\n\n.copy-btn {\n background: none;\n border: 1px solid #4a4a3a;\n border-radius: 6px;\n color: #9e9e8e;\n cursor: pointer;\n padding: 4px 10px;\n margin-left: 10px;\n display: flex;\n align-items: center;\n justify-content: center;\n transition: all 0.25s ease;\n font-size: 14.4px;\n font-weight: 600;\n}\n\n.copy-btn:hover {\n background: #3d3d30;\n color: #f0ead8;\n border-color: #e2b660;\n box-shadow: 0 0 14px rgba(226,182,96,0.3);\n}\n\n.copy-btn.copied {\n color: #7aad7e;\n border-color: #7aad7e;\n background: rgba(122, 173, 126, 0.25);\n}"],"js":["document.addEventListener('click', function (e) {\n const copyBtn = e.target.closest('.copy-btn');\n if (copyBtn) {\n const command = copyBtn.getAttribute('data-command');\n navigator.clipboard.writeText(command).then(() => {\n copyBtn.classList.add('copied');\n const originalHTML = copyBtn.innerHTML;\n copyBtn.innerHTML = ` `;\n setTimeout(() => {\n copyBtn.classList.remove('copied');\n copyBtn.innerHTML = originalHTML;\n }, 1500);\n });\n }\n});"]}
 \n
\n 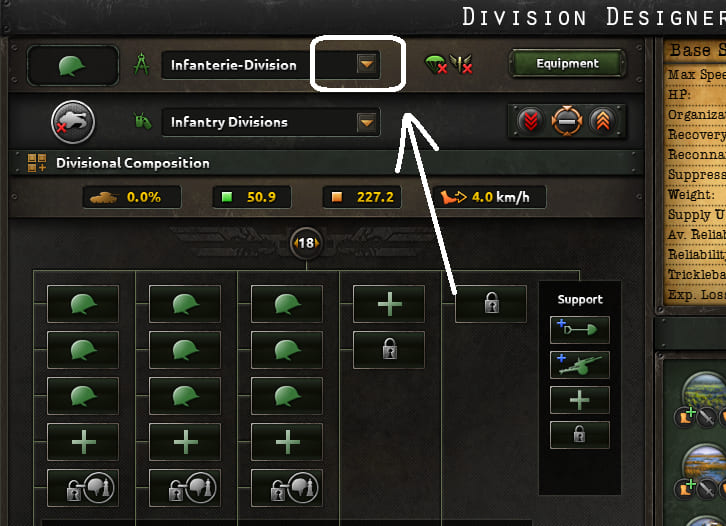 \n
\n